background image

5.


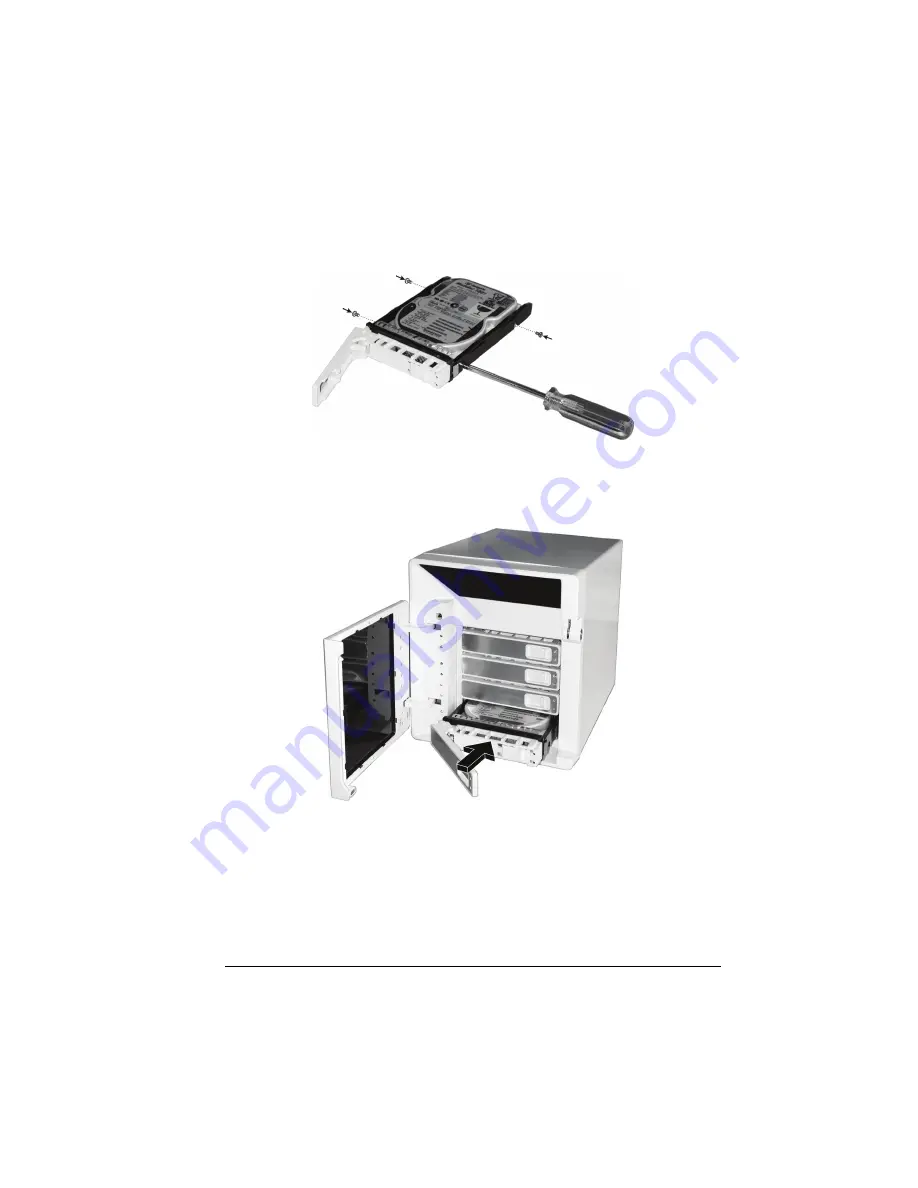
Fit the hard disk into the tray with the connectors pointing toward the rear. 
Then align and fasten four screws to secure the hard disk in place. 


6.


Keeping the handle in its full-open state, slide the hard disk tray all the way 
into the device until the hinge of the handle is inside the device. Then, close 
the handle. The latch should click into place. 


7.


Follow the same procedure for installing other hard disk(s) in the other 
compartment(s). 


 11 

Summary of Contents for Muse NAS-RAID N0001LN

Page 1: ...User Manual ...

Page 2: ...TRADEMARKS All brand and product names are trademarks or registered trademarks of their respective companies NOTE The information in this manual is subject to change without notice ...

Page 3: ...0 240 Vac z Maximum operating ambient temperature 40 o C degree z CAUTION Turn off the system before removing the cabinet cover z CAUTION on using the RTC battery Danger of explosion if battery is incorrectly placed Replace only with the same or equivalent type recommended by the manufacturer Dispose of used batteries according to the manufacturer s instructions i ...

Page 4: ...tem 13 3 Configuring Your Storage System 15 3 1 Installing the Storage System Console 16 3 2 Initializing the Hard Disk s 20 3 3 Starting Web Management 34 3 4 System Management 36 Users Page 36 Shared Folders Page 42 Backups Page Optional 45 Advanced Page 47 3 5 Logging Out of Web Management 62 4 Disk Configurations 65 4 1 Adding hard disks 68 Adding Hard Disks to a Linear or Normal RAID Configur...

Page 5: ...Swapping Hard Disks 76 Transferring Hard Disks to a New Storage System 76 iv ...

Page 6: ...plified through the Web based User Interface UI Additional features include z A single administrative account z Support for dynamically increasing logical drive size For example if two hard disks are in use as a logical drive a third hard disk can be added and you can increase the size of the logical drive configuration to include the third drive without destroying any existing data z User defined...

Page 7: ... Form Factor Small Tower Processor Intel IOP 80219 400 MHz System Memory 256 MB of DDR SDRAM up to 512 MB Flash Memory 8 MB Hard Disk Drive Bay Type Up to four 3 5 inch SATA Serial ATA Storage Capacity Using 500 GB drives provides up to 2 TB Network Intel 10 100 1000 Mbps Fast Ethernet RJ 45 GbE connector Power Supply 100 120 200 240 Vac 50 60 Hz 128 W Environment Operating temperature 0 0 C 32 0 ...

Page 8: ...ation Linear RAID 0 1 5 5 spare 10 Application for NAS Management Data Sharing Protection System OS and Data Backup optional Web User Interface Others English Simplified Chinese multiple language option support Real Time Clock RTC Programmable System Clock Hardware Software Power Off Reset Button to return to factory default setting Firmware upgradeable Event Logs and Email Alerts 3 ...

Page 9: ...onents Ref Component Description n Power Button Turns the power on and off soft off Power Indicator Shows the current power status Power On Glows blue when the power is on o Standby Glows red when the system is in Standby mode 4 ...

Page 10: ...blue to indicate a network connection speed at 1000 Mbps Giga LAN RAID Indicator Shows the current RAID status RAID On Glows blue to indicate RAID function is implemented q RAID Fail Glows red to indicate RAID function is inactive or malfunctioning r Hard Disk Drive Compartment Inside are four hard disk trays Disk Information Indicator Shows the current hard disk drive status Access Blinks green t...

Page 11: ...Front Components Compartment Door Open Ref Component Description n Hard Disk Tray Door Handle Opens the hard disk tray 6 ...

Page 12: ...Right Side Components Ref Component Description n Door Lock Locks the hard disk drive compartment door for security 7 ...

Page 13: ...ect the voltage matching your area p Ventilation Opening Maintain proper operating temperature Do not cover or block the openings q Reset Button Allows you to reset the system to the factory default username password and IP r RS 232 Port For manufacturer use only s RJ 45 Connector Connects the LAN cable 8 ...

Page 14: ...Chapter 2 Setting Up Step 1 Install the Hard Disks 1 Insert the key and turn clockwise to unlock and open the door 2 Slide the latch toward the right to release the handle 9 ...

Page 15: ... the second hard disk on the second lowest level tray and so forth 3 Pull the handle to slide the hard disk tray forward Then pull the hard disk tray out of the device 4 Unfasten two screws from each side of the hard disk tray and remove the metal bracket 10 ...

Page 16: ...ure the hard disk in place 6 Keeping the handle in its full open state slide the hard disk tray all the way into the device until the hinge of the handle is inside the device Then close the handle The latch should click into place 7 Follow the same procedure for installing other hard disk s in the other compartment s 11 ...

Page 17: ...ne end of the Ethernet cable to the network connector on the back of your storage system and the other end to a switch or router Step 3 Connect to Power 1 Before connecting to power set the Voltage Switch to the voltage matching your area 12 ...

Page 18: ...2 Connect one end of the power cord to your storage system and the other end to a standard electrical outlet 3 To turn on your storage system press the Power button 13 ...

Page 19: ...Step 4 Configure Your Storage System See the next chapter for the software configuration instructions 14 ...

Page 20: ... are three main folders namely z StorageSystemConsole z FW_Upgrade z UserManual You must install at least one hard disk lowest level tray before your storage system can provide services MNAS A MNAS network consists of a MNAS server and several clients connected via network links 15 ...

Page 21: ...rage System Console before you can perform any system configurations 1 Install the Storage System Console on your computer by double clicking on Setup exe under the StorageSystemConsole folder of your included CD The following screen appears Click on Next to continue 16 ...

Page 22: ...2 The following screen appears Enter the pertinent information then click on Next to continue 17 ...

Page 23: ...e following screen appears Select the default destination folder or change it by clicking on Browse Then click on Next to continue 4 The following screen appears Click on Next to start copying the files 18 ...

Page 24: ...5 The following screen appears To start the Storage System Console click on the radio button besides Launch Storage System Console Then click on Finish to exit the installation 19 ...

Page 25: ... appears As soon as you start the Console it automatically scans the network for storage systems This might take a few minutes As soon as the scan is complete the left pane displays a tree view of all the storage systems it found Select the storage system that you want to manage for example MNAS4100 NOTE The next time you want to start the Storage System Console click on Start then Programs then S...

Page 26: ...3 The following screen appears Enter the default user name admin and default password storage 4 Click on Log In 21 ...

Page 27: ...5 The following screen appears Click on Scan 22 ...

Page 28: ...6 The following screen appears Click on Browse to select the firmware file under the FW_Upgrade folder of your included CD 23 ...

Page 29: ...7 Click on Upload and the following screens would appear in sequence 24 ...

Page 30: ...8 The system will reboot 25 ...

Page 31: ...ole by clicking on Start then Programs then Storage System Console Wait awhile as it scans the network for storage systems The following screen appears Click on Discover Storage Systems 10 The following screen appears Click on Next to continue 26 ...

Page 32: ...11 The following screen appears Enter the Storage system name then click on Next 12 The following screen appears Set the Date Time and Time zone then click on Next 27 ...

Page 33: ...13 The following screen appears Set the network settings then click on Next 28 ...

Page 34: ...de then click on Next NOTE Your MNAS uses RAID Redundant Array of Independent Disks technology to manage up to four hard disks Refer to the later section Disk Configurations see page 65 to learn more about choosing the type of RAID for your system 29 ...

Page 35: ... Select the Number of disks to back up then click on Next NOTE The backup software is optional if the storage system does not contain the backup software and you do not plan to use the backup feature in the future please select 0 30 ...

Page 36: ...16 The following screen appears Enter the capacity of the disks to back up then click on Next 31 ...

Page 37: ...the amount percentage of disk space to be allocated for shared folders and backups then click on Finish 18 On the next dialog box click on OK to confirm setup information will be written to the system The following screen would appear 32 ...

Page 38: ...19 The system will reboot 33 ...

Page 39: ...n is complete the left pane displays a tree view of all the storage systems it found The following screen appears 2 In the left pane select the name of the storage system that you want to manage for example MNAS4100 then click on Log On Storage System Manager NOTE If you connect a storage system to the network after the Console has already scanned it or if you change the IP address of the storage ...

Page 40: ...3 The following screen appears Input the default user name admin and the default password storage 4 Then click on Log In Refer to the next section on performing various system management tasks 35 ...

Page 41: ...us section on accessing Web Management Users Page Displays a list of all currently configured users and lets you add modify and remove users This area also lets you add modify and remove groups Users Computers 1 To get started click the Users button on your homepage The following screen appears 36 ...

Page 42: ...2 Click on Add and the following screen appears allowing you to specify the type of user Windows Mac OS X or Linux Other Mac you want to add 37 ...

Page 43: ...3 Click on Next and the following screen appears You must provide the requested user information For Windows Mac OS X user CIFS 38 ...

Page 44: ... Linux other Mac user NFS 4 Click on Done and the new user would be added Repeat the above steps until you have added all the users that you want to add at this time you can always add more users later 39 ...

Page 45: ...Groups Placing users into groups makes it easier to give several users access to the same shared folder at once 1 Click on Groups on the Users page The following screen appears 40 ...

Page 46: ...2 Click on Add and the following screen appears Enter a group name and add all or selected users to this group You can also remove all or selected users from a group 41 ...

Page 47: ...nfigured and shared folders and lets you add shared folders change which users can access them and remove them 1 Click the Shared Folders button on your homepage The following screen appears 2 Select the shared folder whose user access you want to change 42 ...

Page 48: ...3 Click on Assign Access and the following screen appears For Windows Mac OS X user CIFS 43 ...

Page 49: ...For Linux other Mac user NFS 4 You can Add specify as Read Only or Read Write users groups to as well as Remove existing users groups from Shared Folders 5 Click on OK 44 ...

Page 50: ... backup software skip this section and proceed to the next section Advanced Page The Backups page displays a list of all computer disk backups that currently exist and lets you change the recovery disc password or delete the backups for a particular computer hard disk 45 ...

Page 51: ...nge Password Deleting a Backup 1 Select the radio button next to the disk whose backups you want to delete in the second Select column 2 Click on Delete Backup 3 When prompted to confirm the deletion click on Yes Deleting a Client 1 Select the radio button to the left of the computer whose backups and computer name you want to delete from the storage system in the first Select column 2 Click on De...

Page 52: ...you to set up the storage system to notify up to three people via email if a problem occurs for example if one of the disks fails or if insufficient space is available for creating new files or performing a backup To take advantage of this feature you must have access to an SMTP email server either within your own network or through an Internet service provider NOTE In order to be able to send out...

Page 53: ...ick the Advanced button on your homepage The following screen appears 2 Enter the information about your email server and up to three email addresses that should receive the notification 3 Click on Apply 48 ...

Page 54: ...s installed on your storage system It also allows you to upgrade it if a newer firmware become available 1 Click on Firmware and the following screen appears For additional security you must enter your administration password in order to upgrade the firmware 49 ...

Page 55: ...kage such as D fs20060921 pkg or click Browse and select the file from the displayed list 3 In the Administrator password text box enter the password that you use for logging in to the Storage System Console 4 Click on Upgrade 5 When the confirmation message appears click on OK 50 ...

Page 56: ...date and time You can also change the administrator name and password to use for logging in to the Storage System Manager 1 Click on System and the following screen appears NOTE Changing the Storage system name might affect access to shared folders or backups depending on how your network is configured and how users access the storage system 51 ...

Page 57: ...ress Enter the name or IP address of the Network Time Protocol server from which the storage system should adjust its time You can use a NTP server name only if it is resolvable Administrator name Password Confirm password In the Administrator name field enter the user name for logging in to the Storage System Manager In the Password and Confirm password fields enter the password for logging in to...

Page 58: ...that were set when you initially configured the storage system only the first Ethernet port was configured during setup the second uses its default settings unless you change them here 1 Click on Network and the following screen appears 53 ...

Page 59: ...e system 1 Click on Disks and the following screen appears NOTE The color indicated on the Hotplug Indicator column is as follows z RED cannot hotswap hard drive data will be loss z GREEN can hotswap hard drive z YELLOW can hotswap hard drive but it will be downgraded 2 In the Administrator password text box enter your password for logging in to the Storage System Console 54 ...

Page 60: ...n message appears click on OK The Disk Configuration page appears the options that appear on this page vary depending on the number of hard disks that are currently installed in the system If you have four disks installed the following screen appears 55 ...

Page 61: ...ction If you are adding disks wait until the disk LED is green before you click on Scan To accept the default disk configuration which will provide the best level of data protection available for the number of hard disks currently installed click on Next If you want to change the disk configuration select the desired RAID level and then click on Next 56 ...

Page 62: ...ct the total number of disks that you plan to back up to this storage system If some computers have multiple disks be sure to select the total number of disks that you plan to back up For example if your network has five computers and each computer has two hard disks you would select 10 57 ...

Page 63: ... of drives group box IMPORTANT If your storage system does not contain the backup software and you do not plan to add it in the future select 0 click on Next and go directly to step 10 7 In each text box enter the size of each disk that you plan to back up in gigabytes The Disk Space Distribution page appears on screen 58 ...

Page 64: ...When the confirmation message appears click on OK The following screen appears showing the progress of the process When this process is complete the storage system restarts 10 Close the Storage System Console After the system has restarted when the system status LED is once again green you can access the Storage System Console and re create your users and shared folders see previous sections 59 ...

Page 65: ...roblems that you might encounter 1 Click on System Log and the following screen appears The date and time of the event the type of event I for informational E for error W for warning and C for critical and a brief description of the event are displayed 2 If an event occurs while you are viewing this list click on Refresh to update it 60 ...

Page 66: ...ment 1 Click on Shutdown and the following screen appears allowing you to shutdown the storage system CAUTION Make sure no one is backing up a disk or using a shared folder before you shut down the storage system 2 To ensure that you do not shut down the system accidentally enter the Administrator password 3 Click on Shut Down A message appears indicating that the system is shutting down Once the ...

Page 67: ...ystem in accordance with the instructions above An improper shutdown may affect the functionality of storage system in the next startup 3 5 Logging Out of Web Management 1 To log out of the Web Management system click on the Logout button on your homepage 2 When the confirmation message appears click on OK and the following screen appears 62 ...

Page 68: ...To use the Web Management later click on Log In 63 ...

Page 69: ...age system has only one disk you must use a linear configuration However you can use a linear configuration for two three or four disks as well z RAID 0 Instead of writing all the data to one disk in a linear fashion some bytes are written to one disk and other bytes are written to another Performance is faster because reading and writing activities can occur on multiple disks simultaneously All t...

Page 70: ... disks is used for data and the larger of the two disks is used as the mirror If one disk fails the other disk continues to make its data available z RAID 10 RAID 10 is similar to RAID 1 but rather than having one disk mirror to one other disk two disks mirror to the two other disks You can use RAID 10 only if your storage system has four disks The disks in the first two slots constitute the first...

Page 71: ...ains the parity information needed to reconstruct either of the other two In this way if any of the three disks fails it can be reconstructed when a new disk is installed in the storage system If your storage system has four disks of equal size three fourths of each disk are used for data and the remaining fourth contains the parity information needed to reconstruct either of the other three If an...

Page 72: ... 5 4 1 Adding hard disks The effect of adding hard disks to your storage system varies depending on the disk configuration you chose when you configured the system and the current state of the existing disks For example in a linear configuration you can add a new disk at any time and data can be written to that disk as soon as it is added Whether you previously removed a disk or one of the other d...

Page 73: ...ng all your existing data In a degraded state you can add a disk to a RAID at any time and the new disk will be rebuilt to replace the disk that was removed or failed CAUTION If the RAID has failed that is if so many disks have failed or been removed that the RAID can no longer function you must either re install the disks or reconfigure the entire storage system deleting all the data on your syst...

Page 74: ...k to the storage system click on Add New Disk If the information on this page is not correct click on Scan to scan the storage system again and update the page You can also click on Shut Down to shut down the storage system but you will be presented with this page again the next time you access the Storage System Console 70 ...

Page 75: ...state of the disk configuration To add the disk to the storage system but not add it to the RAID at this time click on Ignore The Disks page lists the disk that is part of the storage system but its status is New indicating that it is not being used If you subsequently reconfigure the disks you will be able to use this new disk To return to the previous page for example to re scan the storage syst...

Page 76: ...le or refresh the browser window The Disk Change Notification page appears 3 Click on Add New Disk to add the disk to the storage system The Disks page shows the progress of the rebuilding progress Alternatively if the information on this page is not correct click on Scan to scan the storage system again and update the page You can also click on Shut Down to shut down the storage system When you r...

Page 77: ...uration all the disks are YELLOW Removing any one of them will cause the RAID to be degraded but all the data will still be available However after you remove one disk all the other disks become RED since removing any one of them at this point will cause the entire RAID to fail NOTE In a linear configuration the Hotplug Indicator is RED for all the disks because removing any one of them will remov...

Page 78: ...tegrity of the data cannot be guaranteed However if you replace the removed disks with new disks you must reconfigure your disks CAUTION Reconfiguring your disks will delete all the data on your storage system Responding to RAID Degradation When disk removal failure causes RAID degradation the Disk Change Notification page appears when you access the Storage System Console or refresh the browser w...

Page 79: ...he opposite order that you removed them To return to the Storage System Console and continue to operate in a degraded mode click on Continue Responding to RAID Failure When disk removal failure causes the entire RAID to fail the Disk Change Notification page appears when you access the Storage System Console or refresh the browser window To scan the storage system again and update the information ...

Page 80: ...r disks and the system will function as it previously did when you restart it NOTE For RAID 5 spare if you swap the disks when the storage system is running one of the swapped disks must be the spare For RAID 10 the swapped disks must be in different pairs For example you can swap disks 1 and 3 or disks 2 and 4 but not disks 1 and 2 as those are members of the same pair If the storage system is ru...

Page 81: ...stall the Console on a computer in the same subnet as the storage system and use the Console to access it 5 If the firmware in the flash memory of the new unit differs from the firmware on the hard disks a message appears prompting you to update the flash memory on the storage system with the firmware from the hard disks Click on Update to proceed If you do not want to upgrade the firmware at this...

Reviews: