background image

13

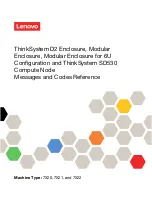
EasySwap HDD Installation

14

Ελληνικ

ά /

1. Στρ

έψτε την κλειδαριά του εμπρόσθιου πίνακα στη 

θέση OPEN (ΑΝΟΙΧΤΟ) χρησιμοποιώντας το κλειδί.

2. Σπρώξτε και κρατήστε το κουμπί απασφάλισης στον 

εμπρόσθιο πίνακα.

3. Τραβήξτε το δίσκο έξω HDD.
4. Τοποθετήστε το 2,5 "ή 3,5" σκληρό δίσκο στο δίσκο 

και στερεώστε το με τις βίδες.

5. Σύρετε το HDD δίσκο πίσω στο κλουβί HDD

繁體中文 /

1.

用鑰匙將面板鎖孔轉至

OPEN

位置。

2.

按壓面板前方釋放鈕。

3. 將硬碟托盤取出
4. 將2.5”或3.5”硬碟放置在硬碟托盤上,用螺絲固定硬碟
5. 將硬碟托盤放回硬碟磁架中

简体中文 /

1. 用

钥匙将面板锁孔转至

OPEN

位置。

2. 按压面板前方释放钮。

3. 将硬盘托盘取出
4. 将2.5”或3.5”硬盘放置在硬盘托盘上,用螺丝固定硬盘
5. 将硬盘托盘放回硬盘磁架中

日本語 /
1. 

かぎを使用し、前面パネルのかぎ穴を回して

OPEN

(開く)位置にします。

2. 前面パネルの解除ボタンを押したままにします。

3.

HDD

トレイを引き出して外します。

4.2.5インチ

HDD

SSD 

もしくは 3.5インチ

HDD

ドラ

イブをトレイにネジで固定します。

5. 

HDD

トレイを

HDD

ケージに戻します。

Русский /

1. 

С помощью ключа поверните отверстие под ключ н
а передней панели в положение 

OPEN (

ОТКРЫТО).

2. Нажмите и удерживайте кнопку освобождения 

на передней панели.

3. Вытяните лоток для жестких дисков.
4. Установите 2,5- или 3,5-дюймовый жесткий диск 

в лоток и закрепите его винтами.

5. Установите лоток для жестких дисков обратно в 
     каркас.

Türkçe /

1. Ö

n panelin anahtar deli

ğ

ini, anahtar

ı 

kullanarak AÇIK 

konumuna getirin.

2. Ön paneldeki serbest b

ı

rakma dü

ğ

mesini bas

ı

l

ı 

tutun.

3. HDD tepsisini d

ı

şarı çekin.

4. 2,5” veya 3,5” sabit disk sürücüsünü tepsinin 

üzerine yerleştirin ve vidalarla sabitleyin.

5. HDD tepsisini HDD kafesine geri yerleştirin.

ภาษาไทย /

1. 

ใช้ลูกกุญแจไขรูกุญแจของแผงด้านหน้าไปที่ตำแหน่ง 
OPEN (เปิด)

2. กดปุ่มปลดล็อคบนแผงด้านหน้าค้างไว้

3. ดึงถาด HDD ออกมา
4. วางฮาร์ดไดร์ฟขนาด 2.5” หรือ 3.5” 

ลงบนถาดแล้วขันสกรูยึดให้แน่น

5. เลื่อนถาด HDD กลับเข้าในโครง HDD

English /

The Easy Swap slot is embedded to enable ultra fast 
transfer (up to 3.0Gbps) of large data to a SATA hard disk 
without having to use an external storage enclosure. To 
ensure proper operation, please make sure the following 
settings are correct:

1. Ensure all required drivers are installed for your 
motherboard or SATA controller card.
2. Squeeze to pull the HDD tray out. 
3. Mount the 3.5” HDD into the tray with screws provided.
4. Slide the HDD tray back to the HDD cage.
5. Connect the SATA cable to an available SATA 
connector on the motherboard or SATA controller card.
6. Connect the power cable to power supply.
7. Ensure AHCI (Advanced Host Controller Interface) is 
enabled on your motherboard or SATA controller card. The 
AHCI enables for “hotswap” capability of the SATA hard 
drives without having to turn off the computer prior to 
connecting or disconnecting of the hard drive. Please 
follow instruction provided by your motherboard or SATA 
controller card to enable the AHCI function.
If you are using a brand new hard drive, the hard drive will 
need to be initialized (formatted) before it is accessible. 
For more information on how to initialize (format) a new 
hard drive, please refer to the hard drive user manual or 
visit 
System running on Windows 7: 
http://www.thermaltakeusa.com/Faq.aspx?ID=1143
System running on Windows Vista: 
http://www.thermaltakeusa.com/Faq.aspx?ID=1079
System running on Windows XP: 
http://www.thermaltakeusa.com/Faq.aspx?ID=1073

Deutsch /

Der Easy Swap-Einführungsschlitz st eingelassen, um einen 
ultraschnellen Transfer (bis zu 3,0 GB/s) von umfangreichen 
Daten zur SATA-Festplatte zu ermöglichen, ohne dafür ein 
externes Gehäuse verwenden zu müssen. Um einen 
ordnungsgemäßen Betrieb zu gewährleisten, stellen Sie bitte 
sicher, dass die folgenden Einstellungen richtig sind:

1. Stellen Sie sicher, dass alle erforderlichen Treiber für Ihr 
Mainboard oder SATA Controller-Karte installiert sind. 
2. Drücken, um das HDD-Fach herauszuziehen.  
3. Montieren Sie die 3,5" HDD mit den mitgelieferten 
Schrauben in das Fach. 
4. Schieben Sie den HDD-Schacht zurück in den HDD-Käfig.
5. Verbinden Sie das SATA-Kabel mit einen freien SATA-
Anschluss auf dem Mainboard oder der SATA Controller-
Karte. 
6. Verbinden Sie das Stromkabel mit dem Netzteil.
7. Stellen Sie sicher, dass AHCI (Advanced Host Controller 
Interface) auf dem Motherboard oder der SATA-Controller-
Karte aktiviert ist.   AHCI ermöglicht die "HotSwap"-Funktion 
der SATA-Festplatten, ohne dass Sie den Computer 
ausschalten müssen, bevor Sie die Festplatte anschließen 
oder entfernen.   Bitte folgen Sie den Anweisungen Ihres 
Motherboards oder der SATA-Controller-Karte, um die AHCI-
Funktion zu aktivieren. 
Wenn Sie eine neue Festplatte benutzen, muss die Festplatte 
initialisiert werden (formatiert), bevor sie nutzbar ist. Weitere 
Informationen darüber, wie man eine neue Festplatte 
formatiert, entnehmen Sie bitte dem Benutzerhandbuch zur 
Festplatte oder besuchen Sie 
System läuft unter Windows 7: 
http://www.thermaltakeusa.com/Faq.aspx?ID=1143

System läuft unter Windows 
Vista:http://www.thermaltakeusa.com/Faq.aspx?ID=1079
System läuft unter Windows XP: 
http://www.thermaltakeusa.com/Faq.aspx?ID=1073

藍色線條為尺寸標示,請勿印刷上去!

產 品料 號

VN1

00

0

1

W

2

N

Level 10 GT

說明 書

11/0 3/17

A

產品 名 稱

印刷 項目

子 件料號

發 稿 日期

版 本

騎馬釘

32

80

4

雙銅

157G

P

X

書寫紙

單色

其他特殊處理效果

表面處理

2

厚度

(g/m )

裝訂方式

材質

頁數

印刷色彩

規格樣式

整本

MARKETING

CHECK

DESIGN

PRODUCT GM

其他特殊處理效果

表面處理

2

厚度

(g/m )

材質

印刷色彩

封面樣式

(當封面與內頁樣式不同時尚須填寫

)

Peipei

刀模線

125

 mm

176

 mm

Summary of Contents for Level 10 GT

Page 1: ...Manual Benutzerhandbuch Mode d emploi Manual del usuario Manuale dell utente Manual do Utilizador Εγχειρίδιο Χρήσης 安裝說明書 用戶手冊 ユーザーズマニュアル Руководство пользователя kullanıcı elkitabı EEE Yönetmeliğine Uygundur คู มือการใช Tested To Comply With FCC Standards FOR HOME OR OFFICE USE VN10001W2N Imagination Imagination without boundaries without boundaries Internal ...

Page 2: ...CS Upgradable Front intake 200 x 200 x 20 mm Colorshift fan x 1 600 800rpm 13 15dBA Rear exhaust 140 x 140 x 25 mm Turbo fan 1000rpm 16dBA Top exhaust 200 x 200 x 30 mm Colorshift fan 600 800rpm 13 15dBA Side intake Plug Play 200 x 200 x 30 mm Colorshift fan 600 800rpm 13 15dBA Bottom Intake 120 x 120 x 25 mm optional USB 3 0 x 2 USB 2 0 x 4 eSATA x 1 HD Audio x 1 Supports 1 2 3 8 1 4 water tube 4...

Page 3: ... schede grafiche Il limite di lunghezza per la VGA scheda grafica è 360 mm 14 2 Atenção Limite de altura para o dissipador do CPU O limite de altura para o dissipador do CPU é 190 mm 7 5 polegadas Limite de comprimento para VGA placa gráfica O limite de comprimento para VGA placa gráfica é 360 mm 14 2 polegadas Προειδοποίηση Όριο ύψους για τον αποδέκτη θερμότητας της CPU Το όριο ύψους για τον αποδ...

Page 4: ...ello laterale destro Rimuovere le viti sulla parte posteriore dello chassis e aprire il pannello laterale Português Painel lado esquerdo 1 Rode o orifício do painel lateral para a posição OPEN aberto com a chave 2 Mantenha premido o botão para abrir na parte inferior da caixa 3 Rode o painel lateral afastando da caixa e levante para remover o painel Painel lado direito Remova os parafusos na parte...

Page 5: ...chassis 2 Install the motherboard in proper location and secure it with screws Deutsch 1 Legen Sie das Gehäuse auf die Seite 2 Installieren Sie die Hauptplatine in ihrer vorgesehenen Position und sichern Sie sie mit Schrauben Français 1 Posez à plat le châssis 2 Installez la carte mère dans l endroit approprié et sécurisez la avec des vis Español 1 Tumbe el chasis 2 Instale la placa madre en la ub...

Page 6: ...linei come nello schema 4 Spingere il laccio in avanti fino a bloccarlo Português 1 Remova a cobertura da baía da unidade de 5 25 2 Coloque o dispositivo de 5 25 na baia da unidade 3 Certifique se que os orifícios estão alinhados do modo apresentado no diagrama 4 Empurre o trinco para a frente até bloquear Ελληνικά 1 Αφαιρέστε το κάλυμμα της θέσης μονάδας 5 25 2 Τοποθετήστε τη συσκευή 5 25 στη θέσ...

Page 7: ...插入硬體裝置 3 插入3 5 硬碟並用螺絲鎖上 English 1 Turn the keyhole of the front panel into the OPEN position using the key 2 Push and hold the release button on the front panel 3 Pull the HDD tray out 4 Place the 2 5 or 3 5 hard drive on the tray and secure it with screws 5 Slide the HDD tray back to the HDD cage Deutsch 1 Drehen Sie das Schloss der Frontverkleidung mithilfe des Schlüssels in die Position OFFEN 2...

Page 8: ...board or SATA controller card The AHCI enables for hotswap capability of the SATA hard drives without having to turn off the computer prior to connecting or disconnecting of the hard drive Please follow instruction provided by your motherboard or SATA controller card to enable the AHCI function If you are using a brand new hard drive the hard drive will need to be initialized formatted before it i...

Page 9: ...namento correcto certifique se que as seguintes definições estão correctas 1 Certifique se que todos os drivers necessários estão instalados na sua motherboard ou placa de controlador SATA 2 Aperte para remover a bandeja do disco rígido 3 Monte o disco rígido de 3 5 na bandeja com os parafusos fornecidos 4 Deslize a bandeja do disco rígido de volta para a caixa do disco rígido 5 Ligue o cabo SATA ...

Page 10: ...konusunda daha fazla bilgi için sabit disk sürücüsü kullanıcı kılavuzuna bakın veya aşağıdaki adresleri ziyaret edin Windows 7 üzerinde çalışan sistem http www thermaltakeusa com Faq aspx ID 1143 Windows Vista üzerinde çalışan sistem http www thermaltakeusa com Faq aspx ID 1079 Windows XP üzerinde çalışan sistem http www thermaltakeusa com Faq aspx ID 1073 ภาษาไทย สล อตแบบสะดวกต อการสลับเปลี ยนเป ...

Page 11: ...vye ve Fare Güvenlik Kilidi üzerinden yerleştirin ve daha sonra güvenlik kilidini kasanın iç tarafından arka panele yeniden vidalayın เดินสายแป นพิมพ หรือสายเมาส ลอดผ าน อุปกรณ เก บสายแป นพิมพ และเมาส จากนั นให ขันสกรูยึดอุปกรณ เก บสายพร อมสายเข ากับแผง ด านหลังของแชสซีส ให แน น Français 1 Commande de voyant appuyez pour changer la couleur des voyants bleu vert rouge et voyant clignotant 2 Contrôl...

Page 12: ... USB 3 0 port on your computer Audio Connection Please refer to the following illustration of Audio connector and your motherboard user manual Please select the motherboard which used AC 97 or HD Audio Azalia be aware of that your audio supports AC 97 or HD Audio Azalia or it will damage your device s Anschlüsse herstellen Gehäuse LED Verbindungen Auf der Gehäusevorderseite finden Sie einige LEDs ...

Page 13: ...ente del produttore della scheda madre quindi connettere i contatti alla parte superiore del pannello sulla scheda madre Connessione USB 2 0 Consultare il manuale per la scheda madre che comprende la sezione relative alla connessione USB Connessione USB 3 0 1 Accertarsi che la scheda madre supporti la connessione USB 3 0 interna 2 Collegare il cavo USB 3 0 alla porta USB 3 0 disponibile sul comput...

Page 14: ...り付けガイド ケース LED の接続 USB 2 0 の接続 オーディオ接続 リード線の取り付けガイド ケース前面には LEDとスイッチリード線があります マザーボードメーカーのユーザーマニュアル を参照し これらのリード線をマザーボードのパネルヘッダに接続してください USB 2 0 の接続 マザーボードのマニュアルを参照して USB接続 のセクションを探します USB 3 0 の接続 1 お使いのマザーボードが内蔵USB 3 0接続をサポートしていることを確認してください 2 USB 3 0ケーブルをコンピュータの空いているUSB 3 0ポートに接続します オーディオ接続 オーディオコネクタの次の図とマザーボードのユーザーマニュアルを参照してください AC 97または HDオーディオ Azalia を使用するマザーボードを選択してください オーディオがAC 97またはHDオーディオ A...

Page 15: ...layın Ses Bağlantısı Lütfen aşağıdaki Ses konektörü resmine ve anakartınızın kullanım kılavuzuna bakın Lütfen AC 97 veya HD Audio Azalia spesifikasyonunu kullanan bir anakart seçin ses sisteminizin AC 97 veya HD Audio Azalia spesifikasyonunu desteklediğini unutmayın aksi takdirde aygıt lar ınız zarar görür Kasa ışık bağlantısı คู มือการติดตั งสายไฟ การเชื อมต อไฟ LED ของเคส กรุณาศึกษารายละเอียดจาก...

Page 16: ...ent Ball bearing fans with high reliability 140mm or 120mm cooling fan and super low acoustic noise under all load condition 3 Modularized Cable Management To eliminate clutter and improve airflow inside the case The functions can assure all Thermaltake Power Supply meets the balance in noise control and heat exhausted All power supply provides complete protection function as follow 1 Over power p...

Reviews: