


11
12
简体中文 /
日本語 /
Русский /
Italiano /
Русский /
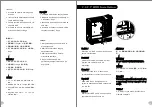
1.
Premere ed estrarre il fermaglio ad
1. Сожмите и вытяните наружу зажим.
incastro.
2.
Вставьте жесткий диск, задвинув ег
2.
Inserire l'unità HDD facendo scorrere
о в корзину
iCage.
l'unità HDD sull'iCage.
3.
Закрепите жесткий диск, затянув на
3.
Fissare l'unità HDD stringendo le viti
нем винт.
sull'unità HDD.
4.
Сожмите и задвиньте зажим, чтобы
4.
Premere ed inserire il fermaglio ad
закрепить корзину iCage.
incastro per fissare l'iCage.
繁體中文
/
Türkçe
/
1.
按下並向外拉免工具安裝夾。
1.
Alet gerektirmeyen klipsi s
ı
k
ı
ştırın ve
2.
將硬碟推入
iCage
內,以便插入硬碟。
dışa doğru çekin.
3.
將螺絲鎖入硬碟,以便固定硬碟。
2. Sabit disk sürücüsünü iCage’e
4.
按下並向內推免工具安裝夾,以便固定
kaydırarak takın.
iCage
。
3. Sabit disk sürücüsünü vidayla
sıkıştırarak sabitleyin.
4. iCage’i sabitlemek için alet
简体中文 /
gerektirmeyen klipsi sıkıştırın ve içe
1.按压免工具卡夹并向外拔出。
doğru ittirin.
2.将硬盘滑入
iCage
,插入硬盘。
3.拧紧螺丝,固定硬盘。
4.按压免工具卡夹并向内推,固定
iCage
。
日本語 /
1.
クリップをつまみながら手前に引き上げ
ます。
2.
HDD
をスライドさせ、
iCage
に挿入します。
3.
iCage
の両サイドからネジで
HDD
を固定し
ます。
4. iCage
を元のベイに戻し、クリップでベイ
に固定します。
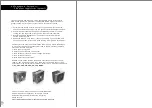
2.4 2.5" HDD Installation
简体中文 /
日本語 /
Русский /
English /
繁體中文
/
Deutsch /
简体中文 /
将 2.5” 硬盘置于正确位置并以螺丝固定。
日本語 /
Français /
Русский /
Español /
Установите 2,5-дюймовый жесткий диск
в надлежащий отсек и закрепите его ви
нтами.
Türkçe
/
Italiano /
Place the 2.5” HDD on proper location and
將 2.5” 硬碟置於適當位置,然後用螺絲固
secure it with screws.
定。
Platzieren Sie die 2,5 Zoll HDD an ihrer
Position und sichern Sie sie mit
Schrauben.
適切な場所に2.5”
HDD
を置き、ねじで締め
付けます。
Mettez le disque dur 2.5” dans le bon
emplacement et sécurisez le avec des vis.
Sitúe el HDD de 2,5 pulgadas en la
ubicación adecuada del HDD y asegúrelo
con tornillos.
2.5”
HDD’yi uygun konuma yerle
ş
tirin ve
Posizionare l’HDD da 2,5” nella posizione
vidalarla sabitleyin.
appropriata e fissarlo con le viti.


