Thermaltake Element V Black Edition VL200K1W2Z User Manual Download Page 5

7

8

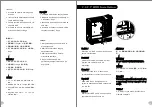
2.1 Motherboard Installation

English /

1. Lay down the chassis.

2. Install the motherboard in proper 

location and secure it with screws.

Deutsch /

1.


Legen Sie das Gehäuse auf die Seite.

2. Installieren Sie die Hauptplatine in ihrer 

vorgesehenen Position und sichern Sie 

sie mit Schrauben.

Français /

1. Posez à plat le châssis. 

2. Installez la carte mère dans l’endroit 

approprié et sécurisez-la avec des vis.

Español /

1. Tumbe el chasis.

2. Instale la placa madre en la ubicación 

adecuada y asegúrela con tornillos.

Italiano /

1. Poggiare lo chassis.

2. Installare la scheda madre nella 

posizione appropriata e fissarla con le 

viti.

繁體中文

 /

1. 

放平機殼。 

2. 將主機板安裝在適當位置,然後用螺絲固定。

日本語 /

日本語 /

. シャーシを下に置きます。 

2. マザーボードを適切な場所に取り付け、ねじ

で固定します。

1

Русский /

Русский /

1. 

Раскройте системный блок. 

2. Установите материнскую плату в надлеж

ащее место и закрепите ее винтами.

简体中文 /

简体中文 /

1. 

放平机箱。 

2. 将主板安装到正确位置并以螺丝固定。

Türkçe


/

1. 

Kasay

ı 

yan yat

ı

r

ı

n. 

2. Ana kart

ı 

uygun konuma tak

ı

n ve vidalarla 

sabitleyin.

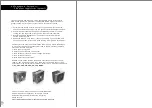
2.2 5.25” Drives Installation

English /

1. 

Pull the bottom of the front panel to 

    detach it from the chassis. 

2. Remove the 5.25" drive bay plastic cover.

3. 

Push inward and upward to unlock the 

    tool-free clip on 5.25” HDD cage.

4. Insert the 5.25” device into the driver bay 

    and push inward and downward to lock 

    the tool-free clip.

Deutsch /

1. 

Ziehen Sie am unteren Rand der 

    Vorderseitentafel, um sie vom Gehäuse 

    zu entfernen. 

2. Entfernen Sie die Plastikabdeckung des 

    5,25 Zoll Schachts.

3. 

Drücken Sie einwärts und aufwärts, um 

    den Clip ohne Werkzeug auf dem 5,25 

    Zoll HDD-Käfig zu entsperren.

4. Führen Sie die 5,25 Zoll Einheit in den 

    Schacht ein und drücken Sie einwärts und 

    abwärts, um den werkzeuglosen Clip zu 

    befestigen.

Français /

1. 

Tirez sur le bas du panneau avant pour le 

    démonter du châssis. 

2. Retirez le couvercle en plastique de la baie 5.25"

3. 

Poussez vers l’intérieur et vers le haut pour 

    déverrouiller le clip sans outil sur la cage à 

    disque dur 5.25”

4. Insérez le périphérique 5.25” dans la baie pour 

    lecteur et poussez vers l’intérieur et vers le bas 

    pour verrouiller le clip sans outil.

Español /

1. 

Tire de la parte inferior del panel frontal para 

    separarlo del chasis. 

2. Extraiga la cubierta de plástico de la bahía de 

    unidad de 5,25 pulgadas.

3. 

Empuje hacia dentro y hacia arriba para abrir el 

    sujetador sin herramientas del cajón del HDD de 

    5,25 pulgadas.

4. Inserte el dispositivo de 5,25 pulgadas en la bahía 

    de unidad y empuje hacia dentro y hacia abajo para 

    cerrar el sujetador sin herramientas.

1

2

4

3

Summary of Contents for Element V Black Edition VL200K1W2Z

Page 1: ...rks belong to their respective companies www thermaltake com Tested To Comply With FCC Standards FOR HOME OR OFFICE USE Create for eSports User s Manual Benutzerhandbuch Mode d emploi Manual del usuar...

Page 2: ...ce Model Case Type Net Weight Dimension H W D Cooling System Drive Bays Accessible Hidden Material Color Expansion Slots Motherboards I O Ports LCS Upgradable PSU Removable PSU Bridge Adjustable PSU B...

Page 3: ...d passe pas 155 mm Limite de longueur de la carte compl mentaire VGA V rifiez que la longueur de votre carte compl mentaire VGA ne d passe pas 335 mm Limitaci n de altura del refrigerador de CPU Aseg...

Page 4: ...vissez les vis au dos du bo tier 4 Tirez le panneau lat ral de droite comme la fl che l indique Espa ol 1 Para extraer el panel lateral izquierdo extraiga los tornillos de mano de la parte trasera de...

Page 5: ...lock the tool free clip Deutsch 1 Ziehen Sie am unteren Rand der Vorderseitentafel um sie vom Geh use zu entfernen 2 Entfernen Sie die Plastikabdeckung des 5 25 Zoll Schachts 3 Dr cken Sie einw rts u...

Page 6: ...y sliding HDD into the icage 3 Secure HDD by tightening screw to HDD 4 Squeeze and push in ward the tool free clip to secure the icage Deutsch 1 Dr cken Sie die Klemme von Hand kein Werkzeug erforderl...

Page 7: ...lemek i in alet gerektirmeyen klipsi s k t r n ve i e 1 do ru ittirin 2 iCage 3 4 iCage 1 2 HDD iCage 3 iCage HDD 4 iCage 2 4 2 5 HDD Installation English Deutsch 2 5 Fran ais Espa ol 2 5 T rk e Itali...

Page 8: ...s vis 2 Fixez le bloc alimentation dans le bon emplacement et securisez le avec des vis 1 G kayna birimini uygun konuma tak n ve vidalarla sabitleyin Instale la unidad de fuente de 2 PSU yu uygun konu...

Page 9: ...Operation English 1 LED Light Control Press to switch LEDs color Blue Green Red and Single LED Flash 2 Fan Speed Control Turn clockwise for higher fan speed 3 Fan Speed Control Turn counter clockwise...

Page 10: ...i in saat y n nde d nd r n 3 Fan H z Denetimi Fan h z n d rmek i in saatin ters y n nde d nd r n 2 9 Water Bottle Cage Installation optional English Deutsch Fran ais Espa ol Italiano T rk e Tighten th...

Page 11: ...R PORT1 L BLUE PORT2 L SENSE_SEND KEY PURPLE GREEN ORANGE BLACK AUDIO AZALIA Function 3 0 Leads Installation Guide Guide d installation des fils Connexion des voyants du bo tier Sur la face avant du...

Page 12: ...Channel Audio Signal Rear Right Channel Audio Signal R RET NC BROWN RED MIC IN MIC POWER Front Microphone Power Front Microphone input Signal KEY BLUE NC BLUE L OUT Front Left Channel Audio Signal Fr...

Page 13: ...unutmay n aksi takdirde ayg t lar n z zarar g r r Kasa k ba lant s AUDIO AC 97 Function GROUND Front Audio Ground L RET Rear Left Channel Audio Signal Rear Right Channel Audio Signal R RET NC BROWN R...

Page 14: ...ti graphic cards mode The functions can assure all Thermaltake Power Supply meets the balance in noise control and heat exhausted All power supply provides complete protection function as follow 1 Ove...

Reviews: