background image

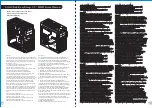
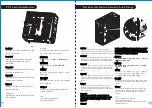
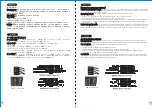
3.5” Drive Installation

日本語 /

简体中文 /

Русский /

Italiano /

3. 插入硬件装置。

1. 

Estrarre il pannello anteriore.

4. 寻找适当的孔位,用螺丝固定硬件。

2. Rimuovere il coperchio del vano unità 

da 3,5’’.

日本語 /

3. Inserire il dispositivo nel vano unità da 

1. 前面

パネルを引き出します。

3,5’’.

2. 3.5”ドライブベイのカバーを取り外しま

4. Individuare le aperture corrette e 

す。

fissare il dispositivo con delle viti.

3. デバイスを 3.5” ドライブベイに挿入し

ます。

Português/

4. 適切な開口部を見つけたら、ねじでデバ

1. Puxe o painel dianteiro para fora.

イスを締め付けます。

2. Remova a cobertura da baía da 

unidade de 3,5”.

Русский /

3. Insira o dispositivo na baía da unidade 

1. 

Снимите переднюю панель.

de 3,5”.

2. Снимите крышку отсека 

4. Encontre as devidas aberturas e fixe o 

3,5-дюймового дисковода.

dispositivo com parafusos.

3. Вставьте 3,5-дюймовое устройство в 

отсек.

Ελληνικ

ά/

4. Найдите нужные отверстия и 

1. Τραβήξτε έξω τον εμπρόσθιο πίνακα.

зафиксируйте устройство винтами.

2. Αφαιρέστε το κάλυμμα της θέσης 

μονάδας 3,5”.

Türkçe


/

3. Εισάγετε τη συσκευή στη θέση μονάδας 

1. Ö

n paneli çekerek ç

ı

kar

ı

n.

3,5”.

2. 3,5” sürücü bölmesinin kapağ

ı

n

ı çı

kar

ı

n.

4. Εντοπίστε τα κατάλληλα ανοίγματα, 

3. Ayg

ı

t

ı, 3,5” 

sürücü bölmesinin içine 

μετά ασφαλίστε τη συσκευή με βίδες.

yerleştirin.

4. Uygun aç

ı

kl

ı

klar

ı 

bulun ve daha sonra, 

繁體中文

 /

ayg

ı

t

ı, 

vidalarla sabitleyin.

1. 拉面板底部,將面板從機殼本體拆下。

2. 移除3.5”擴充槽的擋板。

ไทย /

3. 插入硬體裝置。

1. ถอดแผงด้านหน้าออก

4. 尋找適當的孔位,用螺絲固定硬體。

2. ถอดฝาปิดช่องไดรฟ์ขนาด 3.5” ออก

3. ใส่อุปกรณ์เข้าในช่องไดร์ฟขนาด 3.5”

简体中文 /

4. ขยับให้เข้าที่พอดี 

1. 拉面板底部,

将面板从机壳本体拆下。

จากนั้นขันสกรูยึดอุปกรณ์ให้แน่น

2. 移除3.5”扩充槽的挡板。

English /

1. 

Pull out the front panel.

2. Remove the 3.5” drive bay cover.

3. Insert the device into the 3.5” drive bay.

4. Find the proper openings, then secure 

the device by screws.

Deutsch /

1. 

Ziehen Sie die Vorderseitenabdeckung 

heraus.

2. Entfernen Sie die Abdeckung des 3,5” 

Laufwerksschachts.

3. Führen Sie die Einheit in den 3,5” 

Laufwerksschacht ein.

4. Finden Sie die passenden Löcher und 

befestigen Sie die Einheit mit Schrauben.

Français /

1. 

Enlevez le panneau avant.

2. Enlevez le couvercle de la baie de lecteur 

de 3,5".

3. Insérez le périphérique dans la baie de 

lecteur de 3,5".

4. Trouvez les orifices appropriés, puis fixez le 

périphérique à l’aide des vis.

Español /

1. 

Tire del panel frontal.

2. Extraiga la cubierta de la bahía de unidad de 

3,5 pulgadas.

3. Coloque el dispositivo de 3,5 pulgadas en la 

bahía de unidad.

4. Localice las aberturas adecuadas, a 

continuación, asegure el dispositivo con 

tornillos.

1

2

3

8

9

Summary of Contents for ARMOR A60

Page 1: ...w thermaltake com Tested To Comply With FCC Standards FOR HOME OR OFFICE USE User s Manual Benutzerhandbuch Mode d emploi Manual del usuario Manuale dell utente Manual do Utilizador kullan c elkitab E...

Page 2: ...D PCI for 2 5 HDD for alarm for water cooling pipe front fan for motherboard for front fan 6 32 satandoff 6 32 hesagon M3 screw 6 32 screw M3 4 screw buzzer circle snap bushing 6 32 30 standoff space...

Page 3: ...CPU no excede los 180 mm 7 1 pulgadas Limitaci n de longitud de la tarjeta de v deo adicional Aseg rese de que la longitud de su tarjeta de v deo adicional no excede los 305 mm 12 0 pulgadas Attenzion...

Page 4: ...lar kar n ve yan paneli a n English 1 Lay down the chassis 2 Install the motherboard in proper location and secure it with screws Deutsche 1 Legen Sie das Geh use auf die Seite 2 Installieren Sie die...

Page 5: ...abajo para cerrar el sujetador sin herramientas ein und dr cken Sie einw rts und abw rts um den werkzeuglosen Clip zu befestigen Italiano 1 Tirare il pulsante del pannello anteriore per Fran ais sgan...

Page 6: ...1 2 3 5 English 1 Pull out the front panel 2 Remove the 3 5 drive bay cover 3 Insert the device into the 3 5 drive bay 4 Find the proper openings then secure the device by screws Deutsch 1 Ziehen Sie...

Page 7: ...x ID 1143 Pour un syst me qui ex cute Windows Vista http www thermaltakeusa com Faq aspx ID 1079 Pour un syst me qui ex cute Windows XP http www thermaltakeusa com Faq aspx ID 1073 Espa ol La ranura d...

Page 8: ...arda verilerin d depolama kasas kullanma zorunlulu u olmadan bir SATA sabit diskine ultra h zl aktar m n en fazla 3 0 Gb s sa lamak i in yerle ik olarak tasarlanm t r Sorunsuz al ma i in l tfen a a da...

Page 9: ...ith screws 3 Slide the HDD tray back to the HDD cage Deutsche 1 Ziehen Sie den HD Schacht heraus 2 Montieren Sie die 2 5 oder 3 5 Zoll Festplatte im Schacht und sichern Sie sie mit Schrauben 3 Schiebe...

Page 10: ...chassis com parafusos Place the keyboard or mouse cables through the Keyboard Mouse Security Lock then secure it back to the back panel from inside of the chassis with screw F hren Sie die Kabel durc...

Page 11: ...ie den Abstandhalter vor dem Geh use 2 Nehmen Sie die 6 32 Schraube aus dem Teilesatz des Armor A60 und ziehen Sie sie fest Fran ais 1 Installez l entretoise l avant du boitier 2 Sortez la vis 6 32 du...

Page 12: ...HD Audio Azalia unterst tzt Andernfalls entstehen schwere Sch den an Ihrem n Ger t en Guide d installation des fils Connexion des voyants du bo tier Sur la face avant du bo tier vous trouverez plusie...

Page 13: ...rebbero venire danneggiate Guia de Instala o El ctrica Liga o do LED da Caixa Na parte dianteira da caixa pode encontrar alguns LEDs e fios el ctricos Consulte o manual de utilizador do fabricante da...

Page 14: ...tfen anakart reticinizin sa lad kullan m k lavuzuna bak n ve daha sonra bu ara kablolar anakart zerindeki panel ba lant noktalar na ba lay n USB 2 0 ba lant s L tfen anakart k lavuzunuzun USB ba lant...

Page 15: ...LED USB 2 0 USB USB 3 0 1 USB 3 0 2 USB 3 0 USB 3 0 3 USB 3 0 USB 3 0 USB 2 0 USB 2 0 480 Mb s AC 97 HD Audio Azalia AC 97 HD Audio Azalia LED USB 3 0 Connection 26 27...

Page 16: ...Memo Memo...
Reviews: