background image

คู่มือการติดตั้งสายไฟ

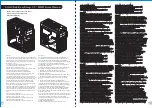
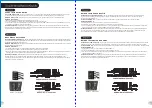
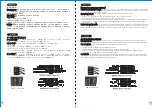
การเชื่อมต่อไฟ LED ของเคส
กรุณาศึกษารายละเอียดจากคู่มือผู้ใช้ของผู้ผลิตแผงวงจรหลักของคุณ 
จากนั้นให้เชื่อมต่อสายไฟเหล่านี้เข้ากับส่วนหัวของแผงบนแผงวงจรหลัก
การเชื่อมต่อ USB 2.0 / กรุณาศึกษารายละเอียดจากคู่มือผู้ใช้ของผู้ผลิตแผงวงจรหลักของคุณ ในหัวข้อ "การเชื่อมต่อ 
USB"
การเชื่อมต่อ USB 3.0 /
1. ตรวจดูให้แน่ใจว่าแผงวงจรหลักของคุณรองรับการเชื่อมต่อ USB 3.0
2. เชื่อมต่อสาย USB 3.0 เข้ากับพอร์ต USB 3.0 ที่สามารถใช้งานได้บนคอมพิวเตอร์ของคุณ
3. ถ้าคอมพิวเตอร์ของคุณไม่มีพอร์ต USB 3.0 คุณสามารถเสียบสาย USB 3.0 เข้ากับพอร์ต USB 2.0 ที่สามารถใช้งานได้ 

แต่ให้ทำงานด้วยความเร็วเต็มพิกัดของ USB 2.0 (480 Mb/s)

การเชื่อมต่ออุปกรณ์รับส่งสัญญาณเสียง/ กรุณาดูรายละเอียดจากภาพประกอบของตัวเชื่อมต่อสัญญาณเสียงต่อไปนี้ 
และคู่มือผู้ใช้ของผู้ผลิตแผงวงจรหลักของคุณ
กรุณาเลือกแผงวงจรหลักที่ใช้ AC’97 หรือ HD Audio(Azalia) 
(กรุณาตรวจสอบให้แน่ใจว่าอุปกรณ์รับส่งสัญญาณเสียงของคุณรองรับ AC’97 หรือ HD Audio (Azalia)) 
มิฉะนั้นอุปกรณ์ของคุณอาจเสียหายได้

 / ที่ด้านหน้าของเคส คุณจะเห็นไฟ LED และสายไฟของสวิตซ์ 

ไทย

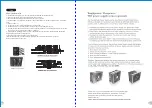
USB 3.0 Connection

26

27

Summary of Contents for ARMOR A60

Page 1: ...w thermaltake com Tested To Comply With FCC Standards FOR HOME OR OFFICE USE User s Manual Benutzerhandbuch Mode d emploi Manual del usuario Manuale dell utente Manual do Utilizador kullan c elkitab E...

Page 2: ...D PCI for 2 5 HDD for alarm for water cooling pipe front fan for motherboard for front fan 6 32 satandoff 6 32 hesagon M3 screw 6 32 screw M3 4 screw buzzer circle snap bushing 6 32 30 standoff space...

Page 3: ...CPU no excede los 180 mm 7 1 pulgadas Limitaci n de longitud de la tarjeta de v deo adicional Aseg rese de que la longitud de su tarjeta de v deo adicional no excede los 305 mm 12 0 pulgadas Attenzion...

Page 4: ...lar kar n ve yan paneli a n English 1 Lay down the chassis 2 Install the motherboard in proper location and secure it with screws Deutsche 1 Legen Sie das Geh use auf die Seite 2 Installieren Sie die...

Page 5: ...abajo para cerrar el sujetador sin herramientas ein und dr cken Sie einw rts und abw rts um den werkzeuglosen Clip zu befestigen Italiano 1 Tirare il pulsante del pannello anteriore per Fran ais sgan...

Page 6: ...1 2 3 5 English 1 Pull out the front panel 2 Remove the 3 5 drive bay cover 3 Insert the device into the 3 5 drive bay 4 Find the proper openings then secure the device by screws Deutsch 1 Ziehen Sie...

Page 7: ...x ID 1143 Pour un syst me qui ex cute Windows Vista http www thermaltakeusa com Faq aspx ID 1079 Pour un syst me qui ex cute Windows XP http www thermaltakeusa com Faq aspx ID 1073 Espa ol La ranura d...

Page 8: ...arda verilerin d depolama kasas kullanma zorunlulu u olmadan bir SATA sabit diskine ultra h zl aktar m n en fazla 3 0 Gb s sa lamak i in yerle ik olarak tasarlanm t r Sorunsuz al ma i in l tfen a a da...

Page 9: ...ith screws 3 Slide the HDD tray back to the HDD cage Deutsche 1 Ziehen Sie den HD Schacht heraus 2 Montieren Sie die 2 5 oder 3 5 Zoll Festplatte im Schacht und sichern Sie sie mit Schrauben 3 Schiebe...

Page 10: ...chassis com parafusos Place the keyboard or mouse cables through the Keyboard Mouse Security Lock then secure it back to the back panel from inside of the chassis with screw F hren Sie die Kabel durc...

Page 11: ...ie den Abstandhalter vor dem Geh use 2 Nehmen Sie die 6 32 Schraube aus dem Teilesatz des Armor A60 und ziehen Sie sie fest Fran ais 1 Installez l entretoise l avant du boitier 2 Sortez la vis 6 32 du...

Page 12: ...HD Audio Azalia unterst tzt Andernfalls entstehen schwere Sch den an Ihrem n Ger t en Guide d installation des fils Connexion des voyants du bo tier Sur la face avant du bo tier vous trouverez plusie...

Page 13: ...rebbero venire danneggiate Guia de Instala o El ctrica Liga o do LED da Caixa Na parte dianteira da caixa pode encontrar alguns LEDs e fios el ctricos Consulte o manual de utilizador do fabricante da...

Page 14: ...tfen anakart reticinizin sa lad kullan m k lavuzuna bak n ve daha sonra bu ara kablolar anakart zerindeki panel ba lant noktalar na ba lay n USB 2 0 ba lant s L tfen anakart k lavuzunuzun USB ba lant...

Page 15: ...LED USB 2 0 USB USB 3 0 1 USB 3 0 2 USB 3 0 USB 3 0 3 USB 3 0 USB 3 0 USB 2 0 USB 2 0 480 Mb s AC 97 HD Audio Azalia AC 97 HD Audio Azalia LED USB 3 0 Connection 26 27...

Page 16: ...Memo Memo...
Reviews: