background image

Manual 0-2583

23

OPERATION

tance for optimum speed and cut quality.  Clean spat-
ter and scale from the shield cup and the tip as soon
as possible.  Spraying or dipping the shield cup in
anti-spatter compound will minimize the amount of
scale which adheres to it.

4.09  Recommended Cutting Speeds

Cutting speed depends on material, thickness, and the
operator’s ability to accurately follow the desired cut line.
The following factors may have an impact on system per-
formance:

•  Torch parts wear

•  Air quality

•  Line voltage fluctuations

•  Torch standoff height

•  Proper work cable connection

NOTE

This information represents realistic expectations
using recommended practices and well-maintained
systems. Actual speeds may vary up to 50% from
those shown.

Refer to Appendix I, Cutting Speed Charts, for complete
chart data.

4.10  Gouging

WARNING

Be sure the operator is equipped with proper gloves,
clothing, eye and ear protection and that all safety
precautions at the front of this manual have been
followed.  Make sure no part of the operator’s body
comes in contact with the workpiece when the torch
is activated.

CAUTIONS

Sparks from plasma gouging can cause damage to
coated, painted or other surfaces such as glass, plas-
tic, and metal.

Check torch parts. The torch parts  must correspond
with the type of operation. Refer to Section 4.04,
Torch Parts Selection.

WARNING

Disconnect primary power to the system before
disassembling the torch, leads, or power supply.

A.  Gouging Parameters

Gouging performance depends on parameters such
as torch travel speed, current level, lead angle (the
angle between the torch and workpiece), and the dis-
tance between the torch tip and workpiece (standoff).

B.   Torch Travel  Speed

Optimum torch travel speed for gouging is 20 inches
per minute (0.5 meters per minute) at 3/16 inch (4.7
mm) standoff. Travel speed is dependent on current
setting, lead angle, and mode of operation (hand or
machine torch).

C.  Current Setting

Current settings depend on torch travel speed, mode
of operation (hand or machine torch), and the amount
of material to be removed.

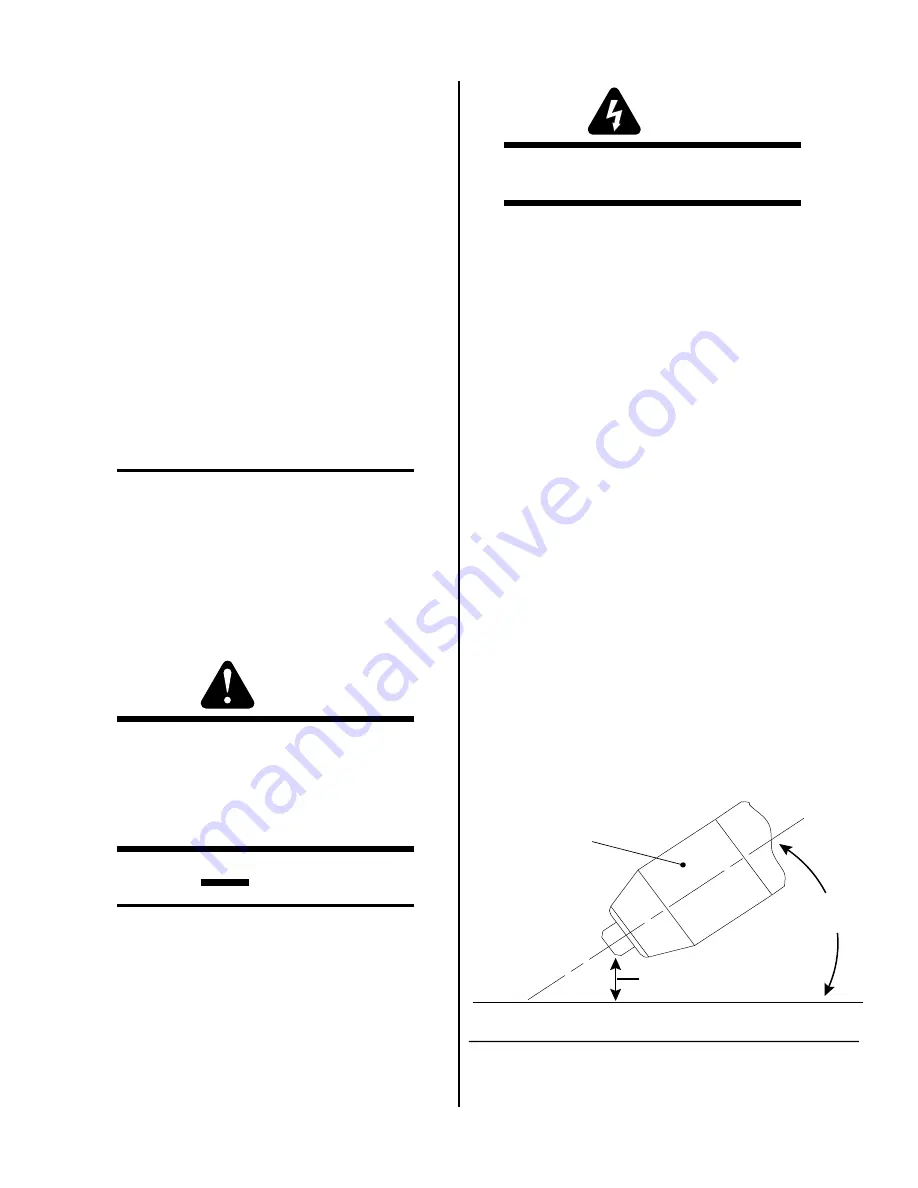
D.  Lead Angle

The angle between the torch and workpiece depends
on the output current setting and torch travel speed.
At 70 amps, the recommended lead angle is 35° (refer
to Figure 4-9).  At a  lead angle greater than 45° the
molten metal will not be blown out of the gouge and
may be blown back onto the torch.  If the lead angle is
too small (less than 35°), less material may be removed,
requiring more passes.  In some applications, such as
removing welds or working with light metal, this may
be desirable.

35˚

Workpiece

Torch Head

Standoff Height

1/8 - 1/4"

A-00941

Figure 4-9  Gouging Angle and Standoff Distance

Summary of Contents for PCH-100XL

Page 1: ...January 15 2001 Manual No 0 2583 PLASMA CUTTING TORCH Instruction Manual Model PCH 100XL Hand Torch Model PCM 100XL Machine Torch...

Page 2: ......

Page 3: ...t the Manufacturer assumes no liability for its use Plasma Cutting Torch Model PCH 100XL PCM 100XL Instruction Manual Number 0 2583 Published by Thermal Dynamics Corporation Industrial Park No 2 West...

Page 4: ...9 2 03 Specifications Design Features 9 2 04 Options And Accessories 10 2 05 Introduction to Plasma 10 SECTION 3 INSTALLATION PROCEDURES 13 3 01 Introduction 13 3 02 Site Location 13 3 03 Unpacking 1...

Page 5: ...Machine Torch Components 28 5 07 Servicing Hand Torch Components 29 5 08 Torch And Leads Troubleshooting 30 SECTION 6 PARTS LISTS 33 6 01 Introduction 33 6 02 Ordering Information 33 6 03 Replacement...

Page 6: ......

Page 7: ...r head out of the welding fume plume Use an air supplied respirator if ventilation is not adequate to remove all fumes and gases The kinds of fumes and gases from the plasma arc depend on the kind of...

Page 8: ...n this manual PLASMAARC RAYS PlasmaArc Rays can injure your eyes and burn your skin The plasma arc process produces very bright ultra violet and infra red light These arc rays will damage your eyes an...

Page 9: ...from American National Standards Institute 1430 Broadway New York NY 10018 1 04 Note Attention et Avertissement Dans ce manuel les mots note attention et avertissement sont utilis s pour mettre en re...

Page 10: ...u m me tuer Le proc d au jet de plasma requiert et produit de l nergie lectrique haute tension Cette nergie lectrique peut produire des chocs graves voire mortels pour l op rateur et les autres person...

Page 11: ...les d cibels le bruit ne d passent pas les niveaux s rs Pour des renseignements sur la mani re de tester le bruit consultez l article 1 page 5 1 06 Documents De Reference Consultez les normes suivante...

Page 12: ...RIT POUR LE SOUDAGE ET LA COUPE disponible aupr s de l Association des Normes Canadiennes Stan dards Sales 178 Rexdale Boulevard Rexdale Ontario Canada M9W 1R3 13 Livret NWSA BIBLIOGRAPHIE SUR LA S CU...

Page 13: ...on standard C22 2 number 60 forArc welding equipment UL Underwriters Laboratory rating 94VO flammability testing for all printed circuit boards used ISO IEC 60974 1 BS 638 PT10 EN 60 974 1 EN50192 EN5...

Page 14: ...follows with the exception of XL Plus Series CutMaster Series Cougar and DRAG GUN A maximum of three 3 years from date of sale to an authorized distributor and a maximum of two 2 years from date of s...

Page 15: ...operation provides a smaller sized torch and inexpensive operation Plasma torches are similar in design to the common au tomotive spark plug They consist of negative and posi tive sections which are s...

Page 16: ...rch Dimensions 2 04 Options And Accessories These items can be used to customize a standard system for a particular application or to further enhance perfor mance refer to Section 6 for ordering infor...

Page 17: ...the torch is started a pilot arc is established be tween the electrode and cutting tip This pilot arc cre ates a path for the main arc to transfer to the work D High Frequency Because direct current D...

Page 18: ...INTRODUCTION DESCRIPTION 12 Manual 0 2583...

Page 19: ...XLhand torches include a handle assembly with torch switch PCM 100XL machine torches include a metal mounting tube with rack and pinion assembly with remote pendant PCH M 100XL Spare Parts Kit includi...

Page 20: ...n extra cable connector sup plied at the control cable connector This connec tor allows connection to a remote pendant or CNC cable while using PIP connections in the TorchAs sembly Connect the remote...

Page 21: ...east 5 microns is required when using air from a compressor This type filter will insure that moisture oil dirt chips rust particles and other contminants from the supply hose do not enter the torch F...

Page 22: ...INSTALLATION PROCEDURES 16 Manual 0 2583...

Page 23: ...et requirements refer to Secton 2 03 K Gas Re quirements Check connections and turn gas supply on E Purge System On the Power Supply place the ON OFF switch to the ON position An automatic gas purge p...

Page 24: ...orch Shown Shield Cup Gas Distributor Tip Electrode A 00937 Figure 4 2 PCH M 100XL Torch Parts 2 Tilt the torch head to remove the tip and gas distribu tor 3 Using a 7 32 inch 5 5 mm nut driver remove...

Page 25: ...peed excess cutting height or cutting tip whose orifice has become elongated H Various Materials and Thicknesses The following table defines the cut quality on various materials and thicknesses Table...

Page 26: ...dross is present on carbon steel it is commonly referred to as either high speed slow speed or top dross Dross present on top of the plate is normally caused by too great a torch to plate distance Top...

Page 27: ...d operator rather than directly back into it until the pierce is com plete 3 In a portion of the unwanted metal start the pierce off the cutting line and then continue the cut onto the line Hold the t...

Page 28: ...Machine Torch Operation For optimum smooth surface quality the travel speed should be adjusted so that only the leading edge of the arc column produces the cut If the travel speed is too slow a rough...

Page 29: ...eck torch parts The torch parts must correspond with the type of operation Refer to Section 4 04 Torch Parts Selection WARNING Disconnect primary power to the system before disassembling the torch lea...

Page 30: ...minimal metal removal or loss of transferred main arc F Slag Build up Slag generated by gouging on materials such as car bon and stainless steels nickels and alloyed steels can be removed easily in mo...

Page 31: ...upply is ON The inside of the torch should be cleaned with electri cal contact cleaner using a cotton swab or soft wet rag In severe cases the torch can be removed from the leads refer to Section 5 06...

Page 32: ...ng the torch or torch leads DO NOT touch any internal torch parts while the AC indicator light of the Power Supply is ON Remove the consumable torch parts per the following procedure NOTE The tip and...

Page 33: ...activating switch again 3 Parts In Place PIP not satisfied a Check canted coiled spring inside shield cup 4 Faulty torch parts a Inspect torch parts and replace if necessary Re fer to Section 5 04 Ins...

Page 34: ...bly a Inspect torch assemblies and replace if neces sary Refer to Section 5 08 Torch and Leads Troubleshooting 3 Faulty components in power supply system components a Return for repair or have qualifi...

Page 35: ...torch switch sheath back over the handle to expose the heat shrink covering the torch switch connectors Sheath Connectors From Torch Switch Torch Handle Torch Control Switch A 00947 Figure 5 6 Removi...

Page 36: ...rol Cable Wiring Figure 5 8 Torch Switch and PIP Schematic 7 Tape the two control cable connector leads together 8 Pull the leads sheathing over the three connectors and secure with electrical tape to...

Page 37: ...be tween the torch leads is breaking down and the leads must be replaced Carefully reassemble the components and recheck the completed assembly per paragraph A Step 3 to confirm that the components ha...

Page 38: ...SERVICE 32 Manual 0 2583...

Page 39: ...ries Section 6 06 Complete Assembly Replacements Section 6 07 Spare Parts Kits NOTE Parts listed without item numbers are not shown but may be ordered by the catalog number shown B Returns If a produc...

Page 40: ...Cutting Air N2 0 047 Orifice 55 Amps 8 7504 1 Tip Drag Air N2 0 039 Orifice 35 Amps 8 7503 1 Tip Gouging Air 0 073 Orifice 8 7506 5 1 Distributor Gas 8 7501 1 Distributor Gas Gouging 8 7508 6 1 Elect...

Page 41: ...35 PARTS LISTS 11 8 1 2 4 10 7 9 13 14 12 5 6 3 A 00948 Castle Shield Cup Assembly Shield Cup Body Heat Shield Copper Copper Shield Cup Assembly Shield Cup Body Heat Shield Copper 1a 1b Hi Vis Shield...

Page 42: ...Head Screw See Note 10 1 6 Internal Star Washer See Note 11 1 Lead Assembly Cable Unshielded Leads Complete 25 ft 7 6m Length 4 0012 50 ft 15 2m Length 4 0013 Shielded Leads For EMC Power Supplies On...

Page 43: ...Manual 0 2583 37 PARTS LISTS 11 12 13 23 23 22 16 19 20 21 18 24 9 1 2 4 8 10 7 14 15 3 5 6 17 A 00949 Copper Shield Cup Assembly Shield Cup Body Heat Shield Copper 1a Hi Vis Shield Cup Black 1b...

Page 44: ...alog 1 Remote Pendant Control includes 7 3114 1 Switch Handle 8 1662 1 Switch Plate 8 1712 1 Eyebolt 1 4 20 x 1 2 Long 9 3096 1 Paddle Switch 9 4229 1 Cord Grip 9 4428 1 23 5 AWG Coil Cord 8 4246 1 Pl...

Page 45: ...th EMC Power Supplies Only PCH 100XL 70 Hand Torch 25 ft 7 6 m Leads 2 0801 PCH 100XL 70 Hand Torch 50 ft 15 2 m Leads 2 0802 PCH 100XL 90 Hand Torch 25 ft 7 6 m Leads 2 0803 PCH 100XL 90 Hand Torch 5...

Page 46: ...Cutting Air Spare Parts Kit Includes 5 0001 1 Lubricant 8 4025 1 Box Utility 8 3141 1 Nut Driver 7 32 8 4220 3 Electrode Air N2 8 7502 5 Cutting Tip Air N2 0 052 Orifice 70 Amp 8 7505 2 Tip Drag Air...

Page 47: ...ckness Tip Output Volts Amperage Speed Per Minute Standoff Plasma Gas Press Flow SCFH Pierce Pierce Height Inches mm Cat No VDC Amps Inches Meters Inches mm PSI BAR Plasma Total Delay Sec Inches mm 1...

Page 48: ...rt If torch is within transfer distance 3 8 in of workpiece main arc will transfer After post flow Gas solenoid closes gas flow stops GAS indicator off ACTION Open external disconnect RESULT No power...

Reviews: