background image

Operating Manual 0-2682

17

DRAG-GUN  Plasma Cutter

5.4  Common Cutting Faults

5.4  Common Cutting Faults

5.4  Common Cutting Faults

5.4  Common Cutting Faults

5.4  Common Cutting Faults

A.  Insufficient Penetration

.  Insufficient Penetration

.  Insufficient Penetration

.  Insufficient Penetration

.  Insufficient Penetration

a.  Cutting speed too fast

b.  Torch tilted too much

c.  Metal too thick

d.  Worn torch parts

B.  Main Arc Extinguishes

B.  Main Arc Extinguishes

B.  Main Arc Extinguishes

B.  Main Arc Extinguishes

B.  Main Arc Extinguishes

a.  Cutting speed too slow

b.  Torch standoff too high from workpiece

c.  Work cable disconnected

d.  Worn torch parts

C. Excessive Dross Formation

C. Excessive Dross Formation

C. Excessive Dross Formation

C. Excessive Dross Formation

C. Excessive Dross Formation

a.  Cutting speed too slow

b.  Torch standoff too high from workpiece

c.  Worn torch parts

D.  Short Torch Parts Life

D.  Short Torch Parts Life

D.  Short Torch Parts Life

D.  Short Torch Parts Life

D.  Short Torch Parts Life

a.  Exceeding system capability (material too thick)

b.  Excessive pilot arc time

c.  Improperly assembled torch

d.  Inadequate air supply (check filter on compressor)

e.  Faulty air compressor

5.5  Common Operating

5.5  Common Operating

5.5  Common Operating

5.5  Common Operating

5.5  Common Operating

Problems

Problems

Problems

Problems

Problems

Getting used to the way the system sounds and feels while
it is operating properly will help to determine the nature
of problems if they should arise.

A.  Compressor Related

A.  Compressor Related

A.  Compressor Related

A.  Compressor Related

A.  Compressor Related

If the unit is cold, the air compressor may not start up or
may run sluggishly.  Most likely, when the torch switch is
depressed, the unit will click once and nothing more will
happen.  Let the unit warm up to room temperature, ap-
proximately over 50° F (10° C) and try again.

If the air filter on the compressor becomes clogged, the
compressor may sound more labored, cut speed and qual-
ity will be reduced, and the arc may have a more green
color. The air filter element can be cleaned - remove it,
blow air through it, and reinstall it.

WARNING

Do not operate unit without filter installed.

B.  Power Source Related

B.  Power Source Related

B.  Power Source Related

B.  Power Source Related

B.  Power Source Related

If the main power service available fluctuates, pilot and
cut performance will be degraded. In some cases, the main
power service circuit breaker may open during use. Some
things that will help:

• Use a service fused or circuit breaker for the correct

amps. (refer to subsection 4.0-D)

• Use heavy gauge extension cords (Refer to subsec-

tion 4.0-D for extension cord lengths).

• Use as short an extension cord as possible.
• Try different outlets on different branch circuits. Use

the one that gives the strongest pilot.

C.  Power Supply/Torch Related

C.  Power Supply/Torch Related

C.  Power Supply/Torch Related

C.  Power Supply/Torch Related

C.  Power Supply/Torch Related

In some instances, the service may be good but when the
torch switch is pressed the compressor comes on but there
is no pilot. You may need to try several times before the
torch fires.

If the torch does not fire (no pilot arc) soon after the torch
switch is activated, try releasing the torch switch and let-
ting the leads bleed down before trying again. The torch
pilots best if started under low air pressure.  This helps
because the torch fires at a lower voltage with lower air
pressure at the torch.

D.  Cutting Related

D.  Cutting Related

D.  Cutting Related

D.  Cutting Related

D.  Cutting Related

1.  Piloting

One of the features of this plasma cutter is the con-
stant DC pilot. This means the plasma arc is always
“on”- either as a pilot arc, or a cutting arc, resulting in
a very smooth, forgiving system. This also means that
the torch tip will wear fairly rapidly if you pilot for
an extended time or cut with too great a standoff (es-
sentially switching from a transferred cutting arc back
to the constant DC pilot arc).

The best way to prevent this is to pilot for no more
than 5 seconds at a time (or start with the torch in
contact with the material) and “drag cut”, that is, hold
the tip in direct contact with the material to be cut.
For some materials, holding a slight standoff (1/16")
may provide a better cut.

Summary of Contents for Drag-gun

Page 1: ...pril 26 2000 Operating Manual Includes 12 Amp Power Supply PCH 10 Torch with Leads Work Cable with Clamp Input Power Cable TM For Models 100 VAC 50 Hz 110 VAC 60Hz 120 VAC 50Hz 120 VAC 60Hz 220 VAC 50Hz 208 230 VAC 60Hz ...

Page 2: ......
Page 3: ...ion Industrial Park No 2 West Lebanon New Hampshire USA 03784 603 298 5711 Copyright 1998 by Thermal Dynamics Corporation All rights reserved Reproduction of this work in whole or in part without written permission of the publisher is prohibited The publisher does not assume and hereby disclaims any liabil ity to any party for any loss or damage caused by any error or omission in the DRAG GUN Plas...

Page 4: ...INSTALLATION 12 5 0 OPERATION 14 5 1 Cutting Techniques 14 5 2 Cut Quality 16 5 3 Recommended Cutting Speeds 16 5 4 Common Cutting Faults 17 5 5 Common Operating Problems 17 6 0 MAINTENANCE 18 6 1 Recommended Maintenance Schedule 18 6 2 Power Supply Cleaning 18 6 3 Torch Cleaning 18 6 4 Inspection and Replacement of Consumable Torch Parts 18 7 0 PARTS REPLACEMENT 19 7 1 Torch Leads Replacement 19 ...

Page 5: ...mes and gases from the breathing area Keep your head out of the welding fume plume Use an air supplied respirator if ventilation is not adequate to remove all fumes and gases The kinds of fumes and gases from the plasma arc depend on the kind of metal being used coatings on the metal and the different processes You must be very careful when cutting or welding any met als which may contain one or m...

Page 6: ...s always wear a welding hel met or shield Also always wear safety glasses with side shields goggles or other protective eye wear Wear welding gloves and suitable clothing to pro tect your skin from the arc rays and sparks Keep helmet and safety glasses in good condition Replace lenses when cracked chipped or dirty Protect others in the work area from the arc rays Use protective booths screens or s...

Page 7: ...t général sur lequel il importe d insister davantage ou qui contribue à l efficacité de fonctionnement du système ATTENTION Toute procédure pouvant résulter l endommagement du matériel en cas de non respect de la procédure en question AVERTISSEMENT Toute procédure pouvant provoquer des blessures de l opérateur ou des autres personnes se trouvant dans la zone de travail en cas de non respect de la ...

Page 8: ...réparation Lisez et respectez toutes les consignes du Manuel de consignes INCENDIE ET EXPLOSION Les incendies et les explosions peuvent résulter des scories chaudes des étincelles ou de l arc de plasma Le procédé à l arc de plasma produit du métal des étincelles des scories chaudes pouvant mettre le feu aux matières com bustibles ou provoquer l explosion de fumées inflammables Soyez certain qu auc...

Page 9: ...f Documents U S Government Printing Office Washington D C 20402 4 NormeANSI Z87 1 PRATIQUES SURES POUR LA PROTECTION DES YEUX ET DU VISAGE AU TRAVAIL ET DANS LES ECOLES disponible de l InstitutAméricain des Normes Nationales Ameri can National Standards Institute 1430 Broadway New York NY 10018 5 Norme ANSI Z41 1 NORMES POUR LES CHAUSSURES PROTECTRICES disponible auprès de l American National Stan...

Page 10: ...PRÉPARATIONÀLACOUPE ET AU SOUDAGE DE CONTENEURS ET TUYAUX AYANT RENFERMÉ DES PRODUITS DANGEREUX disponible auprès de la American Welding Society 550 N W LeJeune Rd Miami FL 33126 15 Norme ANSI Z88 2 PRATIQUES DE PROTEC TION RESPIRATOIRE disponible auprès de l American National Standards Institute 1430 Broadway New York NY 10018 ...

Page 11: ...umber of standards and technical requirements among them are CSA Canadian StandardsAssociation standard C22 2 number 60 forArc welding equipment UL Underwriters Laboratory rating 94VO flammability testing for all printed circuit boards used CENELEC EN50199 EMC Product Standard for Arc Welding Equipment ISO IEC 60974 1 BS 638 PT10 EN 60 974 1 EN50192 EN50078 applicable to plasma cutting equipment a...

Page 12: ...ucts shall be as follows with the exception of XL Plus Series CutMaster 80XL Cougar and DRAG GUN A maximum of three 3 years from date of sale to an authorized distributor and a maximum of two 2 years from date of sale by such distributor to the Purchaser and with the further limitations on such two 2 year period see chart below The limited warranty period for XL Plus Series and CutMaster 80XL shal...

Page 13: ... small area The stiff constricted plasma arc is shown in Zone C Figure 2 1 Direct current DC straight polarity is used for plasma cutting as shown in the illustration Zone A Figure 2 1 is used as a secondary gas that cools the torch This gas assists the high velocity plasma gas in blowing the molten metal out of the cut allowing for a fast slag free cut A 00002 Workpiece Power Supply _ C B A Figur...

Page 14: ...Product Description 2 2 General Product Description The DRAG GUN Plasma Cutter is a small easy to use plasma cutting system which provides 12 amp maximum output and a cut capacity of up to 1 8 3 2 mm of most metals Everything you need to start cutting right away is in cluded with the DRAG GUN power supply with built in air compressor pilot circuitry all control circuitry torch and work lead with t...

Page 15: ... LOCATION FUNCTION LOCATION FUNCTION LOCATION FUNCTION A Front Panel A Front Panel A Front Panel A Front Panel A Front Panel 1 Primary Power ON OFF Switch ON position supplies theAC power to activate all sys tem control circuits OFF position deactivates control circuits In ON position this switch is lighted in the OFF position there is no light 2 Torch Leads Torch leads including torch tip gas dis...

Page 16: ...t power cable work cable or torch leads If using a fork lift vehicle place and secure unit on a proper skid before transporting C Unpacking Procedure C Unpacking Procedure C Unpacking Procedure C Unpacking Procedure C Unpacking Procedure 1 Unpack each item and remove all packing material 2 Locate packing list s and use the list to identify and account for each item 3 Inspect each item for possible...

Page 17: ...tion For 208 230 F Input Voltage Selection For 208 230 F Input Voltage Selection For 208 230 F Input Voltage Selection For 208 230 VAC Service Only VAC Service Only VAC Service Only VAC Service Only VAC Service Only All 208 230 VAC units are factory set for 230 VAC To switch to 208VAC input power operation contact your local distributor G Torch Consumable Parts Selection G Torch Consumable Parts S...

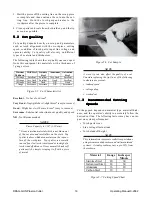
Page 18: ...ill cause the thermal overload protection circuit to become energized and shut down output until the unit cools to normal operating temperature CON TINUAL EXCEEDING OF DUTY CYCLE RATINGS can cause damage to the cutting power source Do NOT exceed indicated duty cycles Sequence of Operation The following is a typical sequence of operation for this cutting system 1 Place the primary power ON OFF swit...

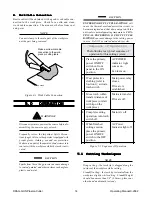
Page 19: ...quickly as pos sible 3 With the torch in starting position press and hold the torch switch The pilot arc will come on and remain on until the cutting arc starts NOTE Limit piloting time to conserve torch parts Refer to section 5 5C for more information CAUTION Torch parts may get quite hot during normal op eration Always wear light cutting gloves when changing torch parts just after operating the ...

Page 20: ...ve Severance Substantial reduction in cut quality and speed NR Not Recommended NOTES Pierce Capacity is 1 16 1 59 mm Dross is molten material which is not blown out of the cut area and resolidifies on the plate Top spatter is dross which accumulates on the top sur face of the workpiece Top spatter is normally caused by a slow torch travel speed or too high of a torch standoff distance Dross normal...

Page 21: ...olor The air filter element can be cleaned remove it blow air through it and reinstall it WARNING Do not operate unit without filter installed B Power Source Related B Power Source Related B Power Source Related B Power Source Related B Power Source Related If the main power service available fluctuates pilot and cut performance will be degraded In some cases the main power service circuit breaker...

Page 22: ...y Cleaning 6 2 Power Supply Cleaning To clean the unit open the enclosure and use a vacuum cleaner to remove any accumulated dirt and dust The unit should also be wiped clean If necessary solvents that are recommended for cleaning electrical apparatus may be used Do not blow air into the power supply dur ing cleaning Make sure to always blow air out of the unit Blowing air into the unit can cause ...

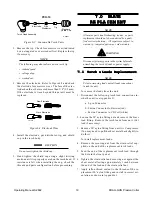
Page 23: ...only be conducted by a quali fied service technician All repairs are subject to warranty tampered parts may void warranty WARNING Disconnect primary power to the system before dis assembling the torch leads or power supply 7 1 Torch Leads Replacement 7 1 Torch Leads Replacement 7 1 Torch Leads Replacement 7 1 Torch Leads Replacement 7 1 Torch Leads Replacement NOTE Prior to removing leads note all...

Page 24: ...Replacement Replacement Replacement Refer to Appendix I Input Power Cable Replacement NOTE In some models the power cable plug must be removed by customer and replaced by an appro priate plug or wired directly to disconnect Re fer to Section 8 2 Parts List for those power cords requiring special wiring 8 0 PARTS LIST 8 0 PARTS LIST 8 0 PARTS LIST 8 0 PARTS LIST 8 0 PARTS LIST Order replacement par...

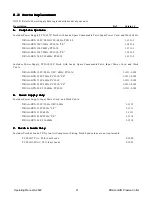
Page 25: ...upply PCH 10 180 Torch with Leads Spare Consumable Parts Input Power Cord and Work Cable DRAG GUN 100V 50Hz 110V 60Hz PCH 10 1 1111 3 180 DRAG GUN 120V 50Hz PCH 10 CE 1 1811 6 180 DRAG GUN 120V 60Hz PCH 10 1 1111 1 180 DRAG GUN 220V 50Hz PCH 10 CE 1 1811 5 180 DRAG GUN 208 230 60Hz PCH 10 1 1111 2 180 B Power Supply Only B Power Supply Only B Power Supply Only B Power Supply Only B Power Supply On...

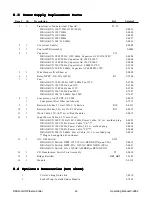
Page 26: ...DRAG GUN 220V 50Hz Fan 220V 9 7687 DRAG GUN 208 230 60Hz Fan 220V 9 7687 8 1 Compressor Air 12VDC 0 5 CFM 9 0010 1 Compressor Disc Filter not shown 9 7912 9 1 Resistor 0 5ohm 55 watt 10 3 16 Faston R30 9 0011 10 1 Resistor 1Kohm 55 watt 5 3 16 Faston R31 9 0012 11 1 Work Cable 15 ft 4 57 m w Red Handles 9 0013 12 1 Input Power Cable 6 5 ft min 2 m DRAG GUN 100V 50Hz 110V 60Hz Power Cable 14 3 w mo...

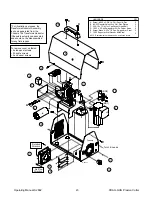
Page 27: ...rch Leads A Screw 6 32 x 3 3 4 Lg Phil Pan Hd Zinc B 6 32 Regular Nylon Lock Nut Zinc Plated C 5 16 18 x 1 3 4 Unc Cap Socket Head Bolt D 10 32 x 5 Pph Swageform Stl Zn Parker Kalon E Screw Black 6 32 x 1 2 Pph Swageform Steel F 10 32 Kepnut w Star Washer Mild Steel Air Flow Direction HARDWARE QTY 2 2 2 4 2 2 NOTE Replacement hardware can be purchased locally F F E E B B D D D C C A A 11 12 To rem...

Page 28: ...t Parts 8 5 Torch Replacement Parts Item Qty Description Catalog 1 1 PCH 10 70 Torch Head Assembly 9 0016 PCH 10 180 Torch Head Assembly 9 0017 2 1 Torch Handle Only 9 0019 3 1 Torch Switch 9 1058 4 1 Standard Electrode 9 6006 5 1 PCH 10 Tip 9 6099 6 1 Gas Distributor 9 6007 7 1 Shield Cup 9 6003 8 1 Torch Head Split Holders PCH 10 70 9 6259 PCH 10 180 9 6261 9 1 PIP Parts In Place Wire Assembly 9...

Page 29: ...ing tab at bottom of Rectifier Bridge Rectifier Strain Relief Primary Input Power Cable A 02653 Green Wire from Primary Input Power Cable Green Wire with Tracer Connect to Compressor Frame Ground Stud ON OFF Input Power Switch Torch Leads Assembly Strain Relief Nut Strain Relief 1 Clearance Strain Relief Torch Lead Faston Connector Red Connect to Bottom Resistor 2 Pin Connectors Torch Lead Faston ...

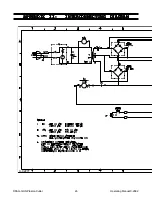
Page 30: ...tter 26 Operating Manual 0 2682 APPENDIX II INTERCONNECTING DIAGRAM APPENDIX II INTERCONNECTING DIAGRAM APPENDIX II INTERCONNECTING DIAGRAM APPENDIX II INTERCONNECTING DIAGRAM APPENDIX II INTERCONNECTING DIAGRAM A 02277 ...

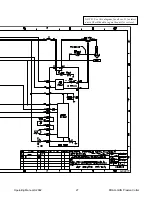
Page 31: ...Operating Manual 0 2682 27 DRAG GUN Plasma Cutter NOTE Use this diagram for all rev D or later units Check the data tag on the unit for rev level A 02277 8063 12 01 98 1 1 ...

Page 32: ...RY CD PWR CIRCUIT E6 E5 E1 E2 SPK1 350V Spark Gap LOGIC CIRCUIT 0 5 55 watt 1K 55 watt 22 3 watt W O R K T O R C H PILOT RED Sleeved 1 4 7 10 11 12 13 16 17 14 15 18 PIP Pin TORCH SWITCH CD PCB Shield Cup 1 4 7 10 11 12 13 16 17 14 15 18 21 22 5 6 20 19 20 19 11 29 8 7 7A 3 4 1 10 26 24 150µƒ 450v 50 5 watt 2 L1 27 43 L4 1A 1 23 C13 T1 21 22 5 6 8 7 7A 3 4 FAN 20 19 208 230 NOTES Model 220vac 120v...

Reviews: