


DRAG-GUN Plasma Cutter
14
Operating Manual 0-2682
H. Work Cable Connection
H. Work Cable Connection
H. Work Cable Connection
H. Work Cable Connection
H. Work Cable Connection
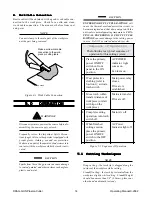
Best results will be obtained with a good work cable con-
nection to the workpiece. Check for a solid and clean
work cable connection. The area must be free from rust
and paint.
NOTE
Connect clamp to the main part of the workpiece,
not the part being removed.
Make a solid work cable
connection to the work-
piece or cutting table
A-02022
Figure 4-3 Work Cable Connection
5.0 OPERATION
5.0 OPERATION
5.0 OPERATION
5.0 OPERATION
5.0 OPERATION
WARNINGS
Disconnect primary power at the source before dis-
assembling the power supply or torch.
Frequently review the Important Safety Precau-
tions (page 1). Be sure the operator is equipped with
proper gloves, clothing, eye and ear protection.
Make sure no part of the operator’s body comes into
contact with the workpiece while the torch is acti-
vated.
CAUTION
Sparks from the cutting process can cause damage
to coated, painted, and other surfaces such as glass,
plastic and metal.
CAUTION
EXCEEDING DUTY CYCLE RATINGS
will
cause the thermal overload protection circuit to
become energized and shut down output until the
unit cools to normal operating temperature. CON-
TINUAL EXCEEDING OF DUTY CYCLE
RATINGS
can cause damage to the cutting power
source. Do NOT exceed indicated duty cycles.
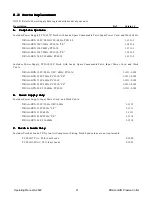
Sequence of Operation
The following is a typical sequence of
operation for this cutting system:
1 Place the primary
power ON/OFF
switch on front
panel to the ON
position.
AC POWER
indicator light
comes on.
Fan turns on.
2 Wear protective
clothing (refer to
Section 1); activate
torch switch.
Main power relay
closes.
Pilot arc is
established.
3 Move torch within
transfer distance of
workpiece (or start
with tip on the
workpiece).
Main arc transfer.
Pilot arc off.
4 Complete cutting
operation; turn torch
switch off.
Main Arc off.
5 When finished
cutting session,
place the primary
power ON/OFF
switch to the OFF
position.
AC Power
Indicator light off.
Figure 5-1 Sequence of Operation
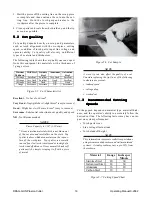
5.1 Cutting Techniques
5.1 Cutting Techniques
5.1 Cutting Techniques
5.1 Cutting Techniques
5.1 Cutting Techniques
NOTE
Drag cutting - the torch tip is dragged along the
surface of the workpiece while cutting.
Standoff cutting - the torch tip is elevated from the
workpiece slightly while cutting. Standoff height
should be no more than 1/8" (3.2 mm); place your
other hand underneath to steady.
Summary of Contents for Drag-gun
Page 2: ......


