203
1.800.735.4328 | THERMADOR.COM
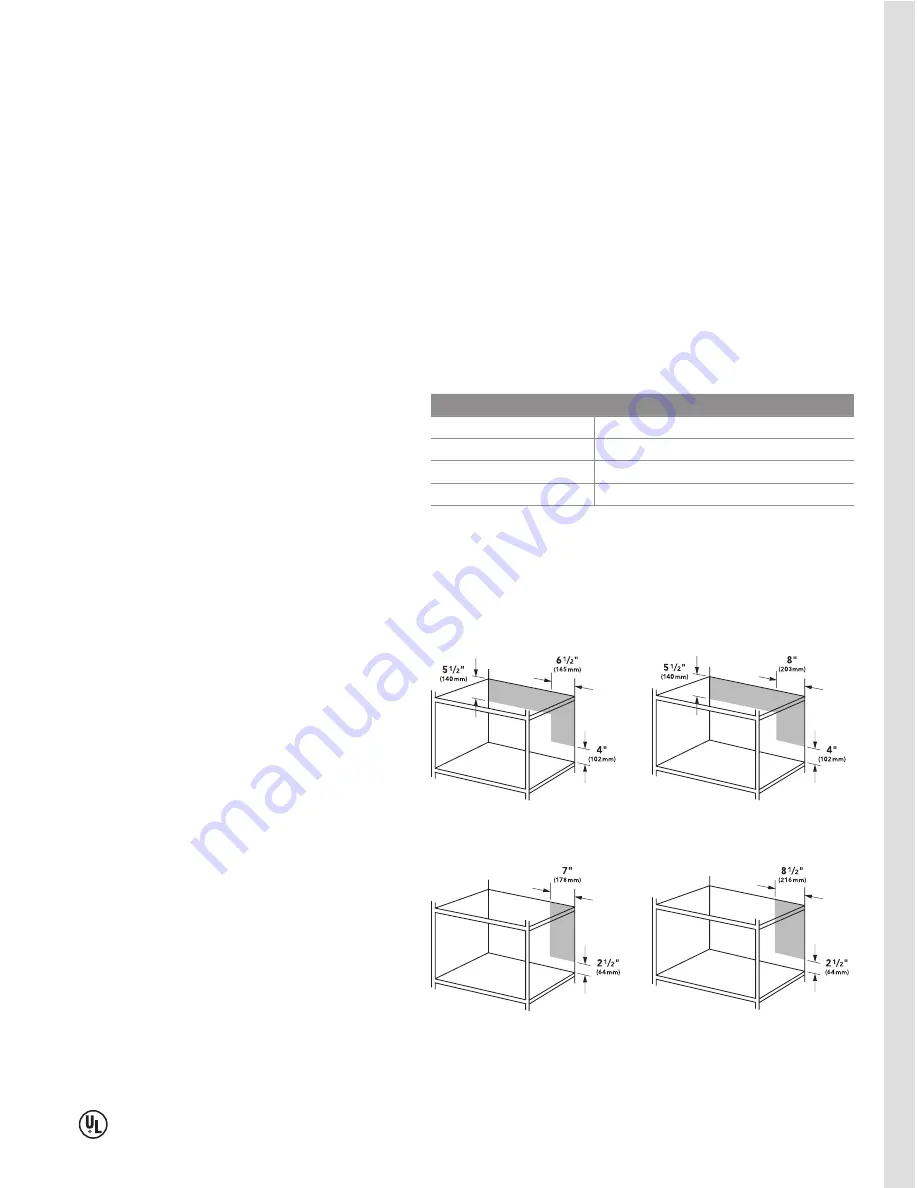
ELECTRICAL LOCATION
The outlet must be properly grounded in accordance with all applicable
codes. It can be installed in the backwall directly behind the oven. The outlet
should be located anywhere within the shaded area.
Note:
See page 207 for electrical location for model MBESLFTD
MODEL OPTIONS
There are two Thermador Built-in Microwaves to choose
from—traditional and convection. 27-inch and 30-inch
stainless steel trim kits are available for each.
An optional stainless steel oven lift door is available
for use with the traditional, non-convection model
MBESLFTD only. The lift door conceals your microwave
behind a coordinating stainless steel door with either
a Masterpiece
®
or Professional Handle for a perfectly
integrated appearance with other Thermador appliances
in your kitchen.
INSTALLATION CONSIDERATIONS
The information in this design guide provides key
features, product dimensions, cutouts and installation
specifications. Before installing a Thermador microwave
oven, be sure to verify the cabinet dimensions and
electrical connections. Also, always consult with the
installation manual packed with the product for complete
details before installing.
It is the responsibility of the owner and the installer to
determine if additional requirements and/or standards
apply to specific installations.
MBES/MCES models must be used in conjunction with a
27-inch or 30-inch microwave trim kit.
Your microwave oven can be installed into a cabinet or
wall by itself or above any Thermador Built-in Oven.
To reduce the risk of fire and electric shock, install
microwave at least
3
/
4
" above designated oven.
The oven must be placed on a flat, stable surface. Place
the front surface of the door three inches or more from
the counter top edge to avoid accidental tipping of the
microwave oven during normal use.
Do not block air vents. If they are blocked during
operation, the oven may be overheated and damaged.
If the oven overheats, a thermal safety device will turn
the oven off. The oven will remain inoperable until it has
cooled.
CAUTIOn: Electrical appliances must always be
operated with the lift door open in order to ensure
adequate ventilation!
Do not place oven near a hot, damp surface such as a
gas or electric range, dishwasher, or in an excessively
humid room.
WARRANTY
Limited warranty parts and labor (1 year).
See page 294 for additional warranty details.
ELECTRICAL SPECIFICATIONS
The oven must be on a separate circuit. no other appliance should share the
circuit with the microwave oven. If it does, the branch circuit fuse may blow or
the circuit breaker may trip, or the food may cook slower than recommended.
This appliance must be grounded. It is equipped with a cord having a
grounding wire with a grounding plug. The plug must be plugged into at
least a 20 Amp, 120 Volt, 60 Hz three-prong, grounded outlet that is properly
installed.
The voltage used must be the same as specified on this microwave oven
(120V, 60Hz). Using a higher voltage is dangerous and may result in a fire or
oven damage. Using a lower voltage will cause slow cooking.
Do not use an extension cord. If the power supply cord is too short, have a
qualified electrician or serviceman install an outlet near the appliance.
BuIL
T-IN MICROW
A
VES
BuILT-IN MICROWAVES
PLANNING INFORMATION
Microwaves are UL approved.
27-Inch Traditional
27-Inch Convection
30-Inch Traditional
30-Inch Convection
MODEL
REQuIRED CIRCuIT BREAKER
240V, 60 Hz
MBES
20 Amp
MBESLFTD
20 Amp
MCES
20 Amp


