


13
12
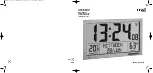
Radio-controlled clock with indoor climate
Radio-controlled clock with indoor climate
7.1.3 Day-of-the week language
• In the setting mode you can set the day-of-the week language: GERMAN, FRENCH, ITALIAN, SPANISH, DANISH, DUTCH, CZECH, POLISH,
SWEDISH and ENGLISH.
7.1.4 Temperature unit setting
•
In the setting mode you can change between °C (Celsius) or °F (Fahrenheit) as temperature unit.
7.1.5 Alarm duration setting
• In the setting mode you can change between 1 or 2 minutes (default) for alarm duration.
7.2 Alarm time setting
• Press the
MODE
button in normal mode, to enter the alarm mode.
• ALARM TIME and 7:00 (default) or the last adjusted alarm time appear on the display.
• Press and hold the
MODE
button.
• The hour digits flash.
• Press the
+
or
–
button to adjust the hours.
• Confirm the setting with the
MODE
button and set minutes in the same way.
• Confirm the setting with the
MODE
button and return to normal mode.
7.2.1 Activate and deactivate the alarm time
• To activate or deactivate the alarm function press the
ALARM
button in normal mode.
• The alarm symbol appears/disappears on the display.
• When the alarm is activated and the adjusted alarm time is reached, the alarm rings.
• Press any button and the alarm will stop.
• If the alarm is not stopped manually, the alarm tone automatically turns off after two minutes (default) or one minute and will be reactivated at the
same set time in the following day.
• The alarm symbol remains on the display.
• When the alarm rings, press the
SNOOZE
button and the snooze function is activated.
• Once the snooze function is activated, the alarm symbol will be flashing on the display.
• The alarm will be interrupted for 5 minutes.
• Press any button (except
SNOOZE
) and the alarm will stop.
• The alarm symbol remains on the display.
8. Mounting
• With the suspension device you can fix the device with a nail or a solid screw and dowel on a wall. The device can be placed onto flat surfaces
with the fold-out stand.
9. Care and maintenance
• Clean the device with a soft damp cloth. Do not use solvents or scouring agents.
• Remove the batteries if the device will not be used for an extended period of time.
• Keep the device in a dry place.
• If the clock cannot detect the DCF-signal (e.g. due to interference, transmitting distance, etc.), the time can be set manually. The DCF reception
symbol disappears and the clock will then work as a normal quartz clock (see: Manual settings).
6.2.1 Note on radio-controlled time
The time base for the radio-controlled time is a caesium atomic clock operated by the Physikalisch Technische Bundesanstalt based in Braun-
schweig (Brunswick), Germany. It has a time deviation of less than one second in one million years. The time is coded and transmitted from Main-
flingen near Frankfurt via the frequency signal DCF-77 (77.5 kHz) and has a transmitting range of approximately 1,500 km. The adjustment to Day-
light Saving Time (summer/winter time) is automatic. In Daylight Saving Time the DST symbol
is shown on the display. The reception quality
depends mainly on geographic location. Normally there should be no reception problems within a 1,500 km radius around Frankfurt.
Therefore, please note the following steps:
• The recommended distance to any interfering sources like computer screens or TV sets is at least 1.5 - 2 meters.
• Within concrete walls (reinforced with steel) such as basements, the received signal is naturally weakened. In extreme cases, please place the
unit close to a window to improve reception.
• During night-time, the atmospheric interference is usually less severe and reception is possible in most cases. A single daily reception is ade-
quate to keep the accuracy deviation under 1 second.
7. Operation
• Press and hold the
+
or
–
button in the respective setting mode for quick setting.
• The device will automatically quit the setting mode if no button is pressed for a long period of time.
7.1 Manual settings
• Press and hold the
MODE
button in normal mode for two seconds.
• The 24 h digit (default) will be flashing. Press the
+
or
–
button to choose 12 HR or 24 HR system. In the 12-hour system AM or PM (after 12
o'clock) appears on the display.
• Press the
MODE
button again to do the settings in the following sequence: the radio signal reception (rcc on - default), time zone (00 - default),
the day-of-the-week language (GERMAN - default), the hours, the minutes, the seconds, the year, the month and the day, the temperature unit (°C
- default) and the alarm interval (2 minutes - default). Press the
+
or
–
button to adjust it.
• Confirm with the
MODE
button.
• Once the DCF time signal is successfully received and the DCF reception is activated, the manually set time is overwritten.
7.1.1 DCF reception
• By default, the DCF reception is activated (rcc on) and after successful reception of the DCF signal no manual adjustment is necessary.
• In the setting mode, press the
+
or
–
button if you want to deactivate the DCF reception (rcc OF).
• Once the DCF time reception is deactivated the clock must be manually set.
7.1.2 Time zone setting
• In the setting mode you can make the time zone correction (-23/+23).
• The time zone correction is needed for countries where the DCF signal can be received but the time zone is different from the DCF time (e.g.
+1=one hour plus).
TFA_No. 60.4517_Anleitung 14.09.2017 13:54 Uhr Seite 7