background image

Texmate, Inc. Tel. (760) 598-9899  •  www.texmate.com

Page 2

   FX-B101Q-DCA_DCV manual (d0103)

Quickset Programming
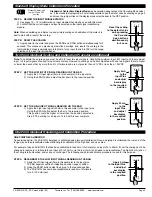
This bargraph features Texmate's unique QUICKSET 

PROGRAMMING.  When  a  front  panel  button  is 

pressed and held down, the associated function is 

directly  changed.  The  direction  of  change  will  be 

either  up  or  down,  as  indicated  by  the  UP  and 

DOWN indicator LEDs. After the indicator LED lights 

up there is a 0.5 second delay before any change 

occurs.  When  a  button  is  released  and  pressed 

down again the direction of change is reversed. As 

there  are  no  menu  or  sub-menus  to  navigate,  the 

programming and setup is quick and easy.

Front Panel Buttons
Zero Button

The Zero Button sets the low input signal scaling.
Span Button

The Span Button sets the high input signal scal-

ing.
Lo Button

The Lo Button sets the analog output low setting.
Hi Button

The Hi Button sets the analog output high setting.

1

3

2

4

Z

C

1

Z

C

3

2

4

Lo

Span 


Button

Zero 


Button

UP Program


Direction Indicator

Hi

DOWN Program


Direction Indicator

101 


Segment


Bargraph

Controls and Indicators

Controls and Indicators

Controls and Indicators

Glossary of Programming Symbols and Modes of Operation

Standard or Center Zero Display Mode Select Header  


•Jumper clips enables standard display.


•Jumper clip to enable Center Zero display.

dual bar rvsd

SP1

SP2

SP3

SP4

Horizontal or Reverse Mounting 

Meters can be mounted horizontally in 

the panel and for those applications that 

require an opposite growth of the bar, the 

meter can be vertically or horizontally 

mounted upside down 

Horizontal and Reverse Mounting 

with Custom Face Plate Installed

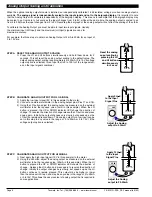
To explain software programming procedures, logic diagrams 

are used to visually assist in following programming steps. The 

following symbols are used to represent the functions and dis-

plays of the meter:

Input Hi

Input Low

This arrow represents 

the direction and level 

of an input signal

Small arrow shows 

direction the bar-

graph display has 

moved or will move.

Shading indicates 

bargraph is ON in 

this area.

When  two  fingers  are  shown  side  by 

side, the two corresponding buttons must 

be pressed at the same time to initiate an 

indicated function.

Zero Span

Summary of Contents for LYNX FX-B101Q-DCA

Page 1: ...Center zero setting header selectable Provision for external brightness setting switch by connect ing the DIM to the GND pin on the back of the meter Smart averaging to speed up display response Opti...

Page 2: ...WN Program Direction Indicator 101 Segment Bargraph Controls and Indicators Controls and Indicators Controls and Indicators Glossary of Programming Symbols and Modes of Operation Standard or Center Ze...

Page 3: ...es to be pressed 3 While the bar is being adjusted a new offset and scale factor is continuously being calculated At the moment the button is released and the scaling is accepted the calculation data...

Page 4: ...ezel lightly lever the plastic catches up and for ward in the sequence shown by the num bers To remove rear cover plate press down lightly to release two plastic catches on either side of the case and...

Page 5: ...e to the input pins 2 Using the ZERO button adjust the bar down to the required position STEP D Set the High Input Signal Reading on the Bar 1 Apply the high input signal 20mA in this example to the i...

Page 6: ...is example When the HI button is pressed the UP or DOWN indicator LED shows the direction of change Release the HI button and press again to reverse the direction of change Initially the output change...

Page 7: ...in the meter s programmed parameters can be viewed but not changed Pin 20 COMMON To activate the LOCK or DIM functions from the rear of the meter the respective pins have to be connected to the COMMON...

Page 8: ...t Zero Offset Pot Input Range Header Input Range Header Input Range Header ID01 DC Volts 2 20 200V Custom w 24V DC Exc Custom 200V 20V 2V ON OFF 24V Exc 24V Exc Decrease Span Increase SPAN DC VOLTS PI...

Page 9: ...to a Hi and a Lo range This has the effect of dividing the adjustment range of the SPAN pot into ten equal 10 steps across 100 of the input Signal Span Range HI LO HI LO SPAN Turn Clockwise to Increas...

Page 10: ...ith Co Logo 170 ART FS1 Small run custom Faceplate 1 color 40 ART FS2 Small run custom Faceplate 2 color 45 ART FS3 Small run custom Faceplate 3 color 54 ART FS4 Small run custom Faceplate 4 color 60...

Page 11: ...ay Texmate s panel adapter enables modern DIN meters to fit in existing cutouts individually or stacked when replacing old 6 edgewise mechanical pointer meters Fits existing cut outs for 6 150 mm edge...

Page 12: ...snaps on the 36x144 mm 1 42 x5 69 case and enables single unit or stack mounting in an existing 6 edgewise pointer meter cut out 100 0 25 50 75 100 0 25 50 75 SP1 SP2 SP3 SP4 Zero Span Zero Span Pane...

Page 13: ...4X splash proof 30 OP PA 144X36 Panel Adapter for 144x36mm from 6 inch cutout 10 For Custom Face Plates see page 10 Prices subject to change without notice WARRANTY Texmate warrants that its products...

Reviews: