Texmate, Inc. Tel. (760) 598-9899 • www.texmate.com
FX-B101Q-DCA_DCV manual (d0103)
Page 3
Input Hi
Input Low
std
Input Hi
Input Low
std Inv
FLB202Q MODE O1
+ Input
- Input
+ Input
- Input
+ Input
- Input
0
0
0
biploar center zero
Input Hi
Input Hi
Input Hi
Input Low Input Low
Input Low
center zer
o
1/2
1/2
1/2
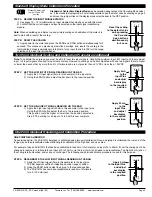
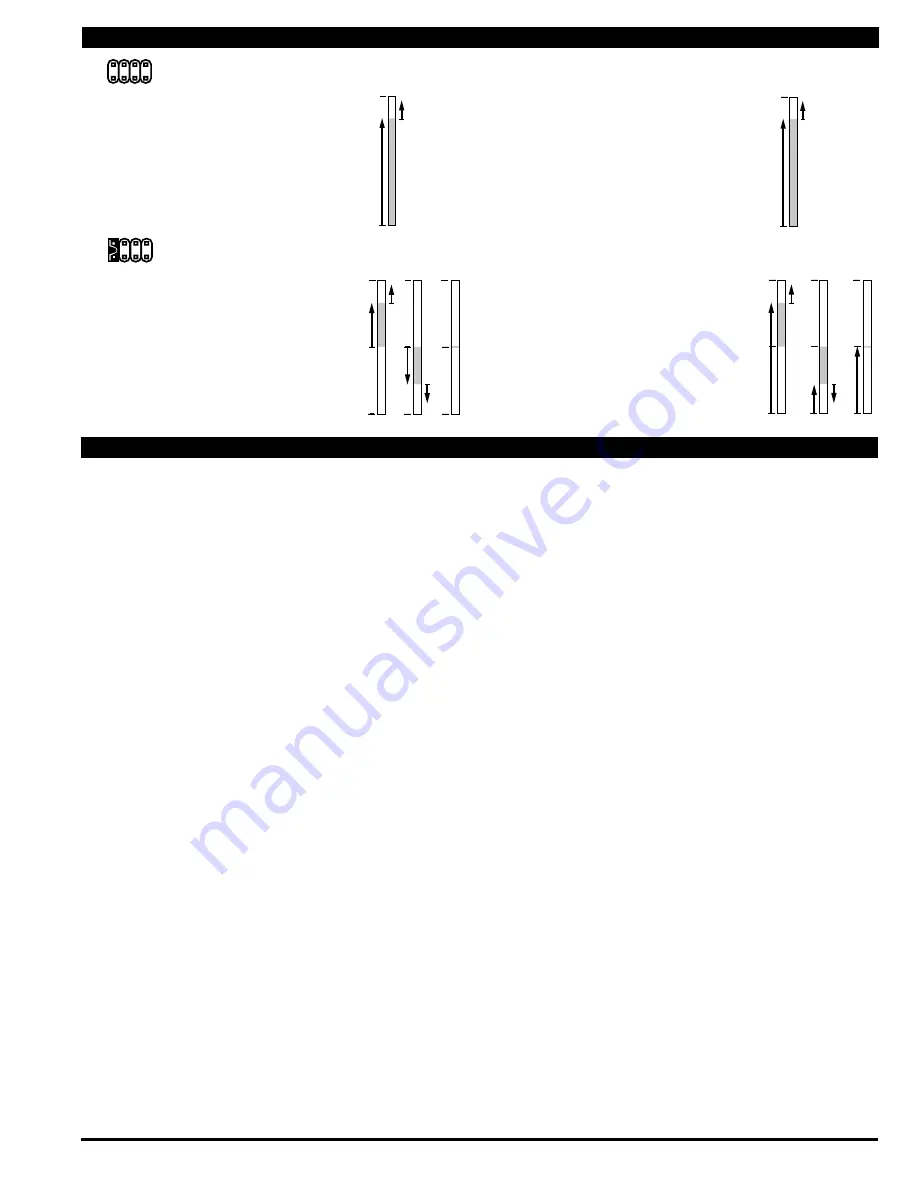
Standard Scaling
Standard display mode selected and
scaled so bar increases as input signal
increases from Low to Hi.
Halfway Zero Point
Center point display mode selected and
scaled, so the bar increases upwards or
downwards from the center point, for sig-
nals that are greater or less than half the
calibrated full scale range respectively.
When the input is equal to half the full
scale range, only the center segment will
be on.
Inverse Scaling
Standard display mode selected and
scaled so the bar increases as the input
signal decreases from Hi to Low.
Bipolar Center Zero
Center point display mode selected and
scaled, so the bar increases upward from
zero, for increasing positive inputs and
downward from zero for increasing negative
inputs. When the input is zero, only the cen-
ter segment will be on.
Standard Display Mode
Center Zero Display Mode
Over View of Display Modes, Scaling Capabilities and Operating Modes
1
3
2
4
Z
C
1
Z
C
3
2
4
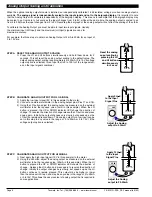
Meters with QuICkSeT PROgRAmmINg feature a unique, easy-to-use, two point scaling and calibration system.
Scaling or calibration is accomplished simply, by applying a zero or low input signal and adjusting the bar to the desired reading, using the
ZERO button. A higher input signal is then applied, and the bar is adjusted to the desired reading for that input value, using the SPAN button.
ImPORTANT DeTAIlS THAT mAke QuICkSeT PROgRAmmINg eASy TO uSe AND uNDeRSTAND
1. The zero and span buttons are functionally the same, except as follows: The ZERO button can initiate a scaling with input signals from
zero to 95% of fullscale.The Span button can initiate a scaling with input signals from 5% of fullscale to 105% of fullscale.
2. When a Zero or Span button is pressed, the Up or Down indicator LED will immediately light up to show the direction, in which the Bar
will move, after a 0.5 second delay. If the button is released and pressed again, the opposite
u
p or
D
own indicator will light up, and 0.5
seconds later the Bar will begin to move in that direction until the button is released. When the bar is being adjusted to zero or fullscale,
the bar will automatically stop at the zero or fullscale position, and will not overshoot these positions, even if the button continues to be
pressed.
3. While the bar is being adjusted, a new offset and scale factor is continuously being calculated. At the moment the button is released,
and the scaling is accepted, the calculation data is memorized and implemented. The Scaling calculation is based on the new position
of the Bar, the input signal being applied at that moment, and the previously memorized position of the Bar and the input signal that was
being applied, when the other button was last released.
4. Positive and negative signals maybe integrated into a two point scaling. However when either a ZERO or SPAN button is pressed the
input signal being applied, must be more than 5% higher or lower than the previously memorized value of the input signal, that was
being applied when the other button was last released. If not, the bar will flash, the scaling will not be accepted, and the previous scaling
will still be retained in memory.
5. Because of the requirement, that a new scaling input signal must be 5% higher or lower than the previously stored value, it can some-
times be difficult to implement a desired scaling, particularly when using a calibrator that only has fixed output values. In this case Reset
the Scaling by pressing the ZERO and SPAN buttons simultaneously for two seconds. Both scaling memories will be erased and an
internal default scale factor will be loaded. This provides a display of zero to fullscale on the bar for an input of approximately 0 to 100%
of the range selected on the input signal conditioning module. After Resetting the Scaling a new calibration, using either button, can be
implemented with new input signal values. It is good practice to always use the Zero button for lower input signals and the Span button
for higher input signals, even when the bar display scale is inversed.
6. The larger the difference between two points used for calibration, the better the accuracy. However if the difference is too high, and
the output from the input signal conditioning module is greater than +2.1VDC, or less than -1.05VDC, the bar will flash over range. The
calibration will not then be accepted and, the previous scaling will still be retained in memory. In this case, either a lower input signal
must be used, or a higher range on the input module should be selected to recalibrate the meter.
Note: Most input signal conditioners have provisions for analog calibration and scaling. If the meterʼs scale factor is set to read zero with a
zero input (shorted input), and to read 10 Bars fullscale with a 2.000 V input, any pre-calibrated signal conditioner with an output that does
not exceed – 1 V to + 2 V, will read correctly in the meter without any further calibration.
Two Point Quickset Scaling and Calibration


