Texmate, Inc. Tel. (760) 598-9899 • www.texmate.com
Page 2
FL-B101Q-DCA _ FL-B01Q-DCV (d0084)
Standard or Center Zero Display Mode Select Header
• Jumper clips enables standard
display on CH1 and CH2.
• Jumper clip to enable Center
Zero display.
Operating Mode Select Header
This header selects one of the two basic operating
modes presently available for this meter.
Mode 0 Bargraph with four set points displayed on
bargraph display.
Mode 3 Enables the Hysteresis mode for tank
filling or tank emptying applications.
Relay Activation Mode Select Header
When no jumper clips are installed the relays will
activate when the display exceeds the set point.
Any relay that has a jumper clip installed will
activate when the display is less than the set point.
CH1
CH2
CH1
CH2
MODE
1
3
2
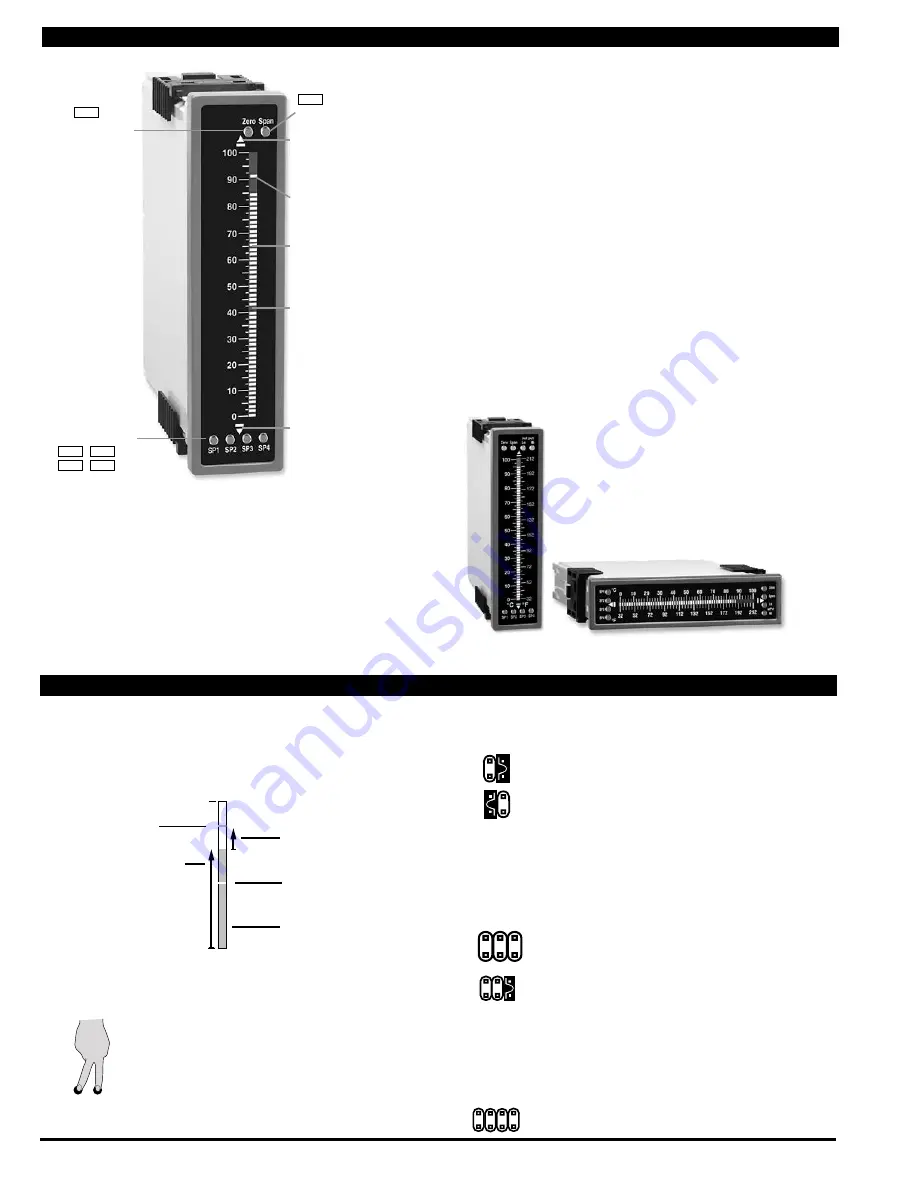
Controls and Indicators
Controls and Indicators
101 Segment Bar
Setpoint indicated
by an OFF Segment
UP Button Indicator
DOWN Button
Indicator
Setpoint indicated
by an ON Segment
Quickset Programming
This bargraph features Texmate's unique QUICKSET PROGRAMMING.
When a front panel button is pressed the associated function is directly
changed. The direction of change will be either up or down, as indicat
-
ed by the UP and DOWN indicator LEDs. After the indicator LED lights
up there is a 0.5 second delay before any change occurs. When a but
-
ton is released and pressed again the direction of change is reversed.
As there are no menu or sub-menus to navigate, the programming and
setup is quick and
Span Buttons
Span
Zero Buttons
Zero
Set Point Button
SP1
SP2
SP3
SP4
Front Panel Buttons
Zero Button
The Zero Button sets the Channel 1 low input signal scaling.
Span Button
The Span Button sets the Channel 1 high input signal scaling.
SP1, SP2, SP3 and SP4 Buttons
These buttons setup the corresponding setpoints.
Setpoint Indication
The position of setpoints on the bargraph display are indicated by
an ON segment if the bargraph display is below the setpoint, and
by an OFF segment if the bargraph display is above the setpoint.
(See the drawing above)
To explain software programming procedures, logic diagrams
are used to visually assist in following programming steps. The
following symbols are used to represent the functions and dis
-
plays of the meter:
When two fingers are shown side by
side, the two corresponding buttons must
be pressed at the same time to initiate an
indicated function.
Controls and Indicators
Glossary of Programming Symbols and Modes of Operation
Input Hi
Input Low
This arrow represents
the direction and level
of an input signal
Small arrow shows
direction the bar
-
graph display has
moved or will move.
Shading indicates
bargraph is ON in
this area.
Setpoint indicated by
an OFF segment.
Setpoint indicated by
an ON segment.
Zero Span
Center Bar Display Option
This display option can be selected
when a dual scale is required. A
custom face plate is required for dual
scales. Tri-Color option is available
only for the Center Bar display.
MODE
1
3
2
RELAYS
1
3 4
2


