Page 4
CL-B101D40RPM(d0097) manual
STEP A Enter the Calibration Mode
1)
Press the
P
and buttons at the same time. Display tog-
gles between [CAL] and [oFF].
2) Press the or button. Display changes from [oFF] to
[on].
3)
Press the
P
button. Display toggles between [CAL] and
[out].
Note:
If at this point, the display skips directly to STEP C and toggles
between [SPAn] and the previous [SPan] setting, the software is
detecting that the optional analog output hardware is NOT installed.
STEP B Select Pulese Per Revolution, Range Slection
1) Press the or button to select CAL [iP] for Pulses Per
Revolution Slection.
2) Press the
P
button. Display toggles between [PPr] and
the previous Pulses Per Revolution setting.
STEP C Enter the Pulese Per Revolution (PPR)
1) Using the and buttons, enter the number of pulese
per revolution. Any number between 1 and 9999 may be
enterd.
2) Press the
P
button. Display toggles between [rg] and the
previous range setting.
STEP D Select the Range
1) Using the and buttons, selete the required range.
There are three ranges with resolutions of 0.1 (max. 999.9
RPM), 1 (max. 9999 RPM) and 10 RPM (max. 99.99 x 10000
RPM)
2) Press the
P
button.
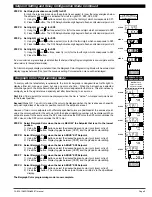
Pulses Per Revolution and Range Selection
MAIN MENU
Operational Display
Sub-menu
MODE
STEP A Calibration
Mode
STEP B Calibration
Mode
STEP C PPR
STEP D Range
To Digital Span Selection for
Bargraph Display Page 5
cAL out/iP branch will only
appear if the analog output
option is installed, otherwise
cAL on goes directly to ZEro
setting
PULSES PER
REVOLUTION, RANGE
SELECTION
To Digital Span Selection
for Bargraph Display
See Page 6
To Two Point Analog
Output Range Setting
and Calibration
See Page 7
[0.1]
[1]
[10]


