Texas Instruments AM243x User Manual Download Page 53

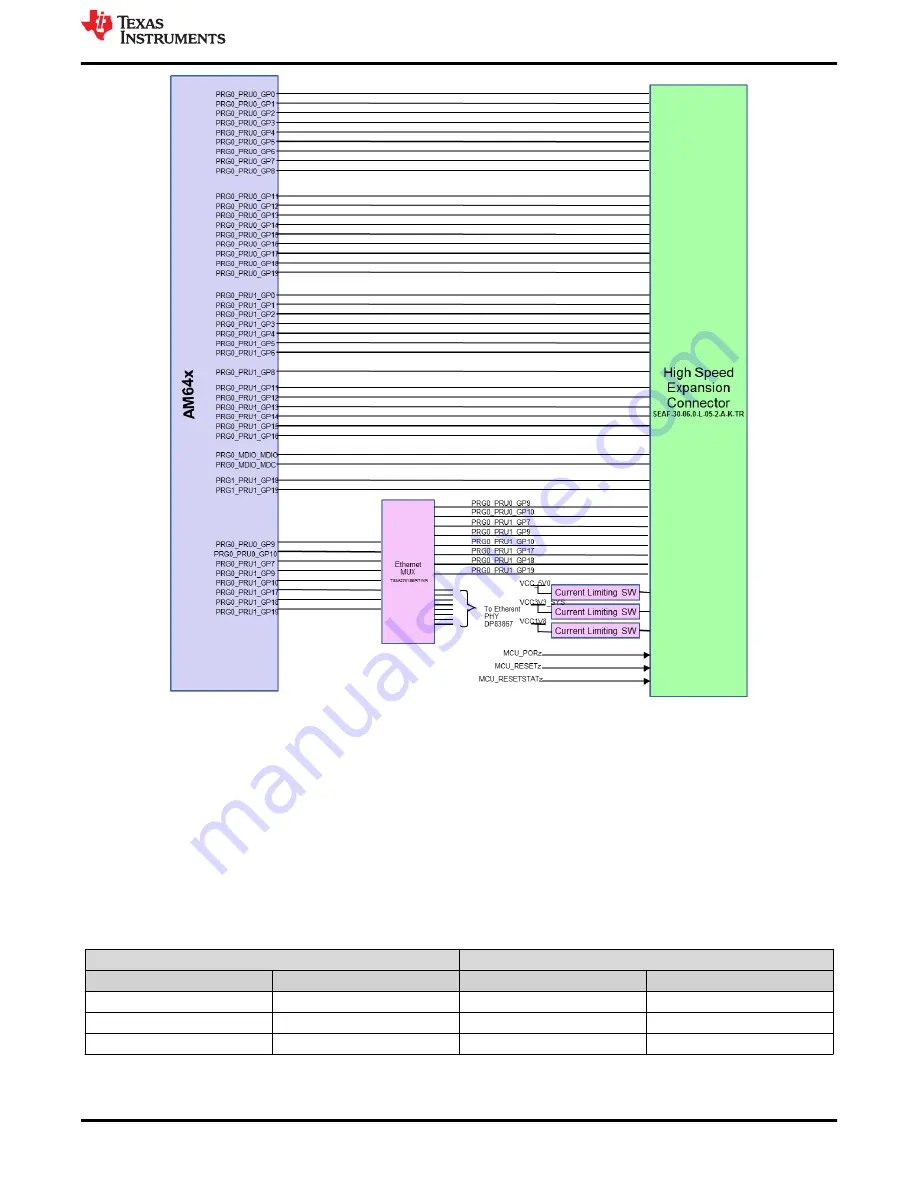
Figure 3-28. AM64x/AM243x High Speed Expansion Connector - Part 2

3.4.14 CAN Interface

The EVM includes two CAN interfaces. The MCAN0 and MCAN1 pins are muxed internally with UART4 and 
I2C3 respectively. These signals are connected to an on board MUX to route the signals to either the MCAN 
Transceiver or to the HSE connector, this MUX is controlled by the IO Expander. 

Figure 3-29

 depicts the 

implementation of CAN interface using TCAN1042HGV. RXD and TXD pins are connected to MCAN0_RX/
UART4_TXD and MCAN0_TX/UART4_RXD pins of AM64x respectively. STB pin of the IC is by default 
connected to ground to avoid IC entering stand-by mode. The STB pin is controlled by GPIO to enable Standby 
mode.

The pin-out of CAN connector is shown in 

Table 3-25

.

Table 3-25. CAN (J31 and J32) Pin-out

CAN0 J31

CAN1 J32

Pin No.

Signal

Pin No.

Signal

1

MCAN0_H

1

MCAN0_H

2

GND

2

GND

3

MCAN0_L

3

MCAN0_L

www.ti.com

System Description

SPRUJ63 – SEPTEMBER 2022

Submit Document Feedback

AM64x/AM243x EVM User's Guide

53

Copyright © 2022 Texas Instruments Incorporated

Summary of Contents for AM243x

Page 1: ...16 3 4 3 6 AM64x AM243x Power 17 3 4 4 Configuration 18 3 4 4 1 Boot Modes 18 3 4 5 JTAG 22 3 4 6 Test Automation 25 3 4 7 UART Interfaces 28 3 4 8 Memory Interfaces 29 3 4 8 1 DDR4 Interface 29 3 4...

Page 2: ...st Interface 43 Figure 3 25 AM64x AM243x PCIe Interface 44 Figure 3 26 AM64x AM243x High Speed Expansion Connector 51 Figure 3 27 AM64x AM243x High Speed Expansion Connector Part 1 52 Figure 3 28 AM64...

Page 3: ...43EVM is a standalone test development and evaluation module EVM that lets developers evaluate the AM64x AM243x functionality and develop prototypes for a variety of applications The EVM implements ei...

Page 4: ...FS silicon to customize keys and encryption for security applications 1 2 Inside the Box EVM Micro SD Card USB Cable Type A to Micro B for serial terminal logging Ethernet Cable Quick Start Guide Note...

Page 5: ...he PCB are provided in Figure 3 1 and Figure 3 2 for reference to major IC and connector component locations Figure 3 1 Top View of the AM64x AM243x EVM Board www ti com System Description SPRUJ63 SEP...

Page 6: ...erial Peripheral Interface SPI EEPROM 512 Mbit OSPI EEPROM 1 Mbit Inter Integrated Circuit I2C Boot EEPROM I O Interface One CPSW Gigabit Ethernet port and two Industrial Ethernet ports based on the G...

Page 7: ...appropriately sized DC barrel jack for your particular EVM revision as these have changed from the board known as TMDS64GPEVM A GP EVM Power Supply can be adapted to this revision by using an adapter...

Page 8: ...e 3 3 General Processor Board Functional Block Diagram Note Diagram is compatible with both the AM6442 MPU and the AM2434 MCU version of the system System Description www ti com 8 AM64x AM243x EVM Use...

Page 9: ...nrush currents and prevent possible damage to the AM64x AM243x EVM components the following EVM power on and power off procedures should be utilized 3 3 1 Power On Procedure 1 Place EVM power SW1 swit...

Page 10: ...photo above The following LED should be illuminated LD1 LD2 LD3 LD4 LD6 LD7 LD8 LD9 LD10 LD15 LD24 LD25 Note If using an AM243x EVM LD2 will not be illuminated 3 3 2 Power Off Procedure 1 Switch EVM...

Page 11: ...ce specific data sheet Table 3 1 Source Clock Selection for the Clock Buffer IN_SEL1 IN_SEL0 Clock Chosen Mount Unmount 0 0 EXT_REFCLK from SoC R40 R45 R248 R253 1 0 Oscillator input R253 R40 R45 R248...

Page 12: ...rovide reset for MCU_PORz MCU_RESETz and RESET_REQz Warm reset can also be applied through Test automation header or manual reset switches SW4 SoC and SW6 MCU MCU_PORz input can be applied though swit...

Page 13: ...erse polarity LD6 will be in ON status to indicate VMAIN power good Note The Switch SW1 does not turn of VMAIN It only disables the VCC_5V0 output of LM5140 from which all other power supplies are der...

Page 14: ...o Power Supply Test Point Voltage Top Side 1 VMAIN TP81 12 V 2 VCC_5V0 TP18 5 V 3 VCC3V3_PREREG TP12 3 3 V 4 VCC_3V3_SYS TP44 3 3 V 5 VDD_2V5 TP6 2 5 V 6 VDD_1V1 TP28 1 1 V 7 VDDA1V8 TP29 1 8 V 8 VDD_...

Page 15: ...4 VCC3V3_PREREG LD4 5 VCC_3V3_SYS LD9 6 VDD_2V5 LD1 7 VDD_1V1 LD10 8 VDDA1V8 LD8 9 VDD_CORE LD2 10 VCC_CORE LD7 11 VDD_2V8 LD25 12 VCC1V2_DDR LD3 Figure 3 6 Power Good LEDs www ti com System Descripti...

Page 16: ...r Down sequence of all the Power supplies present on the EVM Board Figure 3 7 Power ON and OFF Sequencing System Description www ti com 16 AM64x AM243x EVM User s Guide SPRUJ63 SEPTEMBER 2022 Submit D...

Page 17: ...r providing single voltage supply or different voltage supply to the SoC Core and SoC Array Core and other Array Core Voltages and based requirement This can be configured by the placement of resistor...

Page 18: ...uration 3 4 4 1 Boot Modes The boot mode for the EVM is defined by either a bank of switches SW2 and SW3 or by the I2C buffer U96 connected to the test automation connector J38 All the boot mode pins...

Page 19: ...ODE pins provide means to select the boot mode before the device is powered up They are divided into the following categories Note The following bit pattern is reversed in the table from the switch or...

Page 20: ...SVD BOOTMODE 6 3 This provides primary boot mode configuration to select the requested boot mode after POR that is the peripheral memory to boot from Table 3 9 Boot Device Selection BOOTMODE 6 3 SW2 7...

Page 21: ...de that is the peripheral memory to boot from if primary boot device failed Table 3 11 Backup Boot Mode Selection BOOTMODE 12 10 SW3 2 SW3 1 SW2 8 Backup Boot Device Selected off off off None No backu...

Page 22: ...ct these signals to the HSE or Trace connector as mentioned in the Table 3 13 The pinout of TI20 pin connector and MIPI60 pin connector are given in Table 3 13 and Table 3 15 respectively Table 3 13 S...

Page 23: ...Figure 3 11 JTAG Interface www ti com System Description SPRUJ63 SEPTEMBER 2022 Submit Document Feedback AM64x AM243x EVM User s Guide 23 Copyright 2022 Texas Instruments Incorporated...

Page 24: ..._TRC_DAT12 14 NC 44 NC 15 DGND 45 MIPI_TRC_DAT13 16 DGND 46 NC 17 MIPI_TRC_CTL 47 MIPI_TRC_DAT14 18 MIPI_TRC_DAT19 48 NC 19 MIPI_TRC_DAT00 49 MIPI_TRC_DAT15 20 MIPI_TRC_DAT20 50 NC 21 MIPI_TRC_DAT01 5...

Page 25: ...tion header is connected to an I2C IO expander which can drive the Boot mode pins of the processor Note The bootmode selection switches should be in the OFF condition and GPIO3 should be set to logic...

Page 26: ...Figure 3 12 Test Automation Header System Description www ti com 26 AM64x AM243x EVM User s Guide SPRUJ63 SEPTEMBER 2022 Submit Document Feedback Copyright 2022 Texas Instruments Incorporated...

Page 27: ...25 DGND Ground 26 TEST_POWERDOWN Input 27 TEST_PORz Input 28 TEST_WARMRESETn Input 29 NC NA 30 TEST_GPIO1 Bidirectional 31 TEST_GPIO2 Bidirectional 32 TEST_GPIO3 Input 33 TEST_GPIO4 Input 34 DGND Gro...

Page 28: ...htm The FT_Prog has three modes of operation Idle Mode Program Mode and Edit Mode FT_Prog programming parameters can be saved in files referred as EEPROM templates Once defined these EEPROM templates...

Page 29: ...ake one x16 The DDR memory is mounted on board single chip The placement and routing of the DDR4 device will be point to point with VTT termination The DDR4 requires 1 2V and thus reduces power demand...

Page 30: ...s a circuit to generate the uSD voltage based on IO level negotiation with the uSD card For high speed cards ROM code of the SoC attempts to find the fastest speed that the card and controller can sup...

Page 31: ...OSPI0_LBCLK from SoC Mount R600 and R591 and DNI R601 and R592 Note For more information see the OSPI and QSPI Board Design and Layout Guidelines section in the AM64x Sitara Processors Data Manual OS...

Page 32: ...able EEPROM memory are preprogrammed with identification information for each board The remaining 32509 bytes are available to the user for data or code storage Table 3 18 Board ID Memory Header Infor...

Page 33: ...RX port is also multiplexed with PRG0 signals a mux is needed to select the path from the SoC to this PHY in CPSW mode or to the HSE connector PRG0 mode The selection is done using a GPIO from the 24...

Page 34: ...t is that it should support both RGMII and MII modes without the use of CRS and COL signals as they are multiplexed with the CPSW_RGMII1 used for the first PHY Hence the same DP83869 48pin PHY is used...

Page 35: ...resistor strapping generates four distinct voltages ranges The resistors are connected to the RX data pins which are normally driven by the PHY and are inputs to the AM64x AM243x The voltage range fo...

Page 36: ...MII1 ICSSG2 Description PHY Address RX_D1 PHY_AD3 3 1 3 1 ICSSG1 PHY Address 00011 PHY_AD2 3 1 3 1 RX_D0 PHY_AD1 0 0 3 1 ICSSG2PHY Address 01111 PHY_AD0 0 0 3 1 Modes of Operation RX_CNTL Mirror Enabl...

Page 37: ...LEDS_CFG1 11 18 register bits in the DP83869 device LED_2 is also a strap pin which is having internal pulldown resistor to set RGMII TX Clock Skew in the DP83867 device and to select Auto Negotiatio...

Page 38: ...4x AM243xEthernet Interfaces CPSW Ethernet Strap Settings System Description www ti com 38 AM64x AM243x EVM User s Guide SPRUJ63 SEPTEMBER 2022 Submit Document Feedback Copyright 2022 Texas Instrument...

Page 39: ...x AM243x Ethernet Interfaces ICSSG1 Ethernet Strap Settings www ti com System Description SPRUJ63 SEPTEMBER 2022 Submit Document Feedback AM64x AM243x EVM User s Guide 39 Copyright 2022 Texas Instrume...

Page 40: ...Ethernet Strap Settings Note Resistors that are highlighted by red color box are DNI components System Description www ti com 40 AM64x AM243x EVM User s Guide SPRUJ63 SEPTEMBER 2022 Submit Document Fe...

Page 41: ...rnet activity Additionally there are eight LED s that are connected to an IO Expander which is controlled by the SoC via the I2C1 port These eight LED can be toggled based on the user application Figu...

Page 42: ...1 1 X 3 5 mm The display is connected to the 14 Pin FPC connector on the EVM having part number 10051922 1410ELF from Amphenol ICC and the pin details are mentioned in Table 3 21 Table 3 21 Display Co...

Page 43: ...ex operation or endpoint operation with a cross over cable SoC_I2C1 is used for control purpose The link activation signal from PCIe connectors is pulled up to VCC3V3_SYS Clock SERDES REFCLK is routed...

Page 44: ...2V VDD_12V 12V VDD_12V 4 GND GROUND GND GROUND 5 JTAG2 TP SMCLK SoC_I2C1_CLK 6 JTAG3 TP SMDATA SoC_I2C1_SDA 7 JTAG4 TP GND GROUND 8 JTAG5 TP 3V3 VCC3V3_SYS 9 3V3 VCC3V3_SYS JTAG1 TP 10 3V3 VCC3V3_SYS...

Page 45: ...part number 67997 410HLF from Amphenol ICC FCI These signals are muxed so that they are available to both the FSI connector and the expansion connector FSI_TX0 signals and FSI_RX0 signals are connect...

Page 46: ...GPI4 PRG0_RGMII1_RX_CTL PRG0_PWM2_B0 GPIO1_4 GPMC0_A1 UART3_TXD A14 AA3 PRG0_PRU0GPO12 PRG0_PRU0_GPI12 PRG0_RGMII1_TD1 PRG0_PWM0_A0 GPIO1_12 GPMC0_A14 A15 AA4 PRG0_PRU1GPO16 PRG0_PRU1_GPI16 PRG0_RGMII...

Page 47: ...1 UART2_RTSn EHRPWM_TZn_IN0 TRC_DATA0 GPIO0_17 PRG0_PWM2_TZ_IN BOOTMODE02 C15 U19 GPMC0_AD5 FSI_RX3_D1 UART3_RTSn EHRPWM1_A TRC_DATA3 GPIO0_83 PRG0_PWM2_A1 BOOTMODE05 C16 DGND C17 DGND C18 DGND C19 DG...

Page 48: ...1 A15 SOC_SPI1_MISO EHRPWM6_B GPIO1_51 B2 B15 SOC_SPI1_MOSI EHRPWM6_SYNCO GPIO1_50 B3 DGND B4 R1 PRG0_PRU1GPO8 PRG0_PRU1_GPI8 PRG0_PWM2_TZ_OUT GPIO1_28 EQEP2_S UART4_RTSn B5 DGND B6 DGND B7 T1 PRG0_PR...

Page 49: ...I_REF_CLK PRG0_IEP0_EDIO_DATA_IN_OUT29 GPIO1_10 UART3_RXD B30 DGND D1 B14 SOC_SPI1_CS0 EHRPWM6_A GPIO1_47 D2 D14 SOC_SPI1_CS1 CPTS0_TS_SYNC I2C2_SDA PRG1_IEP0_EDIO_OUTVALID UART6_TXD ADC_EXT_TRIGGER1...

Page 50: ...1 D27 P5 HSE_PRG0_PRU1_GPO18 PRG0_PRU1_GPI18 PRG0_IEP1_EDC_LATCH_IN0 PRG0_PWM1_TZ_IN MDIO0_MDIO RMII1_TX_EN EHRPWM7_A GPIO1_38 PRG0_ECAP0_SYNC_IN D28 W6 HSE_PRG0_PRU0_GPO9 PRG0_PRU0_GPI9 PRG0_UART0_CT...

Page 51: ...U1_GPO10 PRG0_PRU1_GPI10 PRG0_UART0_TXD PRG0_PWM2_TZ_IN RGMII1_RD2 RMII1_TXD0 PRG0_IEP0_EDIO_DATA_IN_OUT31 GPIO1_30 EQEP1_I UART6_RXD E28 DGND E29 DGND E30 B21 MCU_PORZ Figure 3 26 AM64x AM243x High S...

Page 52: ...7 AM64x AM243x High Speed Expansion Connector Part 1 System Description www ti com 52 AM64x AM243x EVM User s Guide SPRUJ63 SEPTEMBER 2022 Submit Document Feedback Copyright 2022 Texas Instruments Inc...

Page 53: ...erface using TCAN1042HGV RXD and TXD pins are connected to MCAN0_RX UART4_TXD and MCAN0_TX UART4_RXD pins of AM64x respectively STB pin of the IC is by default connected to ground to avoid IC entering...

Page 54: ...t input can be applied though switch SW7 3 4 16 ADC Interface A 20 pin connector J3 of part number TSW 110 07 S D for connecting ADC signals of the AM64x AM243x The connector includes ADC0_AIN0 7 VDDA...

Page 55: ...24 CONN_MCU_PORZ 3 4 18 SPI Interfaces SPI0 A 1Kbit SPI EEPROM 93LC46B is interfaced to SPI0 port of the AM64x AM243x It is used for testing purposes SPI1 This interface is routed to the HSE Connecto...

Page 56: ...lave operation Pin outs of I2C test header is given in Table 3 29 Table 3 29 I2C Test Header J4 Pin out Pin No Signal 1 SoC_I2C1_SCL 2 SoC_I2C0_SDA 3 DGND 4 INA_ALERT 5 NC 3 MAIN_I2C3 This is connecte...

Page 57: ...rolled by GPIO from IO Expander A logic low in Mux select pin connects port A and Port B1 whereas a logic high connects A port to B2 port The default state of mux drives the signals from A port to B1...

Page 58: ...Figure 4 1 AM64x AM243x EVM Modification Label Location 4 1 Issue 1 Embedded XDS110 Connection to AM64x Target in CCS Applicable EVM Revisions All Issue Description On some EVM the embedded XDS110 U5...

Page 59: ...n toggle TRSTSN through the XDS110 debug command line utility xds110reset found in the CCS XDS110 utility directory In the Windows OS installation for a default installation of CCS version 10 11 this...

Page 60: ...ument should be followed when applying or removing power from the board Furthermore ensure you are using the recommended part number for your EVM Revision as outlined in the Power Supply section of Se...

Page 61: ...change without notice TI grants you permission to use these resources only for development of an application that uses the TI products described in the resource Other reproduction and display of thes...

Reviews: