background image

41

42

How to Flash Firmware

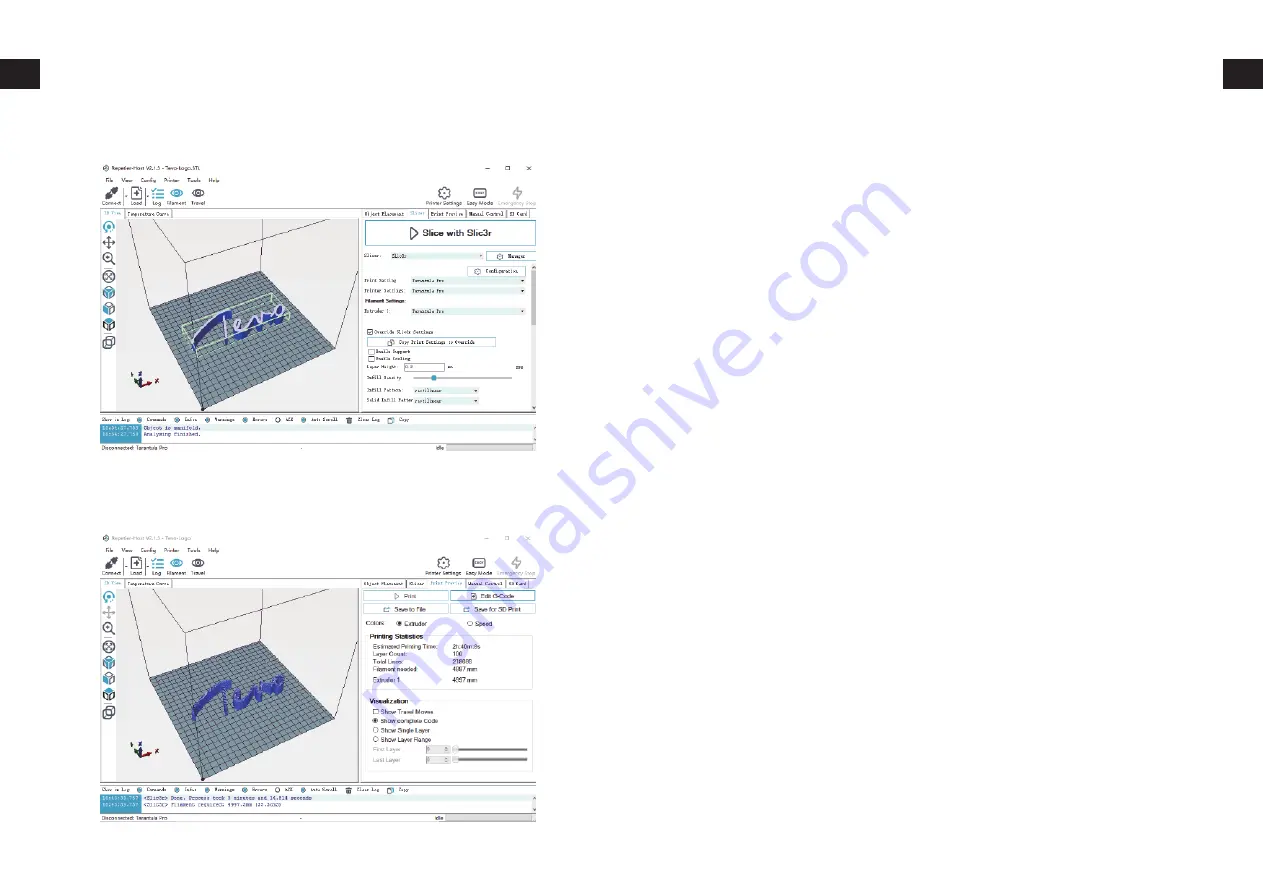
How to Slice 3D Object for SD Print

To install firmware on your printer, you’ll need to download the following:

In this chapter, we’re going to use Marlin for demonstration.

Configuration downloaded from our Facebook page, customer 

service, or software download page are pre-configured, you can use 

it without any modification. We’re not going to go into details how to 

configure from scratch.

To start the process, do the following steps:

Choose the config saved in previous step. Then click on 

Slice with 

Slic3r.

After slicing, click on Save for SD Print to save the G-code file to the 

SD card with file name of your choice. Then you can insert the card 

to your printer and choose Print from SD to start printing.

Arduino IDE (http://www.arduino.cc)

Firmware Source Code (You can get it from many sources, e.g. 

our Facebook Page Files section, our Customer Service, Soft-

ware Download page on http://www.tevo.cn, or from Marlin 

directly.)

1.

2.

1.

2.

3.

4.

5.

6.

7.

Connect your printer to your computer with USB cable supplied.

Double-click 

Flash.ino

 (or 

Marlin.ino

) file to open it in Arduino 

IDE.

Select 

Arduino/Genuino


Mega or Mega 2560

 from 

Tools

 -> 

Boards menu.

Select the serial (USB) port that your board is connected to in 

Tools -> 

Serial Port 

menu.

Click on 

Verify/Compile

 button at the top of the window to 

make sure there are no configuration errors. (If failed to compile, 

please make sure you are using Arduino IDE 1.8.5 or up.)

After it compile successfully, click on 

Upload

 button.

Waiting for Arduino IDE to show Done uploading.

Summary of Contents for Tarantula Pro

Page 1: ......

Page 2: ...s including the belts pulleys gears wheels or leadscrews Static Charge Make sure to ground yourself before touching the printer especially the electronics Electrostatic charges can damage electronic c...

Page 3: ...olution Build speed Travel speed MK3 Heat Bed Heat bed type PC Platform 1 75mm PLA Flexible PLA Wood PVA FFF Fused Filament Fabrication Print surface Filament diameter Supported materials Print techno...

Page 4: ...1 56 01696A Metal panel for Y axis 1 SKU Item Pcs Label A 02 Screw bag 56 00304A M3x4 Bolt 8 56 01208A M3x10 Spacer 4 56 00374A M4x6 Bolt 5 56 00003A M4 T nut 4 09 01080A LCD wire 10pin 0 4m 2 LCD bu...

Page 5: ...bolt M C 2 53 01338A Spacer 4 2x7mm 6mm length 1 56 00274A M4 NUT 1 SKU Item Pcs Label B 04 1 Screw bag SKU Item Pcs Label B 04 2 Screw bag 59 00005A V wheel 24mm 3 53 00671A Spacer 5x8mm 7mm length 2...

Page 6: ...ttention for right orientation of the profiles and the round slots Those round slots are meant to countersunk bolts so that bolt head will be hidden Assembly of the bottom frame A 01 Assembly of the b...

Page 7: ...03 and bag A 03 Prepare the front panel as shown and then slide it in frame you can find these items from slot A 02 and A 02 bag Front panel assembly A 02 4 x M3x4 bolt 4 x M4x6 bolt 1 x knob 4 x T nu...

Page 8: ...as in picture Tighten the two bolts which have 6mm spacers gently but leave the two eccentric nut bolts slightly loose so that eccentric nuts turn easily The parts for this step are found from B 02 s...

Page 9: ...the bolts Loop the GT2 belt around idler and motor pulley and connect both ends to slots in heatbed carriage with zipties Last step is to tighten the belt which can be done by loosening slightly two...

Page 10: ...level These parts can be found from bag B 02 1 Slide the front panel in extrusions and tighten the M5 bolts in both sides of the front panel Hotbed assembly Controller PSU and front panel installatio...

Page 11: ...install the stepper motor pulley and limit switch to the endpiece Motor cable connector should face downwards From slot B03 and B03 1 bag The x motor s timing wheel distance around 17 5mm 19 20 X axis...

Page 12: ...and bag B 04 1 Install hotend carriage to extrusion and tighten the eccentric nut again as explained in the heat bed assembly Right side and hotend assembly B 04 Right side and hotend assembly B 04 3...

Page 13: ...the assembly to other side of extrusion as shown you can leave the M5x8 bolts slightly loose still as those will be tightened later in assembly Don t tighten the screws in case you need to adjust the...

Page 14: ...er this adjust again eccentric nuts so that Z axis moves smoothly and then tighten again the M5 nuts And as last step for X axis tighten the two M8x5 bolts on right side 25 26 Z axis assembly B07 Z ax...

Page 15: ...goes inside the coupler and then tighten the coupler holding screw 27 28 Install the motor bracket and coupler with O ring as shown and install then it to the Z axis extrusion as shown The parts are f...

Page 16: ...ightly so that stepper can move in the slots Install tightly the X axis belt and use zip ties to attach it to carriage and then you can use stepper to tighten the belt little more and then tighten the...

Page 17: ...nd holding plate and hotend assembly as shown in pictures Parts can be found from bag B 04 1 and slot B 04 Adjust the wheels locate in 4 corners and make the filament come out good as shown in picture...

Page 18: ...the following screen Now we have to set up our printer in the settings so that Repe tier Host can connect to it and will know what size of the build area our printer use Open the Printer Settings win...

Page 19: ...ate 15000 Manual Extrusion Speed 2 20 Manual Retraction Speed 30 Default Extruder Temperature 200 Default Heated Bed Temperature 55 Then click on OK to save the settings On Repetier Host main screen c...

Page 20: ...le You can download the latest version of the config file from http ww w tevo cn software download php Select the ini file and click on Open Click on the Gear icon next to Print settings Filament Prin...

Page 21: ...g Software Click on Load browse to location of the file to print then choose Open Or you can drop and drop the STL file to Repetier Host soft ware Click on Slicer tab on the right Click on Plater tab...

Page 22: ...rt the card to your printer and choose Print from SD to start printing Arduino IDE http www arduino cc Firmware Source Code You can get it from many sources e g our Facebook Page Files section our Cus...

Page 23: ...he wires Work Process Troubleshooting Cause Treatment Feedback Print from SD Y N File read Moving Bed is heated Nozzle is heated Wrong result Filament out E stepper is working Extruder is working Fila...

Page 24: ...o After Sales 2 GENERAL SUPPORT For information and support on building and operating your TEVO Tarantula pro 3D printer please visit TEVO Tarantula PRO Normal Prusa i3 Owners https www facebook com g...

Reviews: