background image

9


· 

Concept S SW + R Dolby Digital/dts

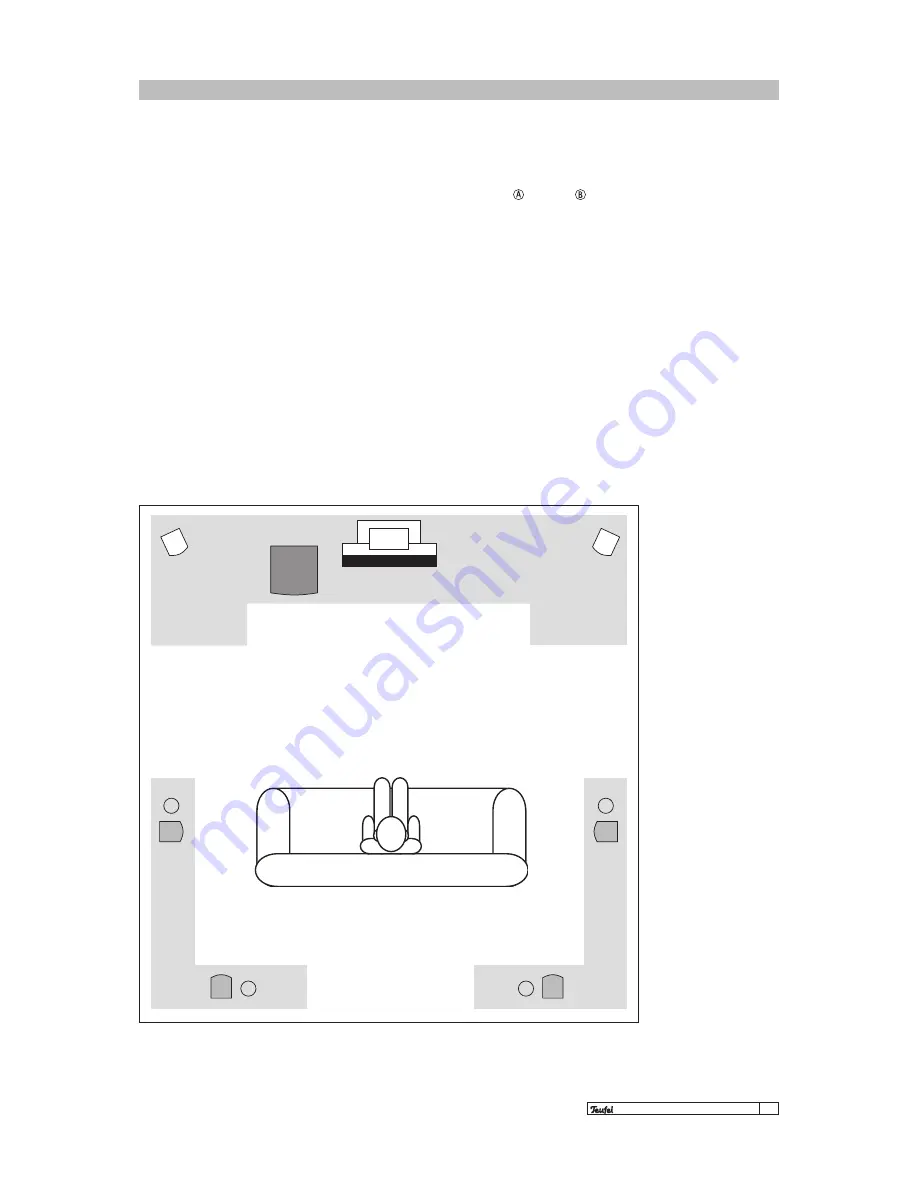
Setting up the 5.1 configuration

We recommend placing  

the subwoofer in the  

front grey area.

We recommend placing  

the rear speakers in the  

rear grey area.

Select position area  

A or B.

Rear 

The rear speakers should be set up to the left and 
right either to the side   or behind   the listen-
ing  location –  ideally  at  the  same  height  as  the 
front speakers, e.g. on a shelf or directly on the 

wall.  The  speakers  can  be  fixed  higher  than  the 

front speakers (up to 2.10 m); but we advise you 
not to position them lower.

We always recommend that the distance between 
the  rear  speakers  and  the  listening  location  is 
more than 1.00 m. But if you (have to) sit closer, 
please  ensure  that  the  front  of  the  speaker  is 
not  pointing  directly  at  you;  instead,  angle  the 
speakers more into the room. Or create a greater 
distance by positioning the speakers higher than 
1.20 m.

Rear

A

B

Rear

SW

Centre

Front

Front

Rear

A

B Rear

Front 

The  front  loudspeakers  are  placed  at  equal  dis-
tances to the right and left of the TV in old stereo 
fashion (distance to listener = distance between 
the left and right box) or attached to the wall. If 
the speakers have to be placed further out, you 
can easily turn them inwards and towards the lis-
tening location.

The  following  applies  if  the  front  speakers  are 

fixed  to  the  wall  or  placed  on  shelves:  select  a 

set-up  height  of  between  40  centimetres  and 
1.20 metres (lower edge). It is important that the 
centre  and  front  speakers  are  approximately  in 
a line, or possibly even on a slight arc to the TV. 
Otherwise the homogeneity of the playback may 
vary with run time differences. Setting the speak-
ers up in this way allows them to deliver their full 
sound potential.

Summary of Contents for Concept S SW + R

Page 1: ...5 1 channel active subwoofer with integrated Dolby Digital dts receiver Technical specifications and operating instructions...

Page 2: ...40 Fax 49 30 300 930 930 www teufelaudio com Complaints If you have a complaint it is essential that you provide the following information so that we can respond 1 Invoice number Found on the receipt...

Page 3: ...ear Page 11 Remote control Page 12 Operating elements Remote control Page 13 Connection Page 14 Signal sources with digital outputs Page 14 Signal sources with analogue outputs Page 15 Aerial Speakers...

Page 4: ...laid so that it is not likely to be stepped on or squashed from the sides or above by heavy objects Damaged cables must be replaced Pay particular attention to the cable plug connection the mains soc...

Page 5: ...W R Dolby Digital dts to provide sound in rooms up to 30m2 Before operation please read these instructions carefully and store them in a safe place for fu ture reference If you have any further questi...

Page 6: ...week right of return we ask you to retain the original packaging We can only accept returned speakers IN THE ORIGINAL PACKAGING Empty boxes are not available 3VHF FM auxiliary aerial 3Remote control...

Page 7: ...A purchase that will last a lifetime Teufel stereo RCA cable Doubled screened stereo RCA cable with gold plated connectors for common analogue attachments for example between CD players tuners receive...

Page 8: ...lways use our recommendations to experiment with what works best acoustically and optically Let your ears and eyes decide Setting up the 5 1 configuration Subwoofer The location of the subwoofer is fr...

Page 9: ...at you instead angle the speakers more into the room Or create a greater distance by positioning the speakers higher than 1 20 m Rear A B Rear SW Centre Front Front Rear A B Rear Front The front loud...

Page 10: ...l The inputs are selected in sequence each time you press the button Volume This increases the overall volume of the system Volume This decreases the overall volume of the system During operation the...

Page 11: ...alizer preamplifier to connect and operate an analogue record player T Speaker output Connect the two core speaker cables and to the five satellite speakers here Y Mains power switch When set to Off t...

Page 12: ...UTE OPT COAX VCR AUX 1 4 7 2 5 8 3 6 9 10 MEM PC STEREO MONO NIGHT MODE LISTEN MODE TEST C DELAY RESET TUNER S DELAY B A S S T R E B L E Balance L R VOLUME VOLUME O Channel I Scan W Mute U Mem Y Stere...

Page 13: ...orks with Dolby Digital dts Page 19 Test Initialises the test sound to equalise the speakers Page 18 Night Mode Activates reduced volume playback for Dolby Dig ital signals with sound adjustment at lo...

Page 14: ...tical Coaxial Digital connection cable coaxial Digital connection cable optical Optical out coaxial out The Concept S SW R Dolby Digital dts is perfectly suited for combination with a maximum of two o...

Page 15: ...uts the Concept S SW R DD dts has a total of three analogue in puts VCR Aux PC These can be used with the analogue devices of your choice This requires either a stereo cinch cable Aux VCR or 3 5 mm st...

Page 16: ...able e g a cable connection can be connected directly to the FM coax input instead of the sup plied auxiliary aerial Connecting the satellite speakers The speaker cable is used to connect the five sat...

Page 17: ...Coax VCR Aux PC Tuner You can set the desired overall volume using the Volume and buttons With the Concept S SW R DD dts it is possible to make all of the settings using the remote control To do this...

Page 18: ...o rear speakers and the subwoofer to the posi tions r and p on the remote control until the volume of these four speakers corresponds to the volume of the two front speakers Equalisation by ear requir...

Page 19: ...pplies In small rooms up to 20m2 set a delay value of 15 ms in medium sized rooms 20m2 35m2 set a delay value of 20ms and in large rooms over 35m2 set a delay value of 30ms Information The setting opt...

Page 20: ...MODE TEST C DELAY RESET TUNER S DELAY B A S S T R E B L E Balance L R VOLUME VOLUME E Playback Digital and analogue signal sources Listen mode Night mode The abbreviation St signifies stereo mode Ste...

Page 21: ...will keep going until it finds the next station Once you have used the Scan I button on the remote control to find the station of your choice press the MEM U button to select the desired memory space...

Page 22: ...ferent electricity supply in another room e g using an extension lead In addition try disconnecting the cable connection from the subwoofer to the connect ed devices in order to exclude the influence...

Page 23: ...ice another device re sponds to the subwoofer remote control As there are no fundamental regulations on the distribution of frequencies each manufacturer can work with the code of its choice Unfortu n...

Page 24: ...for playing back sounds from the satellites or subwoofer If for example you set a cut off frequency of 120 Hz all frequencies above 120 Hz are emitted by the satellites frequencies under 120 Hz are p...

Reviews: