background image

Location of Airbags

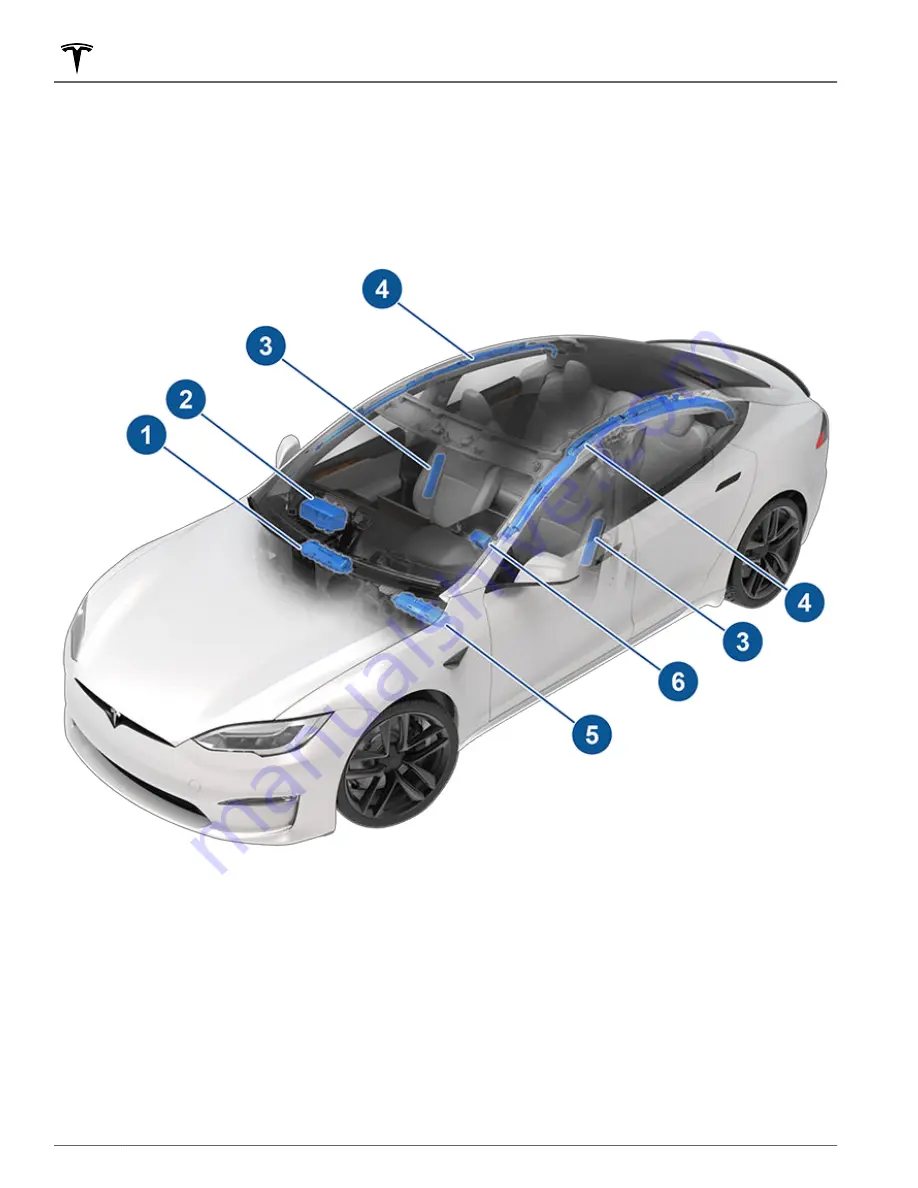
Airbags are located in the approximate areas shown below. Airbag warning information is printed on the sun visors.

Model S is equipped with an airbag and lap/shoulder belt at both front seating positions. The airbag is a 

supplemental restraint at those seating positions. All occupants, including the driver, should always wear their seat 
belts whether or not an airbag is also provided at their seating position to minimize the risk of severe injury or death 

in the event of a crash.

1.  Passenger knee airbag.

2.  Passenger front airbag.
3.  Side airbags.

4.  Curtain airbags.

5.  Driver’s knee airbag.

6.  Driver’s front airbag.

Airbags

38

MODEL S Owner's Manual

Summary of Contents for MODEL S 2021

Page 1: ...MODEL S 2021 OWNER S MANUAL Software version 2022 16 North America ...

Page 2: ...he touchscreen in your vehicle may appear slightly different All specifications and descriptions contained in this document are verified to be accurate at the time of printing However because continuous improvement is a goal at Tesla we reserve the right to make product modifications at any time To communicate any inaccuracies or omissions in this document please send an email to ownersmanualfeedb...

Page 3: ...s 111 Lane Assist 111 Collision Avoidance Assist 114 Speed Assist 117 Cabin Camera 118 Using the Touchscreen 119 Controls 119 Climate Controls 125 Maps and Navigation 131 Media 137 Entertainment 140 Phone and Calendar 143 Air Suspension 146 Voice Commands 148 Security Settings 150 Dashcam and Sentry Mode 151 HomeLink Universal Transceiver 154 Connecting to Wi Fi 156 Software Updates 157 Mobile App...

Page 4: ...About Autopilot on page 81 5 Exterior mirrors Mirrors on page 49 6 Hood Front trunk Front Trunk on page 18 7 Front rear tow eye cover Instructions for Transporters on page 201 8 Wheels and tires Wheels and Tires on page 193 9 Rear view camera Rear Facing Camera s on page 77 and About Autopilot on page 81 10 Rear trunk liftgate Rear Trunk on page 16 11 Ultrasonic sensors Park Assist on page 68 and ...

Page 5: ...age 47 Horn Horn on page 47 Wipers Wipers and Washers on page 63 Voice Commands Voice Commands on page 148 5 Touchscreen Touchscreen Overview on page 5 6 Camera Cabin Camera on page 118 7 Cabin climate control Climate Controls on page 125 8 Power window switches Opening and Closing on page 15 9 Manual door release Doors on page 13 10 Seats Front and Rear Seats on page 26 11 Brake pedal Braking and...

Page 6: ...r Touchscreen on page 7 2 USB ports USB Ports on page 21 3 Adjustable climate control vents Climate Controls on page 125 4 Console release button Second Row Console on page 21 5 Cup holders Second Row Console on page 21 6 Wireless phone chargers Wireless Phone Chargers on page 23 7 Rear armrest Second Row Console on page 21 Interior Overview 4 MODEL S Owner s Manual ...

Page 7: ...llustrations are provided to improve conceptual understanding only Depending on vehicle options software version market region and regional and language settings the details displayed on the screen will differ 1 Navigation Change the orientation of the map find or navigate to a destination and change navigation settings see Maps and Navigation on page 131 2 Drive mode strip Use to shift into Park ...

Page 8: ...ommands appear when in use If applicable touch options from these popup messages for example accept decline a phone call choose an option from the headlight menu etc To dismiss a popup message swipe it downward The bottom of the touchscreen may also display the following Displays the status of the front passenger airbag see Airbags on page 38 Customizing My Apps For one touch access to commonly us...

Page 9: ...the currently playing song see Media on page 137 5 Video Access video streaming services 6 Volume Touch to adjust the volume NOTE Adjusting the temperature media and volume controls adjusts the front cabin settings also You can lock the rear touchscreen by touching Controls Display Lock Rear Display Locking the rear display stops any media and video apps from playing and all touches are ignored un...

Page 10: ... settings are enabled Bluetooth is enabled within your phone s settings for the Tesla mobile app For example on your phone navigate to Settings choose the Tesla mobile app and ensure the Bluetooth setting is turned on Access to your location is enabled Open the Tesla mobile app in your phone s settings and select Location Always For the best experience keep the mobile app running in the background...

Page 11: ...All Single click to lock doors and trunks all doors and trunks must be closed Double click to unlock doors and trunks 3 Front trunk Double click to unlatch the front trunk Once inside power up Model S by pressing the brake pedal within two minutes of pressing the unlock button on the key fob see Starting and Powering Off on page 51 If you wait longer than two minutes you must press the unlock butt...

Page 12: ...and extend the handle When carrying your key fob with you you can also open the trunk without having to use the key by pressing the liftgate s exterior switch If Walk Away Door Lock is enabled Model S automatically locks when you exit and the key fob is no longer in range see Walk Away Door Lock on page 14 Passive locking and unlocking is automatically enabled when you pair your key fob to Model S...

Page 13: ...ey fobs that can access your Model S touch Controls Locks An icon displays next to each key to indicate whether the key is a phone key key card or key fob Use this list to manage keys that have access to your Model S To add or delete keys see Adding and Removing Keys on page 11 Model S supports up to 19 keys When you reach this limit you must delete a key before adding a new one NOTE You can use t...

Page 14: ... to remove it 1 On the touchscreen touch Controls Locks 2 In the key list find the key that you would like to delete and touch its associated trash icon 3 When prompted scan an authenticated key card or key fob on the card reader to confirm the deletion When complete the key list no longer includes the deleted key NOTE Model S requires at least one authenticated key card or key fob at all times If...

Page 15: ...earby In these cases extend a door handle by pressing it or by pressing the unlock button on the key fob There is no need to reset the setting The next time you approach Model S provided the above conditions do not apply handles automatically extend Opening Doors from the Interior Model S doors are electrically powered To open a door while sitting inside press the button located at the top of the ...

Page 16: ...u check the Exclude Home checkbox and Model S is parked at the location you have designated as Home For details on how to designate a location as Home see Home Work and Favorite Destinations on page 133 A phone key or paired key fob is detected inside Model S A door or trunk is not fully closed The phone key s Bluetooth setting is turned off Key fob or phone key remains within range for five minut...

Page 17: ...n Lock When enabled your vehicle automatically closes the windows when Model S locks NOTE See Cold Weather Best Practices on page 79 for information on preparing windows for cold weather CAUTION To avoid damage windows automatically lower slightly when you open or close a door If you manually raise a window when the door is open ensure it is slightly lowered before closing the door WARNING Before ...

Page 18: ...gate check the surrounding area for people and objects You must proactively monitor the liftgate to ensure that it does not come into contact with a person or object Failure to do so may result in damage or injury Closing To close the liftgate do one of the following Touch Controls Trunk Double click the rear trunk button on the key fob Press the switch located on the underside of the liftgate see...

Page 19: ... You can then fold the cargo cover forward or remove it from Model S Secure all cargo before moving Model S and place heavy cargo in the upper trunk compartment Distribute cargo weight between the front and rear trunks CAUTION Never load more than 175 lbs 80 kg in the upper compartment of the rear trunk or more than 175 lbs 80 kg in the lower compartment Doing so can cause damage Rear Trunk 17 Ope...

Page 20: ...he latches 2 Place both hands on the front of the hood in the areas shown in green then press down firmly to engage the latches 3 Carefully try to lift the front edge of the hood to ensure that it is fully closed CAUTION To prevent damage Apply pressure only to the green areas shown Applying pressure to the red areas can cause damage Do not close the hood with one hand Doing so applies concentrate...

Page 21: ...event that Model S has no low voltage power you will be unable to open the front trunk using the touchscreen key fob or mobile app To open the front trunk in this situation NOTE The following steps do not open the front trunk if Model S is locked and has low voltage power 1 Locate an external low voltage power supply such as a portable jump starter 2 Release the tow eye cover by pressing firmly on...

Page 22: ...d latches are immediately released and you can now open the hood to access the front trunk area 7 Disconnect both cables beginning with the black negative cable 8 If pulling the vehicle onto a flatbed truck do not replace the tow eye cover yet If necessary install the tow eye cover by inserting the wires into the tow eye opening and aligning the tow eye cover into position and snapping it into pla...

Page 23: ...sing the latch on the underside of it and pulling it up Glovebox To open the glovebox touch Controls Glovebox The glovebox automatically opens and the light turns on To close the glovebox push it upward until it latches into the closed position For additional glovebox security touch Controls Safety Glovebox PIN to set a 4 digit PIN see Glovebox PIN on page 150 NOTE If you leave the glovebox open i...

Page 24: ...ith the mobile app etc Leaving an accessory plugged in does not deplete the low voltage battery NOTE Use USB 3 0 compliant cables to connect a device to a USB port Using non compliant cables can result in slower charging potential connection problems or degraded performance NOTE Do not connect multiple devices using a USB hub This can prevent connected devices from charging or from being recognize...

Page 25: ... Controls Sentry Viewing Video Recordings You can view recorded footage on the touchscreen when Model S is in Park Touch the Dashcam icon located in the app launcher or the Dashcam icon on the Controls screen Touch the menu icon in the top corner of the screen The tabs display a list of all video clips organized by location and timestamp Pause rewind fast forward and delete video recordings as nee...

Page 26: ...ugged in does not deplete the low voltage battery WARNING The power socket and an accessory s connector can become hot WARNING To prevent excessive interference with the vehicle s electronics Tesla recommends that you do not plug any non Tesla accessories including power inverters into the low voltage power socket However if you do use a non Tesla accessory and notice any malfunctions or unexpecte...

Page 27: ...ng time to calibrate before enabling NOTE To ensure active noise reduction operates effectively avoid covering the microphones with seat covers etc Active Road Noise Reduction may disable if a window is rolled down door is open or the fan is turned up CAUTION To prevent damage to these microphones when cleaning do not over saturate the area of the seats where the microphones are located Interior S...

Page 28: ...e belt tightly across your hips not across your stomach Model S front seats include integrated head supports that cannot be adjusted or removed Adjusting the Front Seats 1 Move seat forward backward and adjust the seat s height and tilt angle up down 2 Adjust backrest 3 Adjust lumbar support WARNING Before adjusting a front seat check that the area around the seat is free of obstacles people and o...

Page 29: ...he backrest or caught in the seat latch WARNING Always ensure that the seats are locked in their upright position by attempting to push it forward or rearward ensuring the latch is fully engaged Failure to do so can increase the risk of injury Head Supports The front seats include integrated head supports that you cannot adjust The rear outboard seating positions include an adjustable head support...

Page 30: ...pain is limited because of diabetes age neurological injury or some other condition should exercise caution when using the climate control system and seat heaters Seat Covers WARNING Do not use seat covers in Model S Doing so could restrict deployment of the seat mounted side air bags if a collision occurs Seat covers can also interfere with the occupant detection system that is used to determine ...

Page 31: ...rs the seat belt reminder alert To mute the reminder touch the associated seat on the seat belt reminder popup message that displays on the touchscreen when a seat belt reminder is active When a reminder is muted the seat belt reminder icon is replaced by a seat icon Touch the seat again to unmute the reminder The reminder is disabled for the current drive only WARNING Seat belts must be worn by p...

Page 32: ...ot present WARNING Once the seat belt pre tensioners have been activated they must be replaced After any collision have the airbags seat belt pre tensioners and any associated components checked and if necessary replaced Testing Seat Belts To confirm that seat belts are operating correctly perform these three simple checks on each seat belt 1 With the seat belt fastened give the webbing nearest th...

Page 33: ...spected or replaced by Tesla even if damage to the assembly is not obvious WARNING Seat belts that show signs of wear such as fraying or have been cut or damaged in any way must be replaced by Tesla WARNING Avoid contaminating a seat belt s components with any chemicals liquids grit dirt or cleaning products If a seat belt fails to retract or latch into the buckle it must be replaced immediately C...

Page 34: ...Airbag Off indicator displays on the touchscreen when the passenger front airbag is OFF When the passenger front airbag is OFF it does not inflate when a collision occurs This indicator does not display when the seat is unoccupied To protect an adult occupying the front passenger seat always double check the passenger front airbag to confirm that it is ON WARNING Always ensure that all Model S sea...

Page 35: ...lable allow children to ride rear facing using the child safety seat s integrated 5 point harness for a longer period of time BASED UPON SPECIFIC HEIGHT AND WEIGHT LIMITS Keep your child in a rear facing seat for as long as possible CHECK THE CHILD SAFETY SEAT MANUFACTURER S INSTRUCTIONS AND CAREFULLY FOLLOW ALL INSTRUCTIONS LATCH Lower Anchors and Tethers for Children and ISOFIX are international...

Page 36: ... preventing the seat belt from extending any further until it has been completely rewound When installing a child safety seat with integrated restraints engage the belt s automatic locking retractor by pulling the seat belt webbing until it is fully extended The ALR system engages only when the seat belt is at its maximum extension point The automatic locking retractor ALR feature is not used for ...

Page 37: ...turer of the child restraint system The instructions describe how to slide the child restraint system onto the seat s anchor bars until you hear it click into place You may need to push the child restraint system firmly against the seat back to ensure it fits snugly The flap if equipped remains open when the child seat is installed Adjust until the child restraint system is fitted firmly against t...

Page 38: ...d safety seat WARNING USE ONLY SEAT BELT RETAINED CHILD SAFETY SEATS IN THE CENTER SEATING POSITION For dual strap tethers position the straps as shown Position single strap tethers for the outboard seating positions to run on the outside of the head support Position a single strap in the center seating position to run over the top of the seat as illustrated NOTE To prevent the single strap tether...

Page 39: ...egrated 5 point harness for as long as possible WARNING Do not use seat belt extenders on a seat belt that is being used to install a child safety seat or booster seat WARNING When seating larger children make sure the child s head is supported and the child s seat belt is properly adjusted and fastened The shoulder portion of the belt must be away from the face and neck and the lap portion must n...

Page 40: ...bag is a supplemental restraint at those seating positions All occupants including the driver should always wear their seat belts whether or not an airbag is also provided at their seating position to minimize the risk of severe injury or death in the event of a crash 1 Passenger knee airbag 2 Passenger front airbag 3 Side airbags 4 Curtain airbags 5 Driver s knee airbag 6 Driver s front airbag Ai...

Page 41: ...f airbags Front airbags The front airbags are designed to reduce injuries if larger children or adults are riding in the front seats Follow all warnings and instructions related to seating a child on the front passenger seat if permitted in your market region Knee airbags Knee airbags and the front airbags work together The knee airbags limit the forward motion of the front seat occupants by restr...

Page 42: ... accurate status of the front passenger airbag As a result when you first power on Model S even in situations when it should be OFF because the seat is occupied by a weight of 20 lbs 9 kg or less a delay of approximately six seconds can occur before the touchscreen displays the PASS AIRBAG OFF status If it fails to do so contact Tesla Service and do not seat a child in the front passenger seating ...

Page 43: ...ed under the seat or wedged between the seat back and cushion Heavy objects sitting on the seat briefcase large purse Cargo interfering with the seat Aftermarket items attached to or placed between the seat and the occupant such as covers mats blankets etc These conditions can interfere with the occupancy sensor If you have eliminated the above possibilities and the airbag status is still incorrec...

Page 44: ...voltage power Airbag Warning Indicator The airbag indicator on the instrument cluster remains lit if the airbag system is malfunctioning The only time this indicator should light up is briefly when Model S first powers up in which case it turns off within a few seconds If it remains lit contact Tesla immediately and do not drive Airbag Warnings WARNING Do not place objects over or near airbags bec...

Page 45: ...t airbag can cause serious injury or death WARNING To ensure correct inflation of the side airbags maintain an unobstructed gap between an occupant s torso and the side of Model S WARNING Passengers shouldn t lean their heads against doors Doing so can cause injury if a curtain airbag inflates WARNING Do not allow passengers to obstruct the operation of an airbag by placing feet knees or any other...

Page 46: ...by the most recent driver profile or based on the key if it s linked to a driver profile To use Easy Entry with a driver profile ensure the Use Easy Entry box is checked WARNING Never use Easy Entry to move the driver s seat to the full rearward position when a child safety seat is installed on a rear seat located behind the driver s seat With reduced clearance the movement of the seat may impact ...

Page 47: ...to start and cancel Valet mode provided Model S is in Park When using the mobile app you do not need to enter a PIN because you are already required to log into the app using your Tesla Account credentials NOTE If the PIN to Drive setting is enabled see PIN to Drive on page 150 you must enter the driving PIN before you can define or enter a Valet PIN Once in Valet mode Model S can be driven withou...

Page 48: ... Yoke Buttons Your Model S features stalkless driving in which all controls you need when driving are accessible on the steering yoke 1 Right turn signal see Turn Signals on page 57 2 High beam headlights see High Beam Headlights on page 56 3 Left turn signal see Turn Signals on page 57 4 Left scroll button see Left Scroll Button on page 46 5 Horn see Horn on page 47 6 Identifier that is always il...

Page 49: ...e of the steering yoke to control Autopilot features such as Autosteer and Traffic Aware Cruise Control When driving push and release the button to engage Autosteer or Traffic Aware Cruise Control see Autosteer on page 88 If Autosteer Activation is set to Double Click touch Controls Autopilot Activation Autosteer Activation a single push engages Traffic Aware Cruise Control see Traffic Aware Cruis...

Page 50: ...Steering Yoke 48 MODEL S Owner s Manual ...

Page 51: ...rors dim automatically for example in low light conditions or to reduce glare when driving at night To enable or disable this feature touch Controls Mirrors Mirror Auto Dim Folding Mirrors at Specific Locations In addition to having mirrors fold automatically whenever you park Model S you can fold and unfold mirrors anytime your driving speed is less than 31 mph 50 km h This is useful for parking ...

Page 52: ...rear view mirror is adjusted manually When in Drive or Neutral the rear view mirror automatically dims in low lighting conditions based on the time of day for example when driving at night Mirrors 50 MODEL S Owner s Manual ...

Page 53: ...ng requires authentication If you see this message place the key card in either phone dock where the RFID transmitter can read it The two minute authentication period restarts and you can start Model S by pressing the brake pedal A number of factors can affect whether Model S can detect a phone key or key fob for example the device s battery is low or dead and is no longer able to communicate usin...

Page 54: ...so activates the drive mode selector on the center console NOTE Restarting the touchscreen using the scroll buttons does not power Model S off and on Power Cycling the Vehicle You can power cycle Model S if it demonstrates unusual behavior or displays a nondescript alert 1 Shift into Park 2 On the touchscreen touch Controls Safety Power Off 3 Wait for at least two minutes without interacting with ...

Page 55: ...E Model S does not automatically select drive modes in Valet Mode Auto Shift out of Park is disabled by default When disabled use the touchscreen or the center console to manually shift To enable Auto Shift out of Park touch Controls Pedals Steering Auto Shift out of Park Shifting Using the Touchscreen When you press the brake pedal when parked the drive mode strip displays on one side of the touc...

Page 56: ...ouch the Park button on the touchscreen s drive mode strip If the touchscreen is unavailable press Park on the drive mode selector located on the center console NOTE The touchscreen s drive mode strip displays the Park button only when the brake pedal is pressed and shifting into park is allowed based on the driving speed NOTE You must always press the brake pedal to shift out of Park CAUTION Mode...

Page 57: ...Model S in Neutral when you exit allowing it to roll freely for example pulling onto a flatbed truck you must activate Transport mode 1 Shift into Park 2 Press the brake pedal 3 Touch Controls Service Towing The touchscreen displays a message reminding you how to properly transport Model S 4 Press and hold the Transport Mode button until it turns blue Model S is now free rolling and can slowly be ...

Page 58: ...re on Failure to do so can cause damage or serious injury Fog Lights If equipped touch to turn the fog lights on or off Fog lights operate only when low beam headlights are on When headlights are turned off fog lights also turn off The front fog indicator displays on the instrument panel whenever the optional front fog lights are on NOTE Depending on the market region and vehicle options your vehi...

Page 59: ...with a reading light on each side of the rear seats located above the door and next to the coat hangers see Coat Hangers on page 24 To turn a reading light on or off press its lens If you leave a reading light turned on it automatically turns off when Model S powers off Headlights After Exit When you stop driving and park Model S in low lighting conditions exterior lights temporarily remain illumi...

Page 60: ...ng Then when the first maneuver is complete the turn signal remains on If Automatic Turn Signals is set to Off you must cancel the turn signal manually by pressing the turn signal button after maneuvers such as a merge lane change or fork in the roadway When a turn signal is operating the corresponding indicator lights up on the instrument panel and you can hear a clicking sound Hazard Warning Fla...

Page 61: ...tal estimated driving distance or energy available Instead of driving distance you can display the percentage of battery energy remaining To do so touch Controls Display Energy Display NOTE When anticipating when you need to charge use estimates as a general guideline only 4 Estimated outside temperature 5 Pay attention to instructions or important alert messages that display here If any alerts ar...

Page 62: ...ruising speed When Traffic Aware Cruise Control is available but you haven t set a cruising speed by engaging Traffic Aware Cruise Control or Autosteer the icon is gray see Traffic Aware Cruise Control on page 84 5 Autosteer is actively steering Model S When Autosteer is available but you haven t activated it the icon is gray see Autosteer on page 88 6 When navigating upcoming instructions in the ...

Page 63: ...arking Brake on page 65 The parking brake is manually applied See Parking Brake on page 65 Tire pressure warning The pressure of a tire is out of range If a fault with the Tire Pressure Monitoring System TPMS is detected the indicator flashes For a TPMS fault contact Tesla See Tire Care and Maintenance on page 172 A seat belt for an occupied seat is not fastened See Seat Belts on page 29 Indicator...

Page 64: ...g wheel spin See Traction Control on page 67 Model S is in Transport mode and can roll freely It does not automatically shift into Park when you exit See Activate Transport Mode on page 202 A blue snowflake appears when some of the energy stored in the Battery may not be available due to cold weather conditions During these cold weather conditions charging rates may also be limited If Model S is p...

Page 65: ...For vehicles manufactured after approximately February 13 2022 Autosteer requires wipers to be set to Auto This setting is automatic and you cannot change it I Intermittent slow II Intermittent fast III Continuous slow IIII Continuous fast NOTE If you choose Auto and the ability to detect liquid on the windshield becomes unavailable the wiper setting reverts to the most recently used manual settin...

Page 66: ...terrupts operation of the ABS and can increase braking distance WARNING Always maintain a safe distance from the vehicle in front of you and be aware of hazardous driving conditions While the ABS can improve stopping distance it cannot overcome the laws of physics It also does not prevent the danger of hydroplaning where a layer of water prevents direct contact between the tires and the road CAUTI...

Page 67: ...ight side of the power meter shows power that is used to accelerate the vehicle During acceleration the power meter fills to the right with gray to represent the amount of power being used NOTE To ensure visibility when the display is dark power represented by the gray color displays as white NOTE Installing winter tires with aggressive compound and tread design may result in temporarily reduced r...

Page 68: ...ed to the brake pad that squeals as it rubs against the rotor when the pad wears down This squealing sound indicates that the brake pads have reached the end of their service life and require replacement To replace the brake pads contact Tesla Service Brakes must be periodically inspected visually by removing the tire and wheel For detailed specifications and service limits for rotors and brake pa...

Page 69: ...ip To allow the wheels to spin at a limited speed you can enable Slip Start Slip Start can be enabled only when Model S is moving 30 mph 48 km h or slower Slip Start automatically disables when the speed exceeds 50 mph 80 km h Under normal conditions Slip Start should not be enabled Enable it only in circumstances where you deliberately want the wheels to spin such as Starting on a loose surface s...

Page 70: ... located too far above or below the sensors or too close or too far from the sensors Park Assist is for guidance purposes only and is not intended to replace your own direct visual checks It is not a substitute for careful driving Visual and Audio Feedback When you shift to Reverse the Park Assist view displays on the left side of the instrument panel showing objects that are in close proximity to...

Page 71: ...e into the blind spot of the sensors Model S cannot alert you about an object while it is in the blind spot of the sensors Weather conditions heavy rain snow or fog are interfering with sensor operation The object is thin such as a sign post A sensor s operating range has been exceeded The object is sound absorbing or soft such as powder snow The object is sloped such as a sloped embankment Model ...

Page 72: ...d You can then release the brake pedal and remain stopped even on a hill This indicator displays on the instrument panel whenever Vehicle Hold is actively braking Model S To disengage Vehicle Hold press the accelerator pedal or press and release the brake pedal NOTE Shifting into Neutral also disengages Vehicle Hold NOTE After actively braking Model S for approximately ten minutes Model S shifts i...

Page 73: ...ture times out to prevent unnecessary energy consumption for example you leave the vehicle and forget to cancel Drag Strip Mode When using Drag Strip Mode Model S consumes more energy to keep the Battery within an optimal temperature range Cancel Drag Strip Mode at any time by toggling Drag Strip Mode off NOTE Drag Strip Mode automatically disables Slip Start when enabled WARNING Drag Strip Mode i...

Page 74: ...driving session Once started the Lap Timer starts counting when you drive Model S past the lap s start finish location where you dropped the pin See Using the Lap Timer on page 73 4 Shift into gear and GO If you started the Lap Timer each time you pass the start finish location the timer resets for the next lap See Using the Lap Timer on page 73 A real time accelerometer G meter appears on the ins...

Page 75: ...u drive Model S through the start finish location the Lap Timer automatically starts timing the duration of the lap resetting the timer whenever you pass the start finish location and displaying the real time delta between the current lap and the fastest lap so far in the driving session The map highlights the track in blue At the completion of each lap the Lap Timer displays the duration of the l...

Page 76: ... can also show distance and total and average energy used since your last charge and for additional trips To name or rename a trip touch the trip s name enter a new name for the trip then press Save To reset a particular trip meter touch its associated Reset button Odometer To display the odometer touch Controls Software or open the mobile app Trip Information 74 MODEL S Owner s Manual ...

Page 77: ... the cabin using climate controls With your vehicle plugged in use the mobile app to precondition your vehicle to ensure the cabin is at a comfortable temperature and windows are defrosted if needed before your drive by touching Climate On and customizing your preferences see Mobile App on page 159 Touch Schedule available on both the charging and climate control screens to set a time when you wan...

Page 78: ...n from the list Model S provides navigation instructions and the turn by turn direction list displays the predicted amount of energy that will remain when you arrive at the charging destination Trip Planner routes you through Supercharger locations to minimize the amount of time you spend charging and driving To enable touch Controls Navigation Trip Planner see Trip Planner on page 135 Getting Max...

Page 79: ...nal factors can reduce the performance of the cameras including a dirty or obstructed lens Therefore depending on the cameras to determine if Model S is approaching an obstruction can result in damage to the vehicle and or objects and can potentially cause serious injury Always inspect the area with your own eyes When reversing perform shoulder checks and use all mirrors Use the cameras for guidan...

Page 80: ... of your oncoming vehicle The sound which activates whenever Model S is shifted out of Park gets louder as speed increases WARNING If sound cannot be heard pedestrians may not be aware of your oncoming vehicle which may increase the likelihood of a collision resulting in serious injury or death If the Pedestrian Warning System is not operating immediately contact Tesla Pedestrian Warning System 78...

Page 81: ...navigate to Climate Defrost as mentioned previously Use the mobile app to schedule a service appointment for Tesla to provide hydrophobic coating to your windows for a nominal fee Mirrors If ice buildup is expected when parking turn off Auto Fold Mirrors Touch Controls Auto Fold Ice can prevent exterior side mirrors from folding or unfolding NOTE Side mirrors automatically heat as needed during pr...

Page 82: ...on on page 163 Scheduled Departure When parked plug in Model S and use the Schedule settings available on both the charging and climate control screens to set a time when you want to precondition Model S see Scheduled Charging and Scheduled Departure on page 167 Your vehicle determines the appropriate time to begin charging so it is complete during off peak hours and the cabin and Battery are warm...

Page 83: ... rear view mirror 5 A camera is mounted to each front fender 6 Radar if equipped is mounted behind the front bumper Model S is also equipped with high precision electronically assisted braking and steering systems NOTE Ensure all cameras and sensors if equipped are clean before each drive See Cleaning Cameras and Sensors on page 83 for more information Dirty cameras and sensors as well as environm...

Page 84: ...e calibration completes quicker when driving on a straight road with multiple lanes such as a controlled access highway with highly visible lane markings in the driving lane as well as the adjacent lanes Contact Tesla only if your Model S has not completed the calibration process after driving 100 miles 160 km in the described conditions If a camera has shifted from its calibrated position for exa...

Page 85: ...sable the use of safety features Contact Tesla if you suspect lingering issues Cleaning Cameras and Sensors To ensure the various Autopilot components can provide information that is as accurate as possible keep them clean and free of obstructions condensation or damage see Cleaning on page 177 Condensation can form inside the camera enclosures especially if you park your vehicle outside in cold o...

Page 86: ... Control To initiate Traffic Aware Cruise Control when no vehicle is detected ahead of you you must be driving at least 18 mph 30 km h unless certain vehicle and environmental conditions are met in which case you may be able to initiate it at lower speeds If a vehicle is detected ahead of you you can initiate Traffic Aware Cruise Control at any speed even when stationary provided Model S is at lea...

Page 87: ...ment of the brake pedal However when Traffic Aware Cruise Control is accelerating Model S the accelerator pedal does not move WARNING Traffic Aware Cruise Control may occasionally cause Model S to brake when not required or when you are not expecting it This can be caused by closely following a vehicle ahead detecting vehicles or objects in adjacent lanes especially on curves etc WARNING Due to li...

Page 88: ... continue cruising at your set speed tap the accelerator pedal The new set speed is maintained for the duration of the interchange or off ramp unless you override it or cancel Traffic Aware Cruise Control After the interchange or off ramp the set speed may revert or change as necessary based on the new location For example if you merged onto a different highway the set cruising speed reverts back ...

Page 89: ... or may not be available in the following situations You press the brake pedal Your driving speed exceeds the maximum cruising speed of 90 mph 150 km h You shift Model S A door is opened A camera or sensor is obstructed This could be caused by dirt mud ice snow fog etc The traction control setting is manually disabled or is repeatedly engaging to prevent wheels from slipping The wheels are spinnin...

Page 90: ...blue When Autosteer is able to detect lane markings it also displays the driving lane in blue Autosteer briefly displays a message on the instrument panel reminding you to pay attention to the road and be ready to take over at any time The speed at which you can initiate Autosteer can vary depending on various conditions and whether or not a vehicle is detected ahead of you When no vehicle is dete...

Page 91: ...nce as the steering yoke turns or from you manually turning the steering yoke very lightly without enough force to take over steering Autosteer also qualifies your hands as being detected if you engage a turn signal or use a button or scroll wheel on the steering yoke NOTE When your hands are detected the message disappears and Autosteer resumes normal operation Autosteer requires that you pay att...

Page 92: ...ARNING Failure to follow all warnings and instructions can result in property damage serious injury or death Operating Auto Lane Change Auto Lane Change is available whenever Autosteer is active To change lanes using Auto Lane Change 1 Perform visual checks to make sure it is safe and appropriate to move into the target lane 2 Engage the appropriate turn signal keeping your hands on the steering y...

Page 93: ... equipped to display more details about the roadway and its surroundings such as road markings stop lights objects such as trash cans and poles etc CAUTION Stop Light and Stop Sign Warning requires on board maps to know that a particular stop light or stop sign exists at a location In some cases map data is inaccurate or outdated and may not include all stop lights or stop signs Therefore Stop Lig...

Page 94: ...nt of it which is blocking the view of the camera s WARNING Many unforeseen circumstances can impair the operation of Autosteer Always keep this in mind and remember that as a result Autosteer may not steer Model S appropriately Always drive attentively and be prepared to take immediate action Autosteer 92 MODEL S Owner s Manual ...

Page 95: ...acent lane to pass a vehicle in front of you Speed based lanes changes are optional You can use this setting to disable speed based lane changes or to specify how aggressively you want Navigate on Autopilot to change lanes to achieve the set cruising speed The Mild setting is more conservative about lane changes and may result in a slightly longer driving time whereas Mad Max is designed to allow ...

Page 96: ...ake appropriate action WARNING Navigate on Autopilot may not always attempt to exit at an off ramp or change lanes even when an exit or lane change is determined by the navigation route Always remain alert and be prepared to manually steer onto an off ramp or make a lane change to prepare for or to exit at an off ramp or interchange You can cancel Navigate on Autopilot at any time by touching Navi...

Page 97: ...hen attempting to change lanes or maneuver Model S or when approaching construction zones Navigate on Autopilot may be unable to determine the appropriate driving lane for example complex clover leafs and multi lane off ramps and the instrument panel displays an alert indicating that Navigate on Autopilot is trying to maneuver and may require assistance When you see the message be prepared to take...

Page 98: ...st connect to a Wi Fi network to receive updated maps see Map Updates on page 136 Enable the feature With the vehicle in Park touch Controls Autopilot Traffic Light and Stop Sign Control Once enabled Traffic Light and Stop Sign Control operates whenever Traffic Aware Cruise Control or Autosteer is active How it Works When Traffic Light and Stop Sign Control is enabled and you are using Autosteer o...

Page 99: ...c light or stop sign causing Model S to slow down unexpectedly Be prepared to take immediate action at all times WARNING You must briefly press the accelerator pedal to confirm that you want to proceed through an intersection regardless of the status of the traffic light If you do not confirm Model S stops at the red stop line displayed on the instrument panel even if stopping may be inappropriate...

Page 100: ... in front of you Model S slows down and comes to a complete stop at the red stop line displayed on the instrument panel When you want to continue through the intersection for example the light turns green again or once Model S has come to a complete stop you must briefly press the accelerator pedal Model S slows down and comes to a complete stop at the red stop line displayed on the instrument pan...

Page 101: ...the instrument panel displays the red stop line Model S resumes your set cruising speed immediately after you confirm taking into consideration the speed of a vehicle in front of you WARNING Approach attentively and be prepared to press the brake pedal to slow down or stop Model S slows down and comes to a complete stop at the red stop line displayed on the instrument panel When you want to procee...

Page 102: ...not stop at a T junction that does not have a stop sign or stop line or if the T junction is not included in the map data Drive attentively and be prepared to stop when necessary and or appropriate Stop Sign Model S slows down and comes to a complete stop at the red stop line displayed on the instrument panel When you want to proceed through the intersection you must briefly press the accelerator ...

Page 103: ...ations Depending on many different circumstances and environmental conditions Traffic Light and Stop Sign Control may or may not stop at Railroad crossings Keep out zones Toll booths Crosswalk systems Yield signs or temporary traffic lights and stop signs such as at construction areas Miscellaneous traffic U turn lights bicycle and pedestrian crossing lights lane availability lights etc In additio...

Page 104: ...le etc Model S is being driven very close to a vehicle in front of it which is blocking the view of a camera WARNING The limitations listed above are not an exhaustive list of reasons why Model S may not operate as expected Many unforeseen circumstances can adversely impact the accurate operation of Traffic Light and Stop Sign Control Using this feature does not reduce or eliminate the need to dri...

Page 105: ...riving follow these steps to allow Autopark to maneuver Model S into a parking space 1 While driving slowly on a public road monitor the instrument panel to determine when Autopark has detected a parking space The instrument panel will display a parking icon if the vehicle detects a potential parking spot NOTE The parking icon appears only if the vehicle s position and or the circumstances of the ...

Page 106: ...sloped Autopark is designed to operate on flat roads only Visibility is poor due to heavy rain snow fog etc The curb is constructed of material other than stone or the curb cannot be detected The target parking space is directly adjacent to a wall or pillar for example the last parking space of a row in an underground parking structure One or more of the ultrasonic sensors or cameras is damaged di...

Page 107: ...ately detect the location of obstacles increasing the risk of damage to Model S and or surrounding objects Require Continuous Press By default Summon requires that you press and hold a button on the mobile app to move Model S during the parking process When Require Continuous Press is set to No you can press and release the button you don t need to hold it down to keep the vehicle moving Also when...

Page 108: ... or are hanging from a ceiling for example bicycles In addition many unforeseen circumstances can impair Summon s ability to move in or out of a parking space and as a result Summon may not move Model S appropriately Therefore you must continually monitor the vehicle s movement and its surroundings and remain prepared to stop Model S at any time Operating Summon with the Key Fob NOTE Summon may no...

Page 109: ...r than approximately 1 in 2 5 cm One or more of the ultrasonic sensors or cameras is damaged dirty or obstructed such as by mud ice or snow or by a vehicle bra excessive paint or adhesive products such as wraps stickers rubber coating etc Weather conditions heavy rain snow fog or extremely hot or cold temperatures are interfering with sensor operation The sensors are affected by other electrical e...

Page 110: ... a clear line of sight between you and Model S and stay prepared to stop the vehicle at any time by releasing the button on the mobile app Before Using Smart Summon Download the latest version of the Tesla mobile app to your phone and ensure your phone has cellular service and GPS enabled Your phone must be connected to Model S and located within approximately 213 feet 65 meters The vehicle s came...

Page 111: ... people children or animals are present WARNING Smart Summon may not stop for all objects especially very low objects such as some curbs or very high objects such as a shelf and may not react to all oncoming or side traffic Pay attention and be ready to stop Model S at all times by releasing the button on the mobile app Standby Mode To keep Model S ready to Summon and reduce the time it takes to w...

Page 112: ...rubber coating etc Weather conditions heavy rain snow fog or extremely hot or cold temperatures are interfering with sensor or camera operation The sensors are affected by other electrical equipment or devices that generate ultrasonic waves NOTE Smart Summon is disabled if Model S is in Valet mode see Valet Mode on page 44 WARNING The list above does not represent an exhaustive list of situations ...

Page 113: ... S is traveling between 30 and 85 mph 48 and 140 km h on major roads with clearly visible lane markings When a steering intervention is applied the instrument panel briefly displays a warning message Lane Departure Avoidance Lane Departure Avoidance is designed to warn you if Model S is drifting out of or nears the edge of your driving lane Lane Departure Avoidance operates when driving between 40...

Page 114: ...annot always detect lane markings and you may experience unnecessary or invalid warnings in these situations Visibility is poor and lane markings are not clearly visible due to heavy rain snow fog etc The exact detection zone of the ultrasonic sensors varies depending on environmental conditions Bright light such as from oncoming headlights or direct sunlight is interfering with the view of the ca...

Page 115: ...erfering with or obstructing a sensor Visibility is poor and lane markings are not clearly visible due to heavy rain snow fog etc Lane markings are excessively worn have visible previous markings have been adjusted due to road construction or are changing quickly for example lanes branching off crossing over or merging WARNING The lists above do not represent every possible situation that may inte...

Page 116: ...collision is considered likely unless you take immediate corrective action Forward Collision Warning is designed to sound a chime and highlight the vehicle in front of you in red on the instrument panel If this happens TAKE IMMEDIATE CORRECTIVE ACTION Warnings cancel automatically when the risk of a collision has been reduced for example you have decelerated or stopped Model S or the object in fro...

Page 117: ...ARNING Several factors can affect the performance of Automatic Emergency Braking causing either no braking or inappropriate or untimely braking such as when a vehicle is partially in the path of travel or there is road debris It is the driver s responsibility to drive safely and remain in control of the vehicle at all times Never depend on Automatic Emergency Braking to avoid or reduce the impact ...

Page 118: ...ons particularly if The road has sharp curves Visibility is poor due to heavy rain snow fog etc Bright light such as from oncoming headlights or direct sunlight is interfering with the view of the camera s A camera or sensor is obstructed dirty covered fogged over covered by a sticker etc One or more of the ultrasonic sensors is damaged dirty or obstructed such as by mud ice or snow or by a vehicl...

Page 119: ... 10 km h NOTE The offset from speed limit also affects the number shown in the gray speed icon on the instrument panel Absolute Manually specify any speed limit between 20 and 140 mph 30 and 240 km h NOTE Speed Assist is not always accurate In some situations the location of a road can be miscalculated and Speed Assist can display a speed for a directly adjacent road that may have a different spee...

Page 120: ...lso be shared if diagnostics are required on cabin camera functionality Cabin camera does not perform facial recognition or any other method of identity verification To protect your privacy cabin camera data is not associated with your vehicle identification number To adjust your data sharing preferences touch Controls Software Data Sharing Allow Cabin Camera Analytics You can change your data sha...

Page 121: ...es see Driver Profiles on page 44 2 Display alerts see Troubleshooting Alerts on page 213 and access settings for HomeLink see HomeLink Universal Transceiver on page 154 Bluetooth see Pairing a Bluetooth Phone on page 143 and networks see Connecting to Wi Fi on page 156 3 Quick access to locks trunks and the charge port see Doors on page 13 Front Trunk on page 18 Rear Trunk on page 16 and Opening ...

Page 122: ... at off ramps and interchanges based on your navigation route and can also make lane changes designed to prepare for exits and minimize the driving time to your destination available only if your vehicle is equipped with the Full Self Driving option Touch Customize Navigate on Autopilot to specify how you want Navigate on Autopilot to operate such as whether you want it to automatically enable at ...

Page 123: ...s You can see all the keys used for Model S and their associated driver profiles You can add delete and change the driver profile associated with each key see Driver Profiles on page 44 Window Lock Locks the rear window switches Child Lock If on safety locks prevent the rear doors from being opened from inside the vehicle Walk Away Door Lock If on doors automatically lock when you walk away from t...

Page 124: ...g the volume mutes the instructions You can also mute navigation instructions when a navigation route is active by touching the volume icon on the turn by turn direction list NOTE This volume setting applies only to the navigation system s spoken instructions It does not change the volume of media player and phone calls Automatic Navigation If enabled and your phone s calendar is synced to Model S...

Page 125: ... recording of the most recent 10 minutes of driving to the USB flash drive Off Dashcam is disabled until you select Auto or Manual On Honk When you press the horn Dashcam saves a recording of the most recent 10 minutes of driving to the USB flash drive Delete Dashcam Clips Deletes all Dashcam and Sentry Mode footage including recent and saved clips Format USB Drive if equipped If a USB flash drive...

Page 126: ...ion system WARNING The air suspension system causes Model S to self level even when powered off Therefore when transporting or lifting you must engage Jack Mode to disable self leveling see Instructions for Transporters on page 201 and Jacking and Lifting on page 184 Wiper Service Mode Turn on to provide easy access to wiper blades see Wiper Blades and Washer Jets on page 181 Software Learn more a...

Page 127: ...to feel pain is limited because of diabetes age neurological injury or some other condition should exercise caution when using the climate control system and seat heaters Adjusting Climate Control Settings NOTE Easily adjust your climate preferences such as turning on the seat heater or changing the cabin temperature hands free by using voice commands see Voice Commands on page 148 NOTE For one to...

Page 128: ...is extremely effective at removing particles including pollution allergens bacteria pollen mold spores and viruses Both the HEPA filter and the secondary filtration system also contain activated carbon to remove a broad spectrum of odors and gases When you engage Bioweapon Defense Mode the positive pressure inside the cabin minimizes the amount of outside air that can enter the vehicle NOTE Some g...

Page 129: ...he front or rear windshield defrosters 4 Modify the cabin temperature by dragging along the slider You can also enable temperature splitting which allows the driver and front passenger to customize their own climate preferences The front passenger can touch the temperature icon on the bottom of the touchscreen or the main climate controls screen to adjust Touch Split again to disable climate split...

Page 130: ...an pinpoint exactly where you want to direct the air flowing from this vent when heating or cooling the cabin When the face level vent is on you can adjust the direction of the air flow from each vent To adjust the direction of the air flow touch the radiating air waves from the corresponding vent on the touchscreen The air flows in a single stream when centered or splits into mirrored air streams...

Page 131: ...u can play music browse the internet play games in the arcade or watch shows in Tesla Theater You can also control media and climate settings from a paired phone Camp is ideal for remaining inside your vehicle such as camping or staying with a child While active Sentry Mode and the vehicle alarm system are disabled To operate Keep Climate On Dog or Camp 1 Make sure the Battery s charge level is at...

Page 132: ...he vehicle unattended Due to automatic shut off or extreme outside conditions the inside of the vehicle can become dangerously hot even when Cabin Overheat Protection is enabled Climate Control Operating Tips When you use the mobile app to turn on the climate control system it automatically turns off after four hours or if the charge level drops to 20 To cool or heat the cabin for a longer period ...

Page 133: ...while a navigation route is active the turn by turn direction list displays the next set of directions and the orientation icon disappears Touch anywhere on the map to re display it Map Display Touch these icons to customize what the map displays Display hide satellite imagery if equipped with premium connectivity Display hide traffic conditions if equipped with premium connectivity Green lines in...

Page 134: ...ome or Work location see Home Work and Favorite Destinations on page 133 A Charging destination see Charging Locations on page 134 A Recent destination the most recent destination is listed at the top A destination you have marked as a Favorite see Home Work and Favorite Destinations on page 133 A popular restaurant when you re feeling Hungry or a popular destination such as museums and amusement ...

Page 135: ...ation Automatic Navigation You must have your phone s calendar synced to Model S and the event must include a uniquely specified and valid address see Phone and Calendar on page 143 NOTE Navigation instructions that you enter manually or send to Model S override routes suggested by Automatic Navigation I m Feeling Lucky Hungry NOTE I m Feeling Lucky and I m Feeling Hungry may not be available in a...

Page 136: ...k gray pins when you choose to display all charging stations The appearance of of a charging location s pin reveals status information about the location Touch the pin to display details The Supercharger location is operational and the number displayed on the pin represents the number of available Supercharger stalls NOTE A Supercharger located on your current navigation route is colored black or ...

Page 137: ...estimated calculation of your round trip energy usage Online Routing Model S detects real time traffic conditions and automatically adjusts the estimated driving and arrival times In situations where traffic conditions will delay your estimated time of arrival and an alternate route is available the navigation system can reroute you to your destination You can also specify the minimum number of mi...

Page 138: ...tion list notifying you that charging is needed to reach your destination Map Updates As updated maps become available they are automatically sent to Model S over Wi Fi To ensure you receive them periodically connect Model S to a Wi Fi network see Connecting to Wi Fi on page 156 The touchscreen displays a message informing you when new maps are installed Maps and Navigation 136 MODEL S Owner s Man...

Page 139: ... you are listening to Touch the next or previous arrows to play the next and in some cases previous available station episode or track You can also play next previous using the left scroll button on the steering yoke Streaming services are available only when a data connection is available for example Wi Fi or Premium Connectivity For some media services you can use a default Tesla account For oth...

Page 140: ...ion podcast or audio file to your Favorites list touch the Favorites icon on Media Player To remove an item as a favorite touch the highlighted Favorites icon You can also remove multiple favorites by expanding Media Player to show all favorites for the applicable type of source content Then press and hold any favorite An X appears on all favorites and you can then touch the X to remove them from ...

Page 141: ...u want to listen to When the chosen file begins to play you can then use Media Player s next and previous icons or use the left scroll button on the steering yoke to play other tracks NOTE To play media from a Bluetooth connected device ensure that access to the device s media is turned on see Pairing a Bluetooth Phone on page 143 Media 139 Using the Touchscreen ...

Page 142: ...ounds from your vehicle s external speaker while in Park See Boombox on page 141 for more details NOTE Check local laws before use in public spaces Emissions Testing Mode Holiday fun can come in surprising ways Select your preferred fart style and target seat For those lucky vehicles equipped with a Pedestrian Warning System you can choose to broadcast externally when in Park Use your turn signal ...

Page 143: ... USB drive NOTE Check local laws before using Boombox in public places 1 Play current media Available in Park only Internal and external volume control If Camp Mode is enabled in Climate Controls you can exit the car and control the volume with the mobile app 2 Megaphone When toggled on you can project a modulated voice through the external speaker of Model S Available in Park only External volume...

Page 144: ...ge the color of your Model S on the touchscreen by navigating to Toybox or Controls Software Touch the color swatch next to the vehicle name and customize the paint tone and more Entertainment 142 MODEL S Owner s Manual ...

Page 145: ...available Bluetooth devices within operating distance displays on the Bluetooth settings screen 5 Choose the phone with which you want to pair Within a few seconds the Bluetooth settings screen displays a randomly generated number Your phone also display a number 6 Check that the number displayed on your phone matches the number on the Bluetooths settings screen Then on your phone confirm that you...

Page 146: ... voice WARNING To minimize distraction and ensure the safety of vehicle occupants as well as other road users do not view or send text messages when the vehicle is in motion Pay attention to road and traffic conditions at all times when driving Contacts Contacts are listed in alphabetical order and can be sorted by first name or last name You can also choose a letter on the right side of the list ...

Page 147: ...ed phone In situations when your vehicle is not connected to a phone touch Connect Phone on the calendar list Mobile access is turned on Controls Safety Allow Mobile Access Both your phone and your vehicle have good connectivity If a calendar event includes an address a navigation arrow displays to indicate that you can touch the address to navigate to the event s location When an event on your ca...

Page 148: ...ontrols window Medium The Medium setting ensures optimum comfort and handling under all loading conditions Low Lowering the height can improve aerodynamics make it easier to load or unload cargo and passengers and improve handling If the Default Ride Height to Low setting is turned off the ride height is adjusted between Medium and Low to balance ride comfort with handling and range To optimize ha...

Page 149: ...raise until Model S slows down NOTE After leaving a saved location the suspension automatically lowers However it may not lower until Model S meets the speed and distance threshold at which the suspension lowers NOTE If Model S reaches a saved location and the existing suspension setting is already higher than the level that has been saved for that location the ride height is not adjusted To remov...

Page 150: ...ecognition Language Voice commands are not available in all languages Climate Controls Adjust your climate preferences using voice commands Make it cooler Make it warmer Turn on off the driver s seat heater Cool down the passenger Direct airflow to my face Sync climate Increase decrease the fan speed Turn on off rear defroster Set the temperature fan Turn on recirculate Windshield Wipers Update th...

Page 151: ... your apps and settings using voice commands Open Toybox browser theater phone Search for The screen is too bright Show me the Owner s Manual Some apps and settings are only accessible while in Park You can also file a bug report by saying Report Feedback or Bug report For a complete list of voice commands go to https www tesla com support voice commands NOTE Tesla is continuously improving the ab...

Page 152: ...or or trunk is opened and Model S does not detect a key nearby If Tilt Intrusion is on the horn also sounds if Model S detects motion inside the cabin or if the vehicle is moved or tilted for example with a tow truck or jack To turn the Tilt Intrusion detection system on or off touch Controls Safety Tilt Intrusion PIN to Drive To increase security you can prevent Model S from being driven until a ...

Page 153: ...Safety Dashcam and choose Auto Dashcam automatically saves a recording to the USB flash drive in situations where Model S detects a safety event such as a collision or airbag deployment When Auto is selected detection can vary and is subject to your vehicle s power sleep and Autopilot state NOTE Several factors determine whether or not Dashcam automatically saves a recording of a safety event for ...

Page 154: ...ter some threats no security system can prevent all attacks To view Sentry Mode footage see Viewing Video Recordings on page 153 Standby Alert and Alarm States While in Sentry Mode Model S may shift through three states as a response to its surroundings Standby Alert and Alarm Standby Model S is automatically on standby when you activate Sentry Mode The cameras constantly monitor the surrounding a...

Page 155: ...n in the top corner of the screen The tabs display a list of all video clips organized by location and timestamp Pause rewind fast forward and delete video recordings as needed You can also navigate to Controls Safety Delete Dashcam Clips to delete all dashcam and Sentry Mode footage including recent and saved clips NOTE Dashcam recording pauses when you launch the Viewer You can also view video f...

Page 156: ...Check the product information for your HomeLink device to determine which mode is compatible with your device Programming HomeLink To program HomeLink 1 Park Model S so that the front bumper is in front of the device you want to program CAUTION Your device might open or close during programming Therefore before programming make sure that the device is clear of any people or objects 2 Check that th...

Page 157: ...t the front bumper and press and hold the button until the headlights flash When the headlights flash Model S has learned the remote control and you can touch Continue on the touchscreen If the headlights do not flash Check the batteries in the remote control It is a good idea to replace the batteries before you start programming Ensure you are standing in front of Model S with the device s remote...

Page 158: ... Confirm 3 Model S connects to the Wi Fi network Whenever the network is within range Model S connects to it automatically You can also connect to a hidden network that isn t shown on the list of scanned networks Just touch Wi Fi Settings enter the name of the network in the resulting dialog box select the security setting then touch Add Network NOTE If more than one previously connected network i...

Page 159: ...e but your vehicle is not connected to Wi Fi Connect your vehicle to Wi Fi to start the download Software Update Preferences Tesla determines how when and where to send updates to vehicles based on various factors unique to each release You can choose how quickly and often you receive software updates To change your preference touch Controls Software Software Update Preferences and choose either o...

Page 160: ...es or new features To display release notes about the current version of your vehicle s software at any time touch Controls Software Release Notes Tesla strongly recommends reading all release notes They may contain important safety information or operating instructions for your Model S Software Updates 158 MODEL S Owner s Manual ...

Page 161: ...ttery is actively heating up including while charging or preparing to charge Open the front trunk View your vehicle s odometer VIN and current firmware version Media settings appear on the mobile app to pause play rewind fast forward and adjust the volume of the media currently playing in the vehicle For supported video sources send videos to Tesla Theater by sharing the link through the mobile ap...

Page 162: ...168 for more information Security The Security tab allows you to do the following Pair your phone to the vehicle see Phone Key on page 8 Enable or disable Sentry Mode see Using Sentry Mode on page 151 Enable or disable Valet Mode see Valet Mode on page 44 Enable or disable Speed Limit Mode and receive notifications when the vehicle s driving speed is within approximately 3 mph 5 km h of your selec...

Page 163: ... has no user serviceable parts Do not disassemble remove or replace high voltage components cables or connectors High voltage cables are typically colored orange for easy identification WARNING Read and follow all instructions provided on the labels that are attached to Model S These labels are there for your safety WARNING In the unlikely event that a fire occurs immediately contact your local fi...

Page 164: ...ctor Owner s Manual available on the touchscreen Additional adapters can be purchased from Tesla Tesla offers adapters for example J1772 CHAdeMO and Combined Charging System CCS to allow you to plug into the most commonly used public charging stations in your region Open the charge port door using the touchscreen see Charging Instructions on page 164 plug the adapter into the charging port on Mode...

Page 165: ...ays the Battery may discharge by approximately 14 Discharging the Battery to 0 may result in damage to vehicle components To protect against a complete discharge Model S enters a low power consumption mode when the displayed charge level drops to approximately 0 In this mode the Battery stops supporting the onboard electronics and auxiliary low voltage battery Once this low power consumption mode ...

Page 166: ...pening the charge port door the charge port door closes If this happens use the touchscreen to open the charge port door again NOTE In extremely cold weather or icy conditions it is possible that your charge port latch may freeze in place In cases where you cannot remove or insert the charge cable or the vehicle is not Supercharging due to the latch being frozen in place use your Tesla mobile app ...

Page 167: ...ed future time BLINKING GREEN Charging is in progress As Model S approaches a full charge the frequency of the blinking slows SOLID GREEN Charging is complete SOLID AMBER The connector is not fully plugged in Realign the connector to the charge port and insert fully BLINKING AMBER Model S is charging at a reduced current AC charging only RED A fault is detected and charging has stopped Check the i...

Page 168: ...ult in serious injury or damage to the vehicle charging equipment or property Stopping Charging Stop charging at any time by disconnecting the charge cable or touching Stop Charging on the touchscreen NOTE To prevent unauthorized unplugging of the charge cable the charge cable latch remains locked and Model S must be unlocked or able to recognize your key before you can disconnect the charge cable...

Page 169: ...ou can manually increase it Tesla recommends charging at the lower current until the underlying problem is resolved and the charging location can provide consistent power Schedule Depending on the setting you select by touching Switch to Scheduled Departure Scheduled Charging this displays either a departure time for when the vehicle should be preconditioned and or charged by or a time to start ch...

Page 170: ...g off peak hours charging continues until the charge limit is reached You can limit Preconditioning and Off Peak Charging to weekdays only Supercharger Usage Fees and Idle Fees When charging at a Tesla supercharger information about the charging session displays at the bottom of the charging screen This includes the location the time that charging started and a cost estimate for the session When y...

Page 171: ... Continuous use can damage the release cable or charging equipment WARNING Do not perform this procedure when your vehicle is charging or if any orange high voltage conductors are exposed Failure to follow these instructions can result in electric shock and serious injury or damage to the vehicle If you are uncertain as to how to safely perform this procedure contact your nearest Service Center Ch...

Page 172: ...le settings Identifiable symptoms Visit https www tesla com support service visits for more information on scheduling service Daily Checks Check the Battery s charge level displayed on the instrument panel or mobile app Check the condition and pressure of each tire see Tire Care and Maintenance on page 172 Check that all exterior lights horn turn signals and wipers and washers are working Check fo...

Page 173: ... The high voltage system has no user serviceable parts Do not disassemble remove or replace high voltage components cables or connectors High voltage cables are colored orange for easy identification If a collision occurs do not touch any high voltage wiring connectors or components connected to the wiring In the unlikely event that a fire occurs immediately contact your local fire emergency respo...

Page 174: ...at resulting in severe tire cracking tread separation or blowout resulting in unexpected loss of vehicle control and increased risk of injury Under inflation also reduces the vehicle s range and tire tread life WARNING Check tire pressures using an accurate pressure gauge when tires are cold It takes only about one mile 1 6 km of driving to warm up the tires sufficiently to affect tire pressures P...

Page 175: ...Center or to a nearby tire repair center NOTE In some cases you can temporarily repair small tire punctures under 1 4 6 mm using an optional tire repair kit available from Tesla This allows you to slowly drive Model S to Tesla or to a nearby tire repair facility WARNING Do not drive with a punctured tire that has not been repaired even if the puncture has not caused the tire to deflate A punctured...

Page 176: ...e For Gemini wheels press on the perimeter of the cover until it aligns with the wheel surface Press on the Tesla T in the center until the cap snaps into place See Parts and Accessories on page 185 for more information CAUTION To prevent the aero cover from falling off ensure that it is fully secured before driving Wheel Configuration If you are installing new wheels or swapping them for differen...

Page 177: ...sensor needs to be replaced If a non Tesla Service Center repairs or replaces a tire the tire sensor may not work until Tesla performs the setup procedure TPMS Malfunction Model S has also been equipped with a TPMS malfunction indicator to indicate when the system is not operating properly The TPMS malfunction indicator is combined with the tire pressure indicator light When the system detects a m...

Page 178: ...s The approved tire chains can be purchased from Tesla Tire Size Recommended Chain 19 KONIG K SUMMIT Do not use tire chains on 21 tires When installing tire chains follow the instructions and warnings provided by the tire chain manufacturer Mount them evenly and as tight as possible When using tire chains Inspect the tire chains for loose fittings and damaged links before each use Set air suspensi...

Page 179: ...glass or mirrored surfaces Car Wash Mode When taking Model S to a car wash Car Wash Mode closes all windows locks all doors and disables windshield wipers Sentry Mode walk away door locking and parking sensor chimes To enable touch Controls Service Car Wash Mode Your vehicle must be stationary and not actively charging If using an automatic car wash Enable Free Roll keeps your vehicle in Neutral a...

Page 180: ... lint free cloth Interior Glass Do not scrape or use any abrasive cleaning fluid on glass or mirrored surfaces This can damage the reflective surface of the mirror and the heating elements in the rear window Airbags Do not allow any substance to enter an airbag cover This could affect correct operation Dashboard and Plastic Surfaces Do not polish the upper surfaces of the dashboard Polished surfac...

Page 181: ...e hazardous and can irritate eyes and skin Read and observe the instructions provided by the manufacturer of the chemical cleaner Polishing Touch Up and Body Repair To preserve the cosmetic appearance of the body you can occasionally treat the paint surfaces with an approved polish containing Very mild abrasive to remove surface contamination without removing or damaging the paint Filling compound...

Page 182: ...nsure that the driver s floor mat is securely fastened and never place an additional floor mat on top of it Floor mats should always rest on top of the vehicle carpeting surface and not on another floor mat or other covering Cleaning 180 MODEL S Owner s Manual ...

Page 183: ... the original blade Different connectors may prevent the replacement blade from connecting to the wiper arm on the vehicle You can purchase replacement wiper blades on http www tesla com NOTE Only install replacement blades that are identical to the original blades Using inappropriate blades can damage the wiper system and windshield To replace the wiper blades 1 Shift into Park and turn off the w...

Page 184: ...complete brake failure A red brake indicator on the instrument panel alerts you if the quantity of fluid in the brake reservoir drops below the recommended level If it displays while driving stop as soon as safety permits by gently applying the brakes Do not continue driving Contact Tesla immediately Fluid Level Check Tesla checks the brake fluid level and health at the regularly scheduled mainten...

Page 185: ...freeze in washer fluid Use a washer fluid with limited VOC content only if it provides adequate freeze resistance for all climates in which you drive Model S CAUTION Do not add formulated washer fluids that contain water repellent or bug wash These fluids can cause streaking smearing and squeaking or other noises WARNING In temperatures below 40 F 4 C use a washer fluid with antifreeze In cold wea...

Page 186: ... even when power is off You MUST disable this system by engaging Jack mode before lifting or jacking If you do not disable the air suspension Model S can attempt to self level causing serious damage bodily injury or death WARNING Never raise Model S when the charge cable is connected even if charging is not in progress WARNING Do not work on an incorrectly supported vehicle Doing so can cause seri...

Page 187: ...ty for death personal injury or damage that occurs if you use or install non approved accessories or make non approved modifications Body Repairs If your Model S is in a collision contact Tesla or a Tesla approved Body Shop to ensure that it is repaired with genuine Tesla parts Tesla has selected and approved body shops that meet strict requirements for training equipment quality and customer sati...

Page 188: ...nel on the front passenger door by gently prying it upward using a flat bladed tool CAUTION Removing the sill panel to view the VIN is not recommended because damage is likely to occur The panel is held in place with fragile clips that break easily Damage caused by removing the sill panel is not covered by the warranty Emission Control Label The emission control label is located on the opening fac...

Page 189: ...on Label The Tire and Loading Information label provides The maximum number of occupant seating positions The maximum vehicle capacity weight The size of the original tires The cold inflation pressures for the original front and rear tires These pressures are recommended to optimize ride and handling characteristics United States Canada Mexico Never change this label even if you use different tire...

Page 190: ...argo weight being loaded on the vehicle That weight must not exceed the available cargo load capacity calculated in Step 4 WARNING Trunks are the preferred places to carry objects In a collision or during hard braking and sharp turns loose items in the cabin could injure occupants Example Load Limit Calculations How much cargo Model S can carry depends on the number and weight of passengers The fo...

Page 191: ...d Clearance lowest setting 4 6 117 G Ground Clearance normal setting 5 0 126 G Ground Clearance highest setting 6 2 158 H Track Front and Rear 66 5 1 690 Values are approximate Dimensions can vary depending on a vehicle s options and various other factors Interior Dimensions Area Location Measurement in Measurement mm Head Room Front 39 7 1 008 Rear 38 1 968 Leg Room Front 42 4 1 077 Rear 35 5 901...

Page 192: ...nk 89 3 1 Behind first row second row folded flat 1 739 61 4 Behind second row 709 25 0 Maximum total cargo volume with driver and front passenger 1 828 64 6 Maximum total cargo volume with driver and 4 passengers 798 28 2 Dimensions 190 MODEL S Owner s Manual ...

Page 193: ...pinion with electronic power steering speed sensitive Number of turns lock to lock 2 33 Turning Circle curb to curb 40 3 ft 12 3 m Brakes Brakes Specifications Type 4 wheel anti lock braking system ABS with Electronic Brake Force Distribution Integrated Advanced Stability Control and Electronic Accelerator pedal actuated regenerative braking system Calipers Front Four piston fixed Rear Single pist...

Page 194: ... air spring with adaptive damper stabilizer bar Battery Low Voltage Battery Low Voltage Specifications Rating 6 9 amp hour Voltage 15 5V Battery High Voltage Battery High Voltage Specifications Type Liquid cooled lithium ion Li ion Nominal Voltage 407 V DC Temperature Range Do not expose Model S to ambient temperatures above 149 F 65 C or below 22 F 30 C for more than 24 hours at a time Subsystems...

Page 195: ... Rear 255 45R19 104W XL 285 40R19 107W XL 19 Summer Front Rear 255 45R19 104Y XL 285 40R19 107Y XL 21 Summer Front Rear 265 35ZR21 101 Y XL 295 30ZR21 102 Y XL Tire pressures vary depending on the type of tires fitted Refer to the tire pressures printed on the Tire and Loading Information label This label is located on the center door pillar and is visible when the driver s door is open see Mainta...

Page 196: ...t as a percentage of the tread width So if the tread width is 205 mm and the aspect ratio is 50 the sidewall height is 102 mm 4 Tire construction R indicates that the tire is of Radial ply construction 5 Wheel diameter This 2 digit number is the diameter of the wheel rim in inches 6 Load index This 2 or 3 digit number is the weight each tire can support This number is not always shown 7 Speed rati...

Page 197: ...o represent the 17th week of 2012 The other numbers are marketing codes used at the manufacturer s discretion This information can be used to contact consumers if a tire defect requires a recall 12 Treadwear grade This number indicates the tire s wear rate The higher the treadwear number is the longer it should take for the tread to wear down A tire rated at 400 for example lasts twice as long as ...

Page 198: ...ons on test surfaces of asphalt and concrete A tire marked C might have poor traction performance WARNING Defective tires are dangerous Do not drive if a tire is damaged excessively worn or is inflated to an incorrect pressure The safety of the vehicle and occupants can be adversely affected Check tires regularly for wear and to ensure there are no cuts bulges or exposure of the ply cord structure...

Page 199: ...4 kg more than the standard items that they replaced and are not already considered in curb or accessory weights PSI lbf in2 Pounds per square inch the unit used to measure tire pressure Recommended Tire Inflation Pressure Tire inflation pressure established by Tesla which is based on the type of tires that are mounted on the vehicle at the factory This information can be found on the Tire and Loa...

Page 200: ...ven inflation pressure Maximum load rating The load rating for a tire at the maximum permissible inflation pressure for that tire Measuring rim The rim on which a tire is fitted for physical dimension requirements Open splice Any parting at any junction of tread sidewall or inner liner that extends to the cord material Outer diameter The overall diameter of an inflated new tire Overall width The l...

Page 201: ...rim on which a tire is fitted for testing and may be any rim listed as appropriate for use with that tire Tread The portion of a tire that comes into contact with the road Tread rib A tread section running around the circumference of a tire Tread separation The pulling away of the tread from the tire carcass Tread wear indicators TWI The projections within the principal grooves designed to give a ...

Page 202: ...The VIN can also been seen on the upper dashboard by looking through the driver s side of the windshield Your exact location The nature of the problem If available in your region you can also expedite your request by choosing the Roadside Assistance option in the Tesla mobile app NOTE For a detailed description of Tesla s Roadside Assistance policy go to the support page on the Tesla web site for ...

Page 203: ...prevent the front wheels from spinning CAUTION DO NOT TRANSPORT YOUR VEHICLE IF THERE IS ANY CHANCE OF ANY OF THE WHEELS SPINNING CAUTION Enable Transport Mode see Activate Transport Mode on page 202 before winching Model S onto a flatbed truck If Transport Mode is not available or the touchscreen is not accessible self loading dollies or tire skates must be used to load the vehicle into the appro...

Page 204: ...l S 4 Press and hold the Transport Mode button until it turns blue Model S is now free rolling and can slowly be rolled no faster than walking speed for short distances or winched To cancel Transport Mode shift Model S into Park NOTE If the electrical system is not working and you therefore cannot use the touchscreen to activate Transport Mode use self loading dollies or tire skates Before doing s...

Page 205: ... not transport the vehicle with wheels on the ground CAUTION To avoid damage only pull the vehicle onto a flatbed truck using a properly installed tow eye Using the chassis frame or suspension components to pull the vehicle can result in damage 1 Locate the tow eye The tow eye is located in the front trunk 2 Release the rear tow eye cover by pressing firmly on its bottom perimeter until it pivots ...

Page 206: ...wly onto the flatbed truck Secure the Tires The vehicle s tires must be secured onto the truck using the eight point tie down method Ensure any metal parts on the tie down straps do not contact painted surfaces or the face of the wheels Do not place tie down straps over body panels or through the wheels CAUTION Attaching the tie down straps to the chassis suspension or other parts of the vehicle s...

Page 207: ...supply s black negative cable to the vehicle in the location shown 7 Turn on the external power supply refer to the manufacturer s instructions Touch the touchscreen to wake it up NOTE It may take several minutes to receive enough power to wake up the touchscreen 8 When external low voltage power is no longer required disconnect both cables beginning with the black negative cable 9 On top of the l...

Page 208: ...lishing However because continuous improvement is a goal at Tesla we reserve the right to make product modifications at any time To communicate any inaccuracies or omissions or to provide general feedback or suggestions regarding the quality of the Owner s Manual send an email to ownersmanualfeedback tesla com Location of Components Owner information may specify the location of a component as bein...

Page 209: ...arious purposes including but not limited to providing you with Tesla telematics services troubleshooting evaluation of your vehicle s quality functionality and performance analysis and research by Tesla and its partners for the improvement and design of our vehicles and systems to defend Tesla and as otherwise may be required by law In servicing your vehicle Tesla can potentially resolve issues r...

Page 210: ...place at Tesla and includes a road test conducted by a technician California Proposition 65 WARNING Operating servicing and maintaining a passenger vehicle or off highway motor vehicle can expose you to chemicals including phthalates and lead which are known to the State of California to cause cancer and birth defects or other reproductive harm To minimize exposure wear gloves or wash your hands f...

Page 211: ...mmediately inform the National Highway Traffic Safety Administration NHTSA in addition to notifying Tesla If NHTSA receives similar complaints it may open an investigation If it finds that a safety defect exists in a group of vehicles it may order a recall and remedy campaign However NHTSA cannot become involved in individual problems between you your dealer or Tesla To contact NHTSA you may call ...

Page 212: ...the FCC rules and Industry Canada s license exempt RSS Standard s and EU Directive 2014 53 EU Operation is subject to the following two conditions 1 this device may not cause harmful interference and 2 this device must accept any interference received including interference that may cause undesired operation Changes or modifications not expressly approved by Tesla could void your authority to oper...

Page 213: ...idential installation This equipment generates uses and can radiate radio frequency energy and if not installed and used in accordance with the instructions may cause harmful interference to radio communications However there is no guarantee that interference will not occur in a particular installation If this equipment does cause harmful interference to radio or television reception which can be ...

Page 214: ... environnement non contrôlé est sans danger pour le fonctionnement prévu tel que décrit dans ce manuel L exposition RF supplémentaire que la conformité a été démontrée à 20cm et plus de séparation du corps de l utilisateur ou de mettre l appareil à la puissance de sortie inférieure si une telle fonction est disponible Japan Korea TPMS Taiwan TPMS Radio Regulatory Compliance 212 MODEL S Owner s Man...

Page 215: ...rmany Autosteer should again be available once your vehicle is traveling below 90 mph 150 km h If Autosteer is not available by the time you reach your destination and remains unavailable during your next planned drive the problem might be one of these issues Damage or obstruction caused by mud ice snow or other environmental factors Obstruction caused by an object mounted on the vehicle like a bi...

Page 216: ...factor like these no action might be needed the condition might clear during your drive If the alert persists throughout your drive examine the front bumper before your next planned drive and attempt to clear any obstruction See the About Autopilot on page 81 sections How It Works and Cleaning Cameras and Sensors for more on the radar location and care needed if clearing dirt debris from that area...

Page 217: ... complete Your vehicle must maneuver with great precision when features like Traffic Aware Cruise Control and Autosteer are active Before these features can be used for the first time the cameras must complete an initial self calibration Occasionally one or more cameras can become uncalibrated For your convenience a calibration progress indicator is displayed on the touchscreen Calibration typical...

Page 218: ...e despite cleaning the indicated camera s and following recommended steps to clear condensation schedule service at your next convenient opportunity Your vehicle is OK to drive in the meantime CC_a001 Unable to charge Insufficient grounding Proper wiring or outlet grounding must be verified What this alert means No ground connection detected in the Wall Connector What to do Have the Wall Connector...

Page 219: ...iled 3 Thermal sensor disconnected 4 Other hardware component issues What to do An internal issue was detected by the Wall Connector 1 Try charging again by disconnecting the Wall Connector from the vehicle and reconnecting 2 If the issue persists turn OFF the circuit breaker for the Wall Connector wait 10 seconds and turn the circuit breaker ON again Then try reconnecting the Wall Connector to th...

Page 220: ...ector CC_a007 Unable to charge Input voltage too high Voltage must be within Wall Connector rating What this alert means Over or under voltage protection What to do Consult your electrician to ensure appropriate voltage on the circuit breaker that services the Wall Connector For more information see the installation guide for your Wall Connector CC_a008 Unable to charge Input voltage too low Volta...

Page 221: ...orqued according to the instructions in the Wall Connector Installation Manual 4 Once your electrician has completed all work and restored power to the Wall Connector try charging again by reconnecting the Wall Connector to the vehicle 5 If the issue persists the Wall Connector requires service For more information see the installation guide for your Wall Connector CC_a011 Unable to charge Wall Co...

Page 222: ...off What to do Make sure the connector is fully inserted into the charge inlet in the vehicle s charging port is not covered by anything and there is no heat source nearby If the issue persists in normal ambient temperatures under 100 F or 38 C service is required For more information see the installation guide for your Wall Connector CC_a014 Unable to charge Wall Connector issue Wall Connector ne...

Page 223: ...ment 3 If the issue persists service is required For more information see the installation guide for your Wall Connector CC_a016 Unable to charge Vehicle connection issue Insert charge handle fully into charge port What this alert means A communication error occurred between the Wall Connector and the vehicle What to do Try charging again by disconnecting the Wall Connector from the vehicle and re...

Page 224: ... 2 If the issue persists and other charging equipment is available plug the vehicle into another Wall Connector or a Mobile Connector to determine if the vehicle is able to communicate with other charging equipment 3 If the issue persists service is required For more information see the installation guide for your Wall Connector CC_a019 Unable to charge Vehicle connection issue Insert charge handl...

Page 225: ...installation guide for your Wall Connector CC_a021 Unable to charge No primary Wall Connector Check that primary unit is powered and available What this alert means Load sharing circuit breaker sharing network Need one and only one Wall Connector set as primary What to do Only one Wall Connector can be set to a primary configuration Have your electrician confirm 1 Only one of the Wall Connectors i...

Page 226: ... the Wall Connector Your electrician should also refer to the Set the Operating Current section in the Wall Connector Installation Manual If the Wall Connector is set up for load sharing circuit breaker sharing and paired with other Wall Connectors the rotary switch of the primary unit must be set to an operating current setting that allows each paired Wall Connector to receive at least 6A of char...

Page 227: ...o do An internal issue was detected by the Wall Connector 1 Try charging again by disconnecting the Wall Connector from the vehicle and reconnecting 2 If the issue persists turn OFF the circuit breaker for the Wall Connector wait 10 seconds and turn the circuit breaker ON again Then try reconnecting the Wall Connector to the vehicle 3 If the issue persists have an electrician make sure all wires a...

Page 228: ...rician should also refer to the Set the Operating Current section in the Wall Connector Installation Manual If the Wall Connector is set up for load sharing circuit breaker sharing and paired with other Wall Connectors the rotary switch of the primary unit must be set to an operating current setting that allows each paired Wall Connector to receive at least 6A of charge current Example Three Wall ...

Page 229: ...ctor but rather an issue with the building wiring This may be caused by a loose building wiring connection to the Wall Connector and can be fixed quickly by an electrician To regain normal charge speed contact an electrician to inspect the building wiring connection to the Wall Connector They should make sure that all wires are properly connected and torqued according to the installation guide for...

Page 230: ...using a Tesla Supercharger or Destination Charging location all of which can be located through the map on your vehicle s touchscreen display See Maps and Navigation on page 131 for more details Additional third party charging stations may also be available in your area to help you to pinpoint the issue For more information on troubleshooting Mobile Connector or Wall Connector status lights refer ...

Page 231: ...this occurs the charge port may be unable to accurately sense the charge port door position and the charge port may not operate as expected The charge port latch may intermittently remain engaged when the charge port door is opened The charge port light may illuminate only intermittently when the charge port door is opened If you encounter these or similar behaviors while the alert is present try ...

Page 232: ...e charge handle button on any Tesla charge cable including a Wall Connector Mobile Connector or Supercharger Hold and press the trunk button on your key fob For more information see Opening the Charge Port on page 164 CP_a053 Unable to charge Charge station not powered Check power source or try a different station Charging cannot begin because the charging equipment is not ready A charge handle is...

Page 233: ...ge cable connector for any obstructions use a flashlight as needed Debris and or foreign objects in the charge port inlet or the charge cable connector can prevent you from fully inserting the charge cable If the cable is not fully inserted the charge port latch will not engage It is recommended that any debris foreign objects be removed Afterward try re inserting the cable into the charge port in...

Page 234: ...s refer to the product s Owner s Manual at Charging Adapter Product Guides If using other external charging equipment refer to the manufacturer s provided documentation for troubleshooting tips CP_a056 Charging stopped Charge cable disconnected Close charge port Press brake pedal and retry Charging has stopped because your vehicle has detected that the connection between the charge port and charge...

Page 235: ...eported an error that prevents your vehicle from charging When this alert is present there will always be at least one other alert present that identifies a more specific condition For more information and troubleshooting suggestions it is recommended that you check in your vehicle touchscreen for other recent alerts that involve charging CP_a066 Charging equipment not ready See equipment instruct...

Page 236: ... to defrost your vehicle for approximately 30 45 minutes This should help thaw any ice on the charge port latch so the charge cable can be removed NOTE Be sure to use Defrost Car in your Mobile App to defrost your vehicle Adjusting the climate control settings in your vehicle s touchscreen will not be as effective If the charge cable still cannot be removed try the manual release cable in your veh...

Page 237: ...ary condition due to cold ambient temperature or a charge port inlet obstruction and it does not typically indicate an issue with your vehicle that can be resolved by scheduling service it is recommended that you Make sure the charge cable is fully inserted during charging Make sure any charge port inlet obstruction has been removed Press the Defrost Car button in your Tesla Mobile App to defrost ...

Page 238: ...tion display and controls to confirm charging has stopped or to end any active charging session 2 Make sure no flashing green or blue light LED is visible on your vehicle s charge port 3 Unplug the charging adapter from your vehicle s charge port 4 Confirm again that the charging station indicates no active charging session 5 Unplug the charging adapter from the charge handle Use different chargin...

Page 239: ...tor pedal Pressing the brake pedal Opening a door and or exiting the vehicle Pressing the Cancel button on the touchscreen Environmental external conditions Steep slope grade Weather conditions affecting visibility sensor function Curb cannot be detected A trailer is attached to the vehicle Vehicle system constraints Autopark should be available again during your next drive If this alert persists ...

Page 240: ...le driving Your vehicle is OK to drive Use the brake pedal as needed to slow your vehicle similar to the way you would apply the brakes in a gas powered non electric vehicle a vehicle with no regenerative braking to provide automatic deceleration This alert may occur when High voltage battery is near full charge Regenerative braking is reduced when the battery is at 95 charge or higher High voltag...

Page 241: ... and vehicle speed This is completely normal and does not indicate any issue with your vehicle Reduced braking performance is usually temporary and can occur for a number of reasons including high brake temperatures after heavy brake use or driving in extremely cold or wet conditions It can also indicate that your brake pads or rotors have worn to the point that normal replacement is needed If you...

Page 242: ... If using other external charging equipment refer to the manufacturer s provided documentation for troubleshooting tips PCS_a017 Charging stopped Power lost while charging Check power source and charging equipment Power has been lost during charging This could result from the charging equipment losing power from the source for example a wall outlet or from an issue with the charging equipment This...

Page 243: ...her troubleshooting tips based on equipment type If using a Mobile Connector try charging your vehicle with a different wall outlet If charging speed is no longer reduced the issue was likely with the original wall outlet It is recommended that you contact an electrician to inspect the building wiring connection to that outlet If charging speed is still reduced the issue may be with the Mobile Con...

Page 244: ...ay also be available in your area to help you to pinpoint the issue For more information on troubleshooting Mobile Connector or Wall Connector status lights refer to the product s Owner s Manual at Charging Adapter Product Guides If using other external charging equipment refer to the manufacturer s provided documentation for troubleshooting tips PCS_a052 External charging equipment not providing ...

Page 245: ...is alert is usually specific to external charging equipment and power sources and it does not typically indicate an issue with your vehicle that can be resolved by scheduling service it is recommended that you Try charging with multiple different types of charging equipment at different locations Contact an electrician to inspect the wiring and equipment at your normal charging location You can al...

Page 246: ... due to a condition that prevents your vehicle from charging with AC power DC fast charging Supercharging should still function as expected Your vehicle s onboard charger is detecting input voltage at the charge port when no power has been requested from the external charging equipment which indicates the external charging equipment is not functioning as expected This can sometimes be caused by a ...

Page 247: ...chnician after your vehicle has been serviced As this alert can be present due to various conditions it is recommended that you schedule service at your earliest convenience UI_a137 Active service connection to vehicle Service performing remote diagnostics A service technician is remotely logged into your vehicle for diagnosis or repair You may notice some loss of Infotainment functionality while ...

Page 248: ... charge with Mobile Connector Voltage too high Try a different wall outlet The vehicle cannot charge or charging is interrupted because either the Mobile Connector Detects the wall outlet voltage is too high OR Detects an unexpected increase in supply voltage from the wall outlet Try charging the vehicle with a different wall outlet If the vehicle starts to charge the issue was likely with the ori...

Page 249: ... the issue For more information on troubleshooting Mobile Connector status lights and charging issues refer to the product s owner s manual UMC_a008 Unable to charge Wall plug temperature high Wall outlet and wiring inspection recommended High temperature detected by Mobile Connector alerts indicate the outlet used to charge is becoming too warm so charging has stopped to protect the outlet This i...

Page 250: ...dapter fully into Mobile Connector and retry Your Mobile Connector is unable to communicate with the wall plug adapter Because your Mobile Connector cannot identify the type of wall outlet the wall plug adapter is connected to charge current is automatically reduced to 8A It is recommended that you try the following troubleshooting steps 1 Unplug your Mobile Connector including the wall plug adapt...

Page 251: ...needed based on the troubleshooting steps above In the meantime you can continue to charge with the same equipment The charge rate will be reduced as charge current will be limited to 8A while this condition persists You can also try charging your vehicle using a Tesla Supercharger or Destination Charging location all of which can be located through the map on your vehicle s touchscreen display Se...

Page 252: ...r Tesla Mobile App or with an independent service provider that offers low voltage battery replacement for your vehicle Please note that independent service provider options may vary based on your vehicle configuration and your location Your vehicle is OK to drive with this alert present However if you delay the low voltage battery replacement your vehicle may eventually not have enough electrical...

Page 253: ...le your vehicle may lose all electrical power If this occurs you can still use the manual door releases to exit the vehicle if necessary For more information see Opening Doors from the Interior on page 13 This alert may be present due to various vehicle conditions For more information and further recommended actions check for other active vehicle alerts VCBATT_a220 Electrical system is unable to s...

Page 254: ...eeds to come to a stop as soon as possible Pull over safely at your earliest opportunity It is possible your vehicle will shut down unexpectedly It is also possible that your vehicle will not restart after the current drive You may notice that some nonessential features are not available This is expected behavior due to your vehicle preserving energy for essential functions It is recommended that ...

Page 255: ...le the recommended cold tire pressure should be maintained at all times The alert should clear once the Tire Pressure Monitoring System detects that each of your tires is inflated to the recommended cold pressure The alert and Tire Pressure indicator light may still be present immediately after you have filled your tires to the recommended cold pressure but both should clear once you have driven a...

Page 256: ...r tires of at least 30 psi The alert and Tire Pressure indicator light may still be present immediately after you have filled your tires to the recommended cold pressure but both should clear once you have driven a short distance You may need to drive over 15 mph 25 km h for at least 10 minutes for the Tire Pressure Monitoring System to measure and report your updated tire pressures For more infor...

Page 257: ...avoidance assist 114 forward collision warning 114 overtake acceleration 84 overview 81 speed assist 117 speed limit warning 117 staying within speed limits 117 Summon 105 Traffic Aware Cruise Control 84 Autopilot components 81 Autosteer 88 B backup camera 77 Battery high voltage 163 182 193 care of 163 coolant 182 specifications 193 temperature limits 163 battery key replacing 10 battery low volt...

Page 258: ...delivery mileage 208 devices 138 Bluetooth playing audio files 138 dimensions 189 Dog 129 dome map lights 56 door handles 13 door labels 187 door seals 179 cleaning 179 doors 13 14 Child Lock 14 interior locking and unlocking 14 locking 13 opening from interior 13 Unlock on Park 14 unlocking 13 doors function 14 Walk Away Door Lock 14 Drag Strip Mode 71 Drive 54 drive away locking 14 drive modes 5...

Page 259: ...n 146 height adjustments suspension 184 disabling Jack mode 184 high beam headlights 56 high voltage 161 171 193 Battery specifications 193 components 161 safety 171 Home 5 button 5 screen 5 Home location 133 HomeLink 105 154 programming and using 154 when using Summon 105 hood 18 horn 47 hub caps 174 I I m Feeling Lucky Hungry 131 IC certifications 210 identification labels 186 inductive phone ch...

Page 260: ...description 162 using 164 modifications 185 motor specifications 191 My Apps 6 my car does what 140 N Navigate on Autopilot 93 NCC certifications 210 Neutral 54 NHTSA contacting 210 noise reduction microphones 24 O Obstacle Aware Acceleration 114 occupancy sensor 40 occupant classification 41 odometer 74 Off Peak Charging 167 offset from speed limit 117 Online Routing 135 opening hood without powe...

Page 261: ...ure 167 using 167 seat belts 29 30 178 cleaning 178 in a collision 30 overview of 29 pre tensioners 30 wearing when pregnant 29 seat covers 28 seat heaters 125 seating capacity 187 seating position 41 seats 26 125 adjusting 26 heaters 125 security settings 150 self leveling 146 sensors 81 Sentry Mode 151 service data recording 207 service intervals 170 Settings erasing 124 shifting 53 shortcuts 6 ...

Page 262: ...re markings 194 traction grade 196 treadwear grade 196 wheel configuration 172 winter 176 toll system transponders attaching 185 torque specifications 191 touch up body 179 touchscreen 5 6 157 179 adding shortcuts 6 cleaning 179 customizing My Apps 6 main 5 rear 5 software updates 157 touchscreens 5 overview of 5 towing 201 towing instructions 201 Toybox 140 TPMS 174 overview of 174 Track Mode 72 ...

Page 263: ...82 washer jets cleaning 181 washers using 63 wheel chocks 204 wheels 173 174 193 aero covers removing and installing 174 alignment 173 replacing 173 specifications 193 torque 193 Wi Fi connecting to 156 windshield washer fluid topping up 182 winter tires 176 wiper blades replacing 181 wipers using 63 wireless phone charger 23 Work location 133 Index ...

Page 264: ...Publication date 2022 5 1 ...

Reviews: