background image

11

ENG

Basic Operations

turning on/Standby 

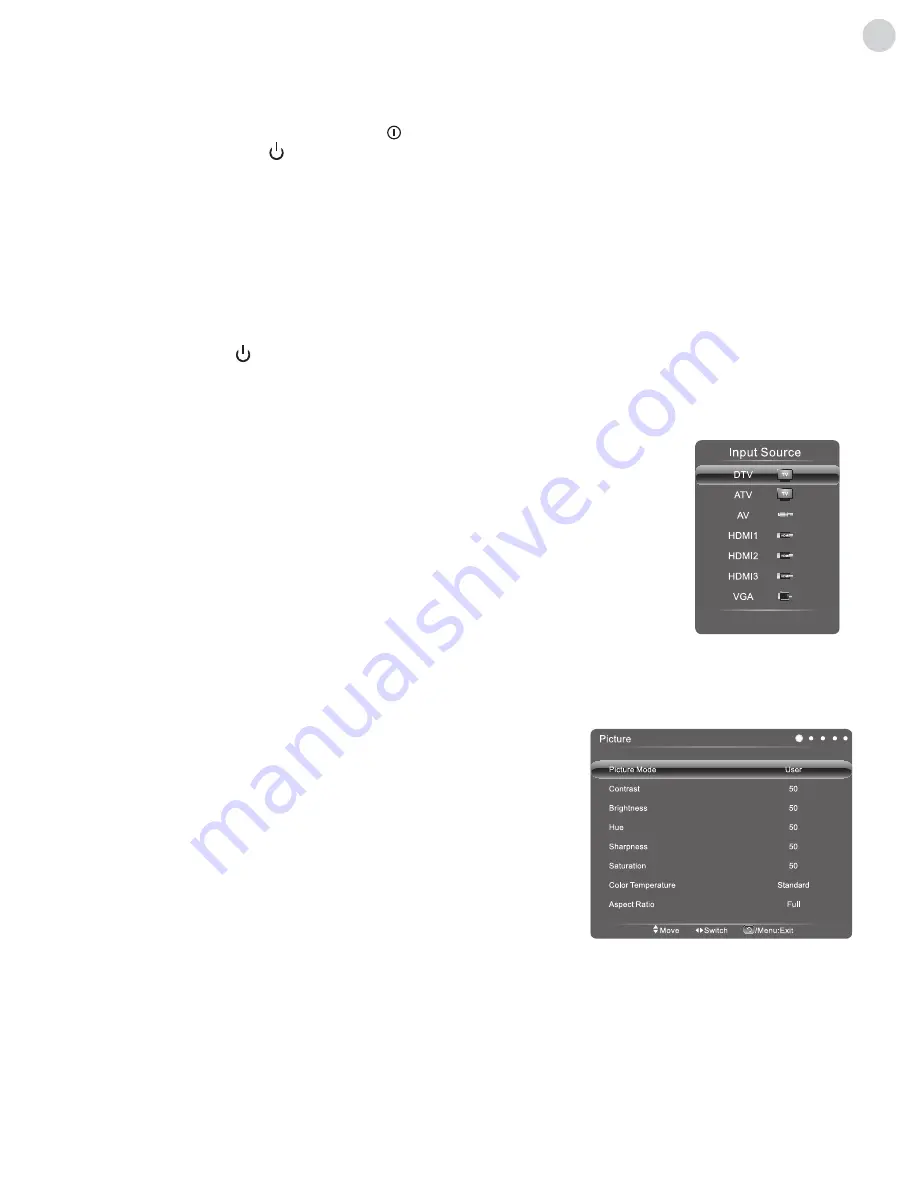
Signal source selection 

Menu operation description 

Plug power cord into the electrical socket� Press „ “  button on the TV set (if it doesn't have this button, you needn't 
operate this step), then press  „ “ key on the remote control or on the TV set to turn on the TV� The screen displays 

Welcome

“ menu� Press „

/

“ key on the remote control to select language which you wish, then select Start 

and press „

OK

“ key on the remote control to confirm� The screen displays „

Please Select Antenna Type and Start 

AutoScan

“� Press „

 /

“ key on the remote control to select Antenna Type which you wish, then select Next and press 

OK

“ key to go into next step (you can also select Skip and press „

OK

“ key to skip�) The screens shows the interface� 

Press „

 /

“ key on the remote control to select Search Type which you wish, then press „

“ key and you can select 

country where you are by pressing „

 /

 /

 /

“ key on the remote control� The device starts auto channel search after 

pressing „

OK

“ key� (If Antenna Type is DVB-C, you have to  press  „

 /

“ key on the remote  control  to  select  Full Scan  

or  Quick  Scan�  Press the „

Red

“ key to  set modulation� Press „

Green

“ key to set symbol rate� Press „

Yellow

“ key to set 

Network ID� After selecting Start Scan, press „

OK

“ key to confirm� The device starts scan� 

In power on state, press  „ “ key to switch to standby mode�

Special Tips:

 This device uses energy saving technology� If there is no signal input in power on state, it will enter standby 

state automatically in five minutes; the device will enter standby state automatically at specified sleep time�

After turning on the device, press „

SOURCE

“ key on the remote control or control panel to 

show the „

Input Source

“ menu on the screen; press „

 /


 key on the remote control or 

CH+/CH-

“ key on the control panel to select a signal source� Press „

OK

“ key on the remote 

control or „

SOURCE

“ key on the control panel to switch to the selected signal source�

The menu operations in this chapter are described in TV state; the operations in other states are basically the same�  
The operation of intelligent mode, please refer to following intelligent platform operating instructions�
Press „

MENU

“ key on the remote control or control panel to show the main menu on the screen:

1� Press „

 /


 key on the remote control or 

VOL+/VOL-

“ key on the 

control panel to select a menu from Picture, Sound, Channel, Setting, 
Parental Control�

2� Press „

/

“ key on the remote control or „

CH+/CH-

“ key on the control 

panel to select an item in the menu�

3� Press „

OK

“ key on the remote control to enter the submenu�

4� Press „

 /


 key on the remote control or 

VOL+/VOL-

“ key

5� When the main menu shows on the screen, press „

Return

“ key to exit the 

main menu�

6� During menu operation, the icons of invalid options will change into grey�

program scanning 

Tune the programs before watching the TV for the first time� Before scanning, please make sure that the antenna has been 
connected properly and select the desired Antenna Type� In the following example of channel searching, Antenna Type is 

DVB-T

Summary of Contents for K43D301B2S

Page 1: ...Model K43D301B2S D LED TV 43 DVB T2 ANDROID SMART Operating Instruction ENG Please read these instructions before operating your set and retain them for future reference...

Page 2: ......

Page 3: ...using experience 5 Thanks to the built in Wi Fi module web surfing is possible without additional network card and network cable 6 Dynamic contrast technology improves clarity and contrast of the scre...

Page 4: ...damage the power cord 1 It is prohibited to refit the power cord 2 Do not put heavy object on the power cord 3 Keep the power cord away from heat source 4 Do not drag the power cord when unplugging Do...

Page 5: ...l attention To carry the TV set with hands please grasp the corners and hold the bottom do not apply force on the panel Displaying the same image for a long time or active image with fixed words icons...

Page 6: ...ut signal source 2 USB interfaces support peripheral equipment including USB camera USB mass storage device USB mouse keyboard etc 3 ARC function is optional and please refer to the device 4 The perip...

Page 7: ...able HDMI signal cable USB 2 interface CI port Connecting power supply Coaxial OUT connection MHL function connection Antenna connection HDMI input connection When connecting outdoor antenna to signal...

Page 8: ...game console Connect to the devices with video input interface e g Monitor ARC function connection Network connection VGA input connection VIDEO output connection AV input connection HDMI signal cable...

Page 9: ...remote control 1 The remote control should be pointed at the remote control sensor during operation An object placed between the remote control and the remote control sensor may impede normal operatio...

Page 10: ...Show the information of the TV program 16 9 Switch the aspect ratio Press this button to return to last watching channel L R Select NICAM mode under ATV signal source INDEX Graphic homepage Index PLAY...

Page 11: ...no signal input in power on state it will enter standby state automatically in five minutes the device will enter standby state automatically at specified sleep time After turning on the device press...

Page 12: ...enu setting list Picture Picture Mode Adjust the overall effect of images Standard Soft User Bright Contrast Adjust the overall layering of images increase the analog value to improve the contrast and...

Page 13: ...ital channels is not possible Signal Information View signal information CI Information View CI information Setting Audio Language Select audio language 2nd Audio Language Select 2nd audio language Su...

Page 14: ...ndicates the current channel Indicates that system is recording a program Indicates the using state of disk Play Select this icon press OK key to play Stop Select this icon press OK key to stop and qu...

Page 15: ...e and mode select to confirm press OK key to finish reminder setting program put in plan management list select Close press OK key to drop out 5 Play current program in current time press OK key Notes...

Page 16: ...ree seconds 3 Clicking the left mouse key has the same effect as pressing OK key on the remote control 4 Clicking the right mouse key has the same effect as pressing Return key on the remote control L...

Page 17: ...uninstall an application Select Manage and press OK key to enter Select the application to be removed and press OK key Select Uninstall click OK key and the system will uninstall the application auto...

Page 18: ...he compatibility and stability of the USB device in this case please turn off the device and re initialize the system Play the previous picture Pause Play slideshow Play the next picture Rotate 90 rig...

Page 19: ...can be transmitted to each other for the Wi Fi Direct match to be succesfull both devices must support Wi Fi Direct feature and be mutually compatible 4 Press any key on the remote control to exit the...

Page 20: ...we will not bear any liability for client service Please directly contact relevant content and service providers if you have any problem and service request concerning relevant service or content Prob...

Page 21: ...remote control is low 1 Remove the object to avoid blocking the remote control receiving window 2 Replace the battery The browser cannot access any link 1 Errors occur in network parameter configurat...

Page 22: ...76i 576P 720P 1080i 1080P 6 Specific internal memory capacity in accordance with actual configuration 7 Specific cache capacity in accordance with actual configuration 8 Wireless connection Wi Fi IEEE...

Page 23: ...fasten the screws Notice that the base has to be adjusted as shown in the figure otherwise it cannot be installed Remark The actual base and device appearance may be different from pictures please ref...

Page 24: ...www tesla info Model K43D301B2S...

Reviews: