


9
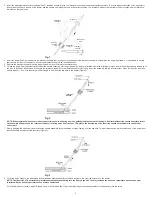
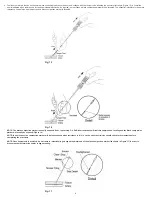
&RQWLQXHWRPDLQWDLQWHQVLRQRQWKHVXWXUHZKLOHFRQWLQXLQJWRDGYDQFHWKHNQRWDQGFROODJHQZLWKWKHWDPSHUWXEHIROORZLQJWKHSXQFWXUHWUDFWDQJOH)LJXUH$FRPSOHWH
VHDOLVLQGLFDWHGZKHQUHVLVWDQFHLVIHOWDQGKHPRVWDVLVLVDFKLHYHG$VDJXLGHLQPRVWFDVHVDEODFNFRPSDFWLRQPDUNHUZLOOEHUHYHDOHG7KHHVVHQWLDOLQGLFDWRUVIRUDVHDODUH
UHVLVWDQFHKHPRVWDVLVDQGLQPRVWFDVHVDEODFNFRPSDFWLRQPDUNHULVUHYHDOHG
Fig. 15
Fig. 16
NOTE: The black compaction marker is usually exposed. If not, repeat step C-4. Sufficient resistance will indicate completion of sealing and the black compaction
marker will usually be exposed (Figure 16).
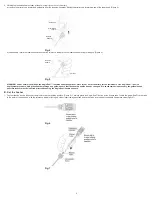
NOTE: In some cases the compaction marker will be fully exposed when resistance is felt. In such a case the clinician should check for hemostasis before
completing the procedure.
NOTE: Once hemostasis is achieved, do not tamp to intentionally go beyond the distal end of the black compaction marker (as shown in Figure 17) in order to
prevent anchor deformation and/or collagen tearing.
Fig. 17


