background image


Fig. A

Fig. 1

 1

 2

 3

 4

 5

 6

 7

 8


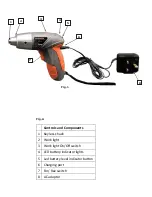
Controls and Components 

1 Keyless 

chuck 

2 Work 

light 

3  Work light On/O

ī

 switch 

4 LED 

ba

Ʃ

ery indicator lights 

5 Led 

ba

Ʃ

ery level indicator bu

Ʃ

on 

6 Charging 

port 

7 For/ 

Rev 

switch 

8 AC 

adaptor 

 1

 2

 3

 4

 5

6

 7

8

Summary of Contents for TLICS01

Page 1: ...3 6V LI ION Cordless Screwdriver Model TLICS01 User Manual Please read and retain for future reference...

Page 2: ...2 Gear shelf 1 Gear shelf 2 Gear 1 Gear Locking ring Locking pin Opening ring Lock sleeve Washer Washer Screw Motor cover Motor gear 17 18 19 20 21 22 23 24 25 26 27 28 29 30 31 32 33 Motor Transpare...

Page 3: ...Exploded Assembly Diagram NOTICE Actual product may vary from pictures shown...

Page 4: ...3 4 5 6 7 8 Controls and Components 1 Keyless chuck 2 Work light 3 Work light On O switch 4 LED ba ery indicator lights 5 Led ba ery level indicator bu on 6 Charging port 7 For Rev switch 8 AC adaptor...

Page 5: ...DC 300mA Read this entire manual before using this product Failure to do so can result in serious injury Save this manual for future reference Copyright 2012 by ACL Group Intl Ltd All rights reserved...

Page 6: ...ension cords with power tools fitted with 3 pin plugs and if using outdoors ensure any extension cord is suitable for outdoor use This symbol is to warn you of potential personal injury hazards Please...

Page 7: ...he job Never force the tool to work harder than it is designed to do Never use your power tool with broken parts such as switches guide fences or leg stands ALWAYS keep your power tools away from chil...

Page 8: ...on slip foot wear is recommended Wear protective hair covering if you have long hair 13 ALWAYS USE SAFETY GLASSES Also use face or dust mask for commercial cutting operations Everyday eyeglasses only...

Page 9: ...and provide for a secure stance The power tool is guided more secure with both hands Keep your workplace clean Blends of materials are particularly dangerous Dust from light alloys can burn or explode...

Page 10: ...e reverse to loosen jammed bits 5 Do NOT operate the Forward Reverse lever when the trigger switch is on The battery will discharge rapidly and damage to the unit may occur 6 When storing or carrying...

Page 11: ...g Port located on the back of the drill Fig 2 4 Allow 3 5 hours to fully charge the battery 5 Disconnect the adapter after charging 6 The LED battery level indicator shows the amount of charge still l...

Page 12: ...es jammed immediately turn the trigger switch off to prevent an overload which can damage the battery pack or motor Use reverse to loosen jammed bits 5 Do NOT operate the Forward Reverse lever when th...

Page 13: ...must be recycled according to the directive 2006 66 EC Maintenance Use only a dry soft cloth for wiping the unit Do not use a damp cloth thinner or other volatile solvents for cleaning Accessories CA...

Page 14: ...ment This warranty DOES NOT COVER normal wear or any damage as a result of accidents misuse abuse or negligence Mr Alan Garnett UK QA Manager We ACL Group Intl Ltd England DN6 8LZ declare that the Cor...

Reviews: