background image

77

Operating Manual Crawler Excavator TC37 

Care and Maintenance

7

7.8.4

Fuel system

Checking the fuel level

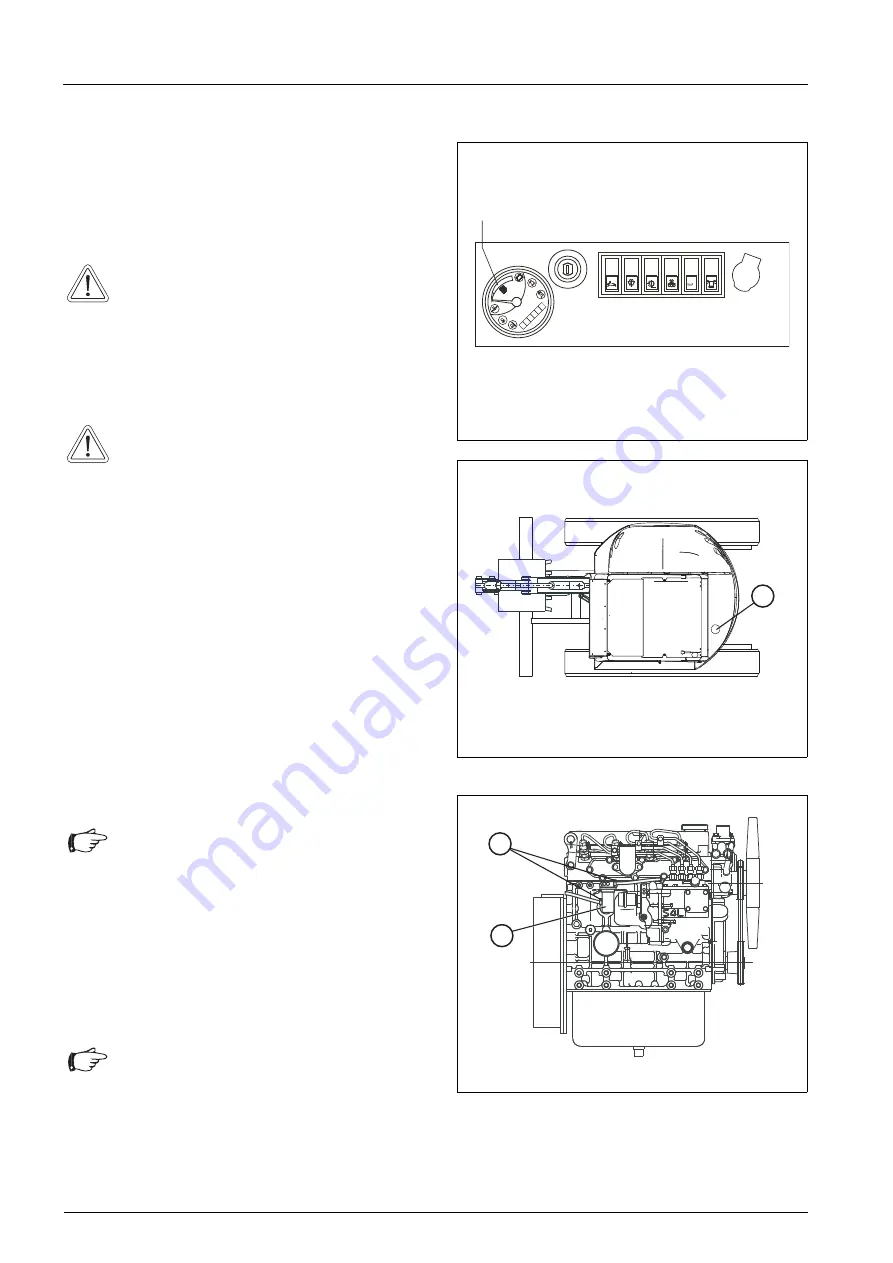
• Check the fuel level using the fuel gauge (45/23).

• In order to prevent condensation from forming 

before the machine is next put into operation, top 
up fuel every day after use (46/1).

Maintain visual contact with the fuel gauge (46/1) 
and the filler neck (46/1).

Replacing the fuel filter

• Loosen the hose clamps (47/2) and remove the 

filter (47/1).

• Collect any escaping fuel.

• Install a new fuel filter and re-tighten the hose 

clamps.

• Check for leakages.

Fig. 45

Checking the fuel level

Fig. 46

Fuel tank

0

4/4

h.

R

HR3.7-03-49

23

HR3.7-04-50

1

Caution

When topping up fuel with the electrical 
refueling pump the fuel cover must be opened 
to avoid excessive pressure in the fuel tank.

Caution

The pump switch is "on".

Fig. 47

Replacing the fuel filter

HR14-03-51

1

2

Attention

• Collect the fuel in a suitable container.

Attention

The fuel system does not have to be vented.

Summary of Contents for tc37

Page 1: ...Language version US Edition 2010 01 Order number 5780210654 From vehicle ID No TC00370429 Original operating instructions tc37 OPERATING INSTRUCTIONS tc37 CRAWLER EXCAVATORS Crawler Excavators...

Page 2: ...issioned on Dealer This operating manual is protected by limited copyright It may be reproduced for and used by the drive plant operator Terex Compact Germany GmbH Kraftwerkstra e 4 74564 Crailsheim G...

Page 3: ...er lines 20 2 16 Operation in closed spaces 21 2 17 Work stoppages 21 2 18 Load hook applications 21 2 19 Change of work attachments maintenance repair 22 2 20 Recovery Loading and Transporting 23 2 2...

Page 4: ...ging work attachments 56 6 2 1 Changing procedure using the quick attach system57 6 2 2 Hydraulically actuated additional work attachments 58 6 2 3 Clamshell grab option 58 6 2 4 Hydraulic rock breake...

Page 5: ...hield washer system 90 7 8 18 Electrical equipment 90 7 9 Immobilization 92 7 9 1 Preservation temporary immobilization 92 7 9 2 During immobilization 92 7 9 3 After immobilization 92 8 Trouble shooti...

Page 6: ...6 Operating Manual Crawler Excavator TC37 Table of Contents...

Page 7: ...se contact your dealer immediately Special equipment and attachments are not included in these Operating Instructions We reserve the right to make improvements on the machine within the scope of impen...

Page 8: ...onstantly in good working order and enjoys a reasonable service life Insist that only original Terex spare parts are used in the event of any repair work In this way you will have a product of lasting...

Page 9: ...ng greases and oils hydraulic oils fuels coolant cleaning fluids containing solvents do not seep into the ground or the sewerage system These substances must be kept transported collected and disposed...

Page 10: ...ry machine damage Travel speed FAST Attention Travel speed SLOW Battery charge indicator Horn Preheating Working floodlight s Engine oil pressure Rotating beacon Engine oil level Dozer blade Coolant t...

Page 11: ...12100 2 6 Applied European standards EN 474 1 EN 474 5 7 Document editor who is authorized to compile technical documentation Rainer Burger 74595 Langenburg Schaeffstra e 8 Germany 8 Voluntary type e...

Page 12: ...ion 2 2 2 Location of safety signs The safety signs are located in the following positions on the Crawler Excavator Fig 2 Locations of safety signs 1 1 Operator s manual 2 Crash hazard 3 Entanglement...

Page 13: ...Accident Prevention 13 Operating Manual Crawler Excavator TC37 2 Fig 3 Locations of safety signs 2 1 Injection hazard 2 Operator s manual 3 Flying object hazard 4 Explosion Burn hazard 5 Fall hazard...

Page 14: ...14 Operating Manual Crawler Excavator TC37 Safety and Accident Prevention 2 Fig 4 Locations of safety signs 3 1 Injection hazard 2 Crash hazard 2 1...

Page 15: ...Safety and Accident Prevention 15 Operating Manual Crawler Excavator TC37 2 Fig 5 Locations of safety signs 4 1 Fall hazard 2 Operator s manual 3 Crash hazard 4 Injection hazard 1 5 4 3...

Page 16: ...nated areas etc must likewise be observed 2 4 Proper use The earth moving machine with standard bucket equipment is intended solely for work which is suitable for the function of the machine and its w...

Page 17: ...s A check must be carried out to ensure that the first aid box is at hand and that its contents comply with regulations Personnel must be aware of the location and method of operation of the fire exti...

Page 18: ...g buildings excavation slopes scaffolding other machines etc If the above safety distance cannot be maintained the area between solid objects and the working zone of the earth moving machine must be b...

Page 19: ...in the user s country and that the driver has the appropriate license as required by the national traffic laws of the country in question Outside areas covered by general traffic regulations e g on co...

Page 20: ...rmined search ditches must be dug manually if need be If underground power lines are encountered unexpectedly or they or their protective covers are damaged the machine operator must discontinue work...

Page 21: ...eys 2 18 Load hook applications Load hook applications are the hoisting transporting and lowering of loads with the aid of a fixing device rope chain etc whereby the assistance of personnel is require...

Page 22: ...maintenance and repair work on the hydraulic system the hydraulic system must be relieved of pressure With the engine turned off lower the work equipment to the ground and actuate all hydraulic contro...

Page 23: ...ne engineer or machine foreman before the machine is put into operation for the first time and before the machine is again put into operation after essential modifications have been made at least once...

Page 24: ...open flames whilst refueling the tank of the machine 2 23 Notes concerning residual dangers Failure of hydraulic system If the hydraulic system fails because the diesel engine is not running the hydr...

Page 25: ...ons 3 1 Views 3 1 1 Digging envelope with 63 0 in dipperstick Fig 6 Digging envelope 35 R102 00 R94 12 98 06 134 33 39 38 R 1 8 1 0 7 R 1 7 4 0 0 120 70 123 85 151 06 178 47 125 54 155 87 182 84 R145...

Page 26: ...ing Manual Crawler Excavator TC37 Technical Specifications 3 3 1 2 Views with cabin Fig 7 Views with cabin A Total width of uppercarriage B Total width of dozer blade 69 31 63 01 98 06 0 4 4 h HR3 7 0...

Page 27: ...wler Excavator TC37 Technical Specifications 3 Fig 8 Working envelope Working envelope dipper heaped also with 23 63 in dipper 180 108 69 in 360 146 49 in 73 25 35 44 R 7 3 2 5 5 51 42 85 29 14 26 00...

Page 28: ...Battery 12 V 74 Ah Generator 12 V 50 A Starter 12 V 2 68 HP Tab 4 Technical specifications Electrical system Chassis Crawler type undercarriage Maintenance free crawler type undercarriage Idler suspen...

Page 29: ...nders part ially with end position damping Swing drive Hydrostatic swing motor and drive pinion on internally toothed ring gear of swing bearing Swing range 360 unlimited Swing speed 0 10 5 rpm The hy...

Page 30: ...and lubricants Fuel 17 17 Diesel Engine oil engine and filter 2 09 0 13 HD oil change quantity Hydraulic oil tank and system 19 02 Hydraulic oil Hydraulic oil tank 14 27 Hydraulic oil change quantity...

Page 31: ...sity limit values must be observed according to ASTM 445 at 212 F min 8 cSt at 14 F approx 1500 cSt BIO E HYD HEES Biodegradable hydraulic oil on synthetic ester base Filling according to customer spe...

Page 32: ...ic ground pressure 1 with rubber crawler chain Basic machine 0 41 da psi Basic machine with cab 0 42 da psi with steel crawler chain Basic machine da psi Basic machine with cab da psi Tab 9 Specific g...

Page 33: ...lbs Deepest bucket hinge point 92 94 in Canopy 176 lbs Maximum possible height 179 18 in Dimensions Dump height 120 50 in Total width of undercarriage dozer blade 69 31 69 31 in Maximum height of buc...

Page 34: ...of the work attachment must be deducted from the stated payload Permissible values Load radius from center of ring gear in foot 8 20 9 84 11 48 13 12 14 76 longt trans verse longt trans verse longt tr...

Page 35: ...g range for grab operations Danger of injury due to overturning hazard of machine For safety reasons ensure that the indicated reach distances are not exceeded when the grab is full Fig 11 Working ran...

Page 36: ...5 24 57 Bucket 19 69 30 12 19 69 32 23 Bucket 23 63 37 78 23 63 39 90 Bucket 27 57 45 18 27 57 47 82 Ditch cleaning bucket 39 38 30 91 39 38 36 99 Rotatable ditch cleaning bucket 39 38 30 91 39 38 30...

Page 37: ...ng beacon Travel motion alarm acoustic signal Crane lifting beam Floor plates rubberized for steel crawler chains Quick mounting adapter for hydraulic rock breaker Catalytic converter Biodegradable oi...

Page 38: ...38 Operating Manual Crawler Excavator TC37 Technical Specifications 3...

Page 39: ...familiarize yourself with the display elements and operator controls Each time before putting the machine into operation it must be subjected to a thorough visual inspection Ensure that there is no d...

Page 40: ...7 Additional control circuit rock breaker etc 8 Operation dozer blade 9 Manual throttle 10 Operation excavator installation 11 Fuse and relay box 12 Change over ISO to SAE control option 13 Vandalism...

Page 41: ...logging indicator yellow 23 Fuel gauge 24 Operating hour meter 25 Coolant temperature red 26 Power socket 27 Travel FAST SLOW option 28 Windshield wiper and washer system only for the cab 29 Working f...

Page 42: ...t the manual throttle 14 9 when the engine is running If the engine has not started after max 30 se conds turn the ignition key to 1 or 0 and pause for at least 1 minute before trying again repeat the...

Page 43: ...lter maintenance indicator 15 21 lights up perform the necessary maintenance work If the permitted coolant temperature 15 25 is exceeded stop work open the engine hood and keep the engine running at i...

Page 44: ...ff Move the manual throttle 15 9 to low idle position Turn the ignition key 15 33 to Position 0 The engine stops automatically Attention Do not switch off the engine when running at full throttle but...

Page 45: ...until the stop the weight adjustment mechanism automatically switches to the 110 25 lbs position 3 Seat back inclination adjustment Adjusting the driver s seat Operate the horizontal adjustment 16 1...

Page 46: ...switch 18 30 Hot air is distributed and aimed as desired via a windshield nozzle in the pedal console and by adjusting the air vent on the seat console Ventilation In ventilating mode the hot water su...

Page 47: ...vator TC37 Operation 4 4 6 Front window To open the windshield release the two levers 19 1 Pull the window back and up at the same time Lock the window in the upper position using the levers 19 1 Fig...

Page 48: ...rve Spot turning Operate the rocker pedal hand lever for the right and left hand crawler chains in an opposed manner Turning over one crawler chain Operate the rocker pedal hand lever for the right or...

Page 49: ...crawler chain as they may cause the crawler chain to be extended or damaged Do not undertake any sharp turns on surfaces with a high friction resistance such as rough concrete Avoid that the rubber cr...

Page 50: ...e ground Lower the dozer blade Turn off the engine and remove the ignition key 22 33 Apply and lock the vandalism guard 22 13 optional in case of canopy Raise the working hydraulics shut off exit barr...

Page 51: ...cified Retract the dipperstick Stop the engine Leave the excavator and close the doors Attach the excavator to the 3 point hoisting appliance at the points illustrated in the correct manner Ensure tha...

Page 52: ...ing the machine onto a truck Fig 26 Connect the loading platform ramp to the excavator max angle 15 Secure the machine to be loaded with chocks against rolling away Drive the machine in reverse onto t...

Page 53: ...urself with the controls Fig 27 Operating the exit barrier HR3 7 03 22 0 4 4 h R 2 2 1 10 12 Danger to life due to incorrect operation of the control system Check your excavator to see which control s...

Page 54: ...efore working with the excavator check if the ISO or SAE control system option is activated Familiarize yourself with the control system Danger of injury due to uncontrolled movements of the machine F...

Page 55: ...and pull joystick rearward dozer blade moves up Press push button 30 18 on joystick 30 10 and push joystick forward dozer blade moves down 6 1 4 Work function Additional control circuit Pedal based co...

Page 56: ...e to install attachments Attention Under special circumstances it is possible to use the work attachments of predecessor models for our machines When mounting the work attachments of predecessor model...

Page 57: ...orage space 33 16 inside the driver s cabin Procedure for changing work attachments without quick attach system Lower the work attachment onto the ground and position so that it cannot tilt Remove the...

Page 58: ...are completely extended Fully retract the bucket cylinder piston rod and close the ball valve 34 3 Connect the swivel motor to the couplings 34 1 additional control circuit and the Open Close function...

Page 59: ...and secure Connect the swivel motor to the couplings 34 1 additional control circuit and the Open Close function to the couplings 34 2 bucket cylinder Machine damage due to the bucket cylinder piston...

Page 60: ...inappropriate hydraulic rock breaker Only use rock breakers approved by Terex The Mounting Operating Instructions of the hydraulic rock breaker manufacturer must be observed Neither the permissible ca...

Page 61: ...ts 36 5 remove nut only in case of screwing 36 B Unhinge the cabin using a crane and place it carefully down onto the ground Put on the canopy and fasten tightening torque MA 59 lbf ft Plug in the cab...

Page 62: ...62 Operating Manual Crawler Excavator TC37 Working operation 6...

Page 63: ...ls Maintenance and inspection plans for this purpose are contained in every Instruction Book It is essential that the recommendations in the Chapter Safety and Prevention of Accidents are observed 2 1...

Page 64: ...Sequential damage can be avoided How often should the oil be analyzed Periodic oil analyses reveal trends in the condition of the oil and the machine The oils should be analyzed at the following inter...

Page 65: ...ther 5 501 655 650 Engine oil filter 5 527 655 812 Fuel filter fuel pump 5 527 656 893 Fuel water separator filter 5 527 665 341 Air filter main cartridge 5 501 648 497 Air filter safety cartridge 5 5...

Page 66: ...Engine Instruction Book should be observed during winter operation Hydraulic oil If the machine is not used for longer periods at temperatures around and below freezing warm it up by running the engin...

Page 67: ...eck hydraulic oil level 7 8 8 84 4 Check fuel level 7 8 4 77 5 Check coolant level 7 8 3 75 6 Check the oil level in the crawler gear units 7 8 12 87 7 Check the crawler chain tension 7 8 14 88 8 Chec...

Page 68: ...vator TC37 Care and Maintenance 7 7 7 2 Daily and weekly tasks Inspection and maintenance jobs to be performed by operating personnel Fig 38 Inspection and maintenance plan 0 4 4 h HR3 7 04 34 R 18 15...

Page 69: ...ng to overview of lubricating points 7 7 3 70 Tab 18 Daily tasks Weekly Chapter 11 Clean the cooling fins of the water cooler and the hydraulic oil cooler 7 8 3 75 7 8 9 85 Machine damage due to stron...

Page 70: ...verview of lubricating points Machine damage due to damaged lubricating nipples Replace damaged grease nipples immediately and check if grease passes through Fig 39 Overview of lubricating points 0 4...

Page 71: ...ylinder Dipperstick 1 X 6 Dipperstick cylinder Dipperstick 1 X 7 Boom Dipperstick 1 X 8 Dipperstick cylinder Boom 1 X 9 Boom cylinder Boom 1 X 10 Boom cylinder Slewing column 1 X 11 Slewing column Boo...

Page 72: ...8 3 75 Machine damage due to strong accumulation of dust Shorten the cleaning intervals 11 Check level of antifreeze in the coolant O 7 8 3 75 12 Change the coolant as required 1 7 8 3 75 13 Check V...

Page 73: ...y fastened O O O 7 8 15 89 33 Grease machine according to overview of lubricating points O O 7 7 3 70 34 Check function condition and completeness of safety devices O O 35 Check function of brake valv...

Page 74: ...the engine until it reaches operating temperature engine oil temperature approx 176 F Park the machine on a level surface Stop the engine Place suitable drip pans under the opening Screw the oil drain...

Page 75: ...with a mixture of water and antifreeze 50 50 Fill the coolant up to the MAX 42 2 filling level Water cooler cleaning the cooling fins Clean the water cooler from the outlet side with compressed air Cl...

Page 76: ...ling system with clean water Refit the drain plug to the engine and close again the drain valve on the cooler Fill the cooling system with coolant and close the cooler with the cap 43 1 Start the engi...

Page 77: ...el filter Loosen the hose clamps 47 2 and remove the filter 47 1 Collect any escaping fuel Install a new fuel filter and re tighten the hose clamps Check for leakages Fig 45 Checking the fuel level Fi...

Page 78: ...fuel filter Draining the fuel system Place a suitable container under the opening of the water separator Unscrew the drain valve 48 3 until fuel flows out of it Remove the container and dispose of th...

Page 79: ...s etc from the air intake section in front of the air filter Check the air filter attachment for damage and repair or replace if necessary Check the tightness of the air duct after the air filter Exam...

Page 80: ...the dust ejection valve Withdraw the dirty air filter cartridge 51 2 by carefully turning and tilting and dispose of it Note down the date of maintenance on the safety cartridge Clean the filter hous...

Page 81: ...n with tension brackets 51 5 7 8 6 V belt Check the entire V belt for damage visual inspection Replace damaged or worn V belts immediately Checking V belt tension Checking without a belt tensioner gau...

Page 82: ...g screw of the protective grill and remove the protective grill Loosen the clamping bolt 53 1 of the generator and remove the V belt Slightly press the water cooler to the right and take out the V bel...

Page 83: ...further by one full turn 360 In this position check the valve lash of the valves on the 1st cylinder To adjust the other cylinders turn the crankshaft further by 180 in each case Order of adjustment f...

Page 84: ...back on the drain plug carefully Loosen the return filter cover Fill up with clean hydraulic oil until the correct level on the sight glass 55 3 is reached Re mount the filter cover Screw back in the...

Page 85: ...h cold detergent or a steam jet appliance if required e g if there is oil in the cooler Park the machine on a cleaning area equipped with an oil separator Clean the machine using a steam jet appliance...

Page 86: ...ew filter element Apply a light coat of grease 58 2 to the cover and tighten 58 1 the cover by hand Check the tightness of the filter 7 8 11 Breather Remove the breather 57 1 replace it by a new filte...

Page 87: ...ion plug 59 2 on the transmission Open the drain plug 59 1 and catch any escaping oil Flush out the transmission with flushing oil if necessary Carefully re insert the drain plug with sealing tape and...

Page 88: ...nipple and let grease drain out until the correct crawler chain tension is obtained Re tighten the valve using the grease nipple Remove any grease and dispose of according to regulations Move the cra...

Page 89: ...re prerequisites for an optimum bolted connection on the chassis and the uppercarriage The contact faces of bolts must be of bright metal i e absolutely free from grease and paint The thread and the b...

Page 90: ...side inside the cabin Only check the battery with the engine switched off The acid level should be approx 0 39 in above the plates If necessary top up with pure distilled water Attention The swing gea...

Page 91: ...st the positive battery cable then the ground cable Close again the cabin floor Checking the lighting and warning equipment Check the function of the lighting equipment Check the function of the indic...

Page 92: ...en out of use for more than 6 months The oil in the assemblies such as axles transmission s etc must be changed Replace hydraulic oil filters suction and return filters breathers if installed Machine...

Page 93: ...Main relief valve damaged or wrongly adjusted Replace main relief valve Insufficient driving performance Insufficient engine power Check diesel engine Main relief valves damaged or wrongly adjusted C...

Page 94: ...operating satisfactorily Seals in cylinders worn Re seal cylinder s Secondary valves damaged or wrongly adjusted Check secondary valves and replace completely if required Main relief valves wrongly a...

Page 95: ...10 20A Optional 2nd control circuit optional electrical seat air conditioning system F11 5A Instrument cluster immobilizer F12 10A Interior light radio rotating beacon F13 20A Socket F14 15A Optional...

Page 96: ...chanical key in the start switch has activated terminal 15 This makes it necessary to first open the mechanical locking system before the electronic key is inspected A manipulation of the immobilizer...

Page 97: ...rding to lubrication chart and demonstration of these points on the machine Handing over of Diesel Engine Operating Instructions 2 Spare Parts List Structure of Spare Parts List Figures and the associ...

Page 98: ...cid level and battery connections O O 20 Check condition of crawler chains O O 21 Check secure fastening of crawler chain sprocket crawler gear units and hydraulic motor O O 22 Check smooth running of...

Page 99: ...ne oil 32 74 Engine oil filter 75 Engine oil level 74 Environmental protection 9 F Filter insert 86 Fire extinguisher 24 Fire protection 24 Front window 47 Fuel 66 Fuel filter 77 Fuel system 77 Fuel t...

Page 100: ...T Table of carrying capacity 34 Table of faults 93 Technical Specifications 25 Toothing 89 Transport 23 52 Trouble shooting 93 U Underground power lines 20 V Valve cover 83 Valve lash 83 V belt 81 82...

Reviews: