background image

Chapter Overview

This chapter provides hydraulic pressure and flow

check, adjustment and troubleshooting procedures. 

Personal Safety

Improper or incomplete maintenance/repair of a Compact

Track Loader can be dangerous and may result in machine

damage, injury or death.   

Do not attempt to perform any type of repair or maintenance

on a Compact Track Loader until you have read and fully

understood the information in this manual.  Refer to the

Operation and Maintenance manual for instructions regard-

ing proper machine operation techniques before operating

any Compact Track Loader.

Prior to performing any type of service work on a Compact

Track Loader, read and understand Chapter 1 (Product

Safety) for personal safety information.

Hydraulic oil must be at operating temperature to

obtain accurate readings during the pressure and flow

test procedures described in this section. Start and

warm the engine and hydraulic oil prior to performing

the test and troubleshooting procedures in this section.

Contamination Inspection

The hydraulic system can become contaminated when

one or more of it’s dynamic components fails or begins

to wear excessively. This can introduce significant

amounts of debris into the hydraulic oil. 

In the event of contamination, the defective compo-

nent(s) must be replaced, the remaining components

must be inspected and thoroughly cleaned (if found to

be reusable) and the system lines and reservoir must

be thoroughly flushed to restore original function. 

The hydraulic filters remove contaminants from the oil.

Small amounts of debris found within the filters are to

be expected, but If there is significant metallic debris

found in either filter, certain components of your

hydraulic system may be contaminated. To inspect for

contamination, label the hydraulic filters by location

and remove them. Cut them apart approx. halfway

between the top and bottom of the filter and inspect

them for debris. If contamination is suspected, contact

the Terex service department at 1-800-346-4367. 

Hydraulic Pressure Test &
Troubleshooting Procedures

Test and troubleshooting procedures are provided for

the following Hydraulic system components.

• 

Charge Pressure Check & Adjustment

• 

Auxiliary Valve Pressure Check & Adjustment

• 

Lift Arm Pressure Check & Troubleshooting

• 

Drive Pressure Check & Troubleshooting

When checking hydraulic system pressures, you are

essentially reading the relief valve settings of each cir-

cuit tested. If your hydraulic system and components

are functioning properly, your readings should match

those specified. If they differ, adjustment and or repair

may be required to restore proper function.

The procedures in this section are listed in the
order they are to be performed. 

When a pressure

issue is suspected, perform these procedures to help

diagnose and or repair the problem.

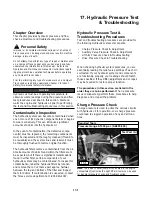
Charge Pressure Check

Charge pressure is used to prime the various circuits

with hydraulic oil for operation. Low charge pressure

could lead to sluggish operation of any and all func-

tions.

Note:

The quick coupler (test port A) located in the engine

compartment just inside the right lift arm tower can be used

for general pressure checks and troubleshooting. 

Required Tools
Pressure Gauge 0-1000p.s.i. (0-6895 kPa)

17-1

Test Port (A)

NOTICE

17-1

17. Hydraulic Pressure Test

& Troubleshooting 

Summary of Contents for PT100G Forestry

Page 1: ...PT 100G PT 100G Forestry Part Number 2076 286 Printed 8 10 Service Manual Compact Track Loader...

Page 2: ......

Page 3: ...ocedure 4 2 Grease Fittings 4 3 Undercarriages 4 3 Track Tension 4 4 Planetary Oil Change 4 4 Drive Sprocket Rollers 4 5 Track Removal 4 6 Track Installation 4 8 Air Cleaner 4 10 Fuel Filter 4 11 Wate...

Page 4: ...tion Procedure 9 5 Suction Screen 9 5 Removal Procedure 9 5 Installation Procedure 9 5 10 Lift Arm Drive Controls Chapter Overview 10 1 Personal Safety 10 1 Machine Preparation 10 1 Removal Installati...

Page 5: ...ssembly Assembly 16 1 Hydraulic Cylinder 16 1 Disassembly Procedure 16 1 Assembly Procedure 16 3 Lift Arm Control Valve 16 4 Disassembly Procedure 16 4 Assembly Procedure 16 5 Drive Pump Drive Relief...

Page 6: ......

Page 7: ...is not specifically recommended by Terex you must satisfy yourself that it is safe for you and others You must also ensure that the machine will not be damaged or be made unsafe by the operation lubri...

Page 8: ...is released from the electrolyte through the battery outlets Do not let electrolyte solution make contact with skin or eyes Electrolyte solution is an acid In case of contact immediately wash skin wit...

Page 9: ...d with the guid ance of appropriate reference information Determine the type of metal being welded and select the correct welding procedure and filler material to provide a weld that is as strong or s...

Page 10: ...x replacement parts or parts that meet or exceed original specifications including but not limited to physical dimensions type strength and material Installing lesser components can lead to premature...

Page 11: ...serious injury or death WARNING NOTICE DANGER Explosion Burn Hazard Will cause death burns or blindness due to ignition of explosive gasses or contact with corrosive acid Keep all flames sparks away N...

Page 12: ......

Page 13: ...3 kPa Cooling filtering Oil is filtered and cooled at all times In auxiliary mode the oil is filtered after the attachment to protect the machine if the attach ment motor fails or contaminants are int...

Page 14: ......

Page 15: ...c control circuit hydraulic drive cir cuit lift arm control valve hydraulic solenoid blocks and electrical attachment outlet Figure 3 1 PT 100G Hydraulic Charge Circuit Hydraulic Charge Circuit 3 Circ...

Page 16: ...t Figure 3 2 PT 100G Hydraulic Auxiliary Circuit 3 2 Compact Track Loader 3 Circuit Diagrams TO HIGH FLOW AUX Q C AUXILIARY PUMP LIFT ARM VALVE AUXILIARY PUMP INLET TO LOW FLOW AUX Q C FROM ATTACHMENT...

Page 17: ...rol Circuit Figure 3 3 PT 100G Hydraulic Control Circuit 3 3 Compact Track Loader 3 Circuit Diagrams LIFT ARM CONTROL VALVE TO LIFT ARM CYL TO BUCKET CYL TO POWER Q A TO TANK CHARGE PRESSURE TEST PORT...

Page 18: ...T 100G Hydraulic Drive Circuit 3 4 Compact Track Loader 3 Circuit Diagrams DRIVE MOTOR DRIVE PUMP CASE DRAIN TO COOLER BRAKE 2 SPEED SHIFT DRIVE MOTOR CHARGE PRESSURE RELIEF 400 2758 kPa DRIVE PRESSUR...

Page 19: ...alve 3 5 Compact Track Loader 3 Circuit Diagrams RELIEF VALVE SETTINGS 3989 PSI 27500 kPa 3989 PSI 27500 kPa 4206 PSI 29000 kPa 3481 PSI 24000 kPa 3989 PSI 27500 kPa 4496 PSI 31000 kPa 3989 PSI 27500...

Page 20: ...Hydraulic Solenoid Blocks Figure 3 6 PT 100G Hyd Solenoid blocks 3 6 Compact Track Loader 3 Circuit Diagrams...

Page 21: ...Electrical Attachment Outlet Figure 3 7 PT 100G Electrical Attachment Outlet 3 7 Compact Track Loader 3 Circuit Diagrams...

Page 22: ......

Page 23: ...orted only by a jack The lift arm brace is used to support the weight of the lift arms much like jack stands are used to mechanically support vehicle weight To install the lift arm brace 1 Park the ma...

Page 24: ...lift arms if raised per page 4 1 Jacking Procedure Occasionally your machine may need to be suspended off of the ground to perform maintenance Exercise caution when jacking the machine Always use a j...

Page 25: ...te in harsh working conditions They work in mud gravel debris and various other abrasive materials during operation Terex recommends a daily inspection of the undercarriage assemblies and cleaning if...

Page 26: ...e 4 8 4 Measure from the bottom of the straight edge to the lug surface top of the track The deflection should measure between 3 4 and 1 1 9 2 5 cm To adjust track tension fig 4 9 1 Loosen the lock nu...

Page 27: ...sprocket to be removed 2 Remove the sprocket mounting bolts 2 to release sprocket from drive motor then remove the sprocket Note You may need to pry or lift the track upwards with a hoist above the d...

Page 28: ...foreign material from the cavity between the suspension rail and the drive table support fig 4 12 Note A shop vac or pressure washer will work well to remove material from this cavity 2 Clean the thr...

Page 29: ...then remove the wheel fig 4 18 4 19 8 Use a pry bar to peel the track over the inner wheel s toward the outside of the machine fig 4 20 9 Once the track is off of the front wheel s pull the rear of t...

Page 30: ...pward slightly and in position to slide over the inner idler wheel at the front fig 4 27 6 Pull all of the slack forward and make sure the track drive lugs are properly meshed with the sprocket to pro...

Page 31: ...om spinning as you torque the mounting bolts fig 4 31 10 Install the scraper onto the suspension rail and tighten the bolts to secure it in place fig 4 32 11 Install the outer idler wheel and secure i...

Page 32: ...nstall the new secondary filter element into the enclosure as found upon disassembly fig 4 37 6 Install the primary element by sliding it into place in the enclosure as found upon disassembly 7 Instal...

Page 33: ...embly 5 Install the new filter element into the assembly by reversing steps 2 4 Water Separator The water separator item A fig 4 38 removes water from the fuel supply as the engine runs Drain the wate...

Page 34: ...If it is not on the old filter check the filter head If it is still on the filter head remove it prior to installing the new filter If the old filter gasket fig 4 42 item A is not removed from the fil...

Page 35: ...ood to gain access to the engine compartment 3 Locate and remove the engine oil dipstick from its tube fig 4 44 item A 4 Wipe the dipstick with a clean shop cloth and re insert it into the tube until...

Page 36: ...to installing the new filters 9 Prepare the new filters by rubbing a small amount of fresh hydraulic oil onto the filter gasket surface and then threading them onto their respective filter heads Tight...

Page 37: ...criptio of the operations manual and is cool 2 Wear any appropriate safety clothing 3 Clean the radiator oil cooler using compressed air or a pressure washer and direct spray forward as shown Note Mak...

Page 38: ...hich is located behind the panel cover in the right rear corner of the interior of the cab behind the operator seat In the event of an electrical malfunction the most logical place to start is at the...

Page 39: ...ily Adjust tension as necessary Air cleaners Inspect Daily Replace if damaged or heavily soiled Radiator oil cooler Inspect Daily Clean often as necessary Undercarriages Inspect Daily Clean often as n...

Page 40: ......

Page 41: ...elec trical signals to attachments connected to the outlet located at the end of the lift arms Throttle The mechnical foot throttle floor mounted pedal item 3 controls engine rpm Instrumentation The...

Page 42: ...ion Switch optional 3 Air Temperature Control optional 4 Work Light Switch 5 Bucket Positioning Switch optional 6 High Flow Aux Switch forward 7 High Flow Aux Switch reverse 8 Power Quick Attach Switc...

Page 43: ...eath to personnel working on a Compact Track Loader As a precaution disconnect the battery cables from the battery terminals tape the battery clamps and remove the key from the ignition switch prior t...

Page 44: ...pose the connectors Disconnect the switches and display from the cab harness then remove the cover fig 6 5 Note The connectors on the harness are labeled as are the wires in the cover Use these labels...

Page 45: ...utlet then remove the panel from the machine fig 6 9 Installation 1 To install the side panels reverse the removal procedure Pillar Harness Panels Removal 1 Remove the fasteners securing the pillar pa...

Page 46: ...val procedure Headliner Removal 1 Remove the finishing caps with a blade type screwdriver to gain access to screws as shown fig 6 14 2 Remove all screws with a phillips screwdriver fig 6 15 3 Lower th...

Page 47: ...tery clamps and remove the key from the ignition switch prior to performing any service work on a Compact Track Loader Place a Do Not Operate tag prominently on the machine to inform personnel that th...

Page 48: ...clamps that secure the return and vent hoses to the left and right rear of the fuel tank fig 7 5 4 Disconnect and plug the ends of the hoses to prevent fuel leakage 5 Carefully remove the zip tie fro...

Page 49: ...7 9 9 Lift and remove the tank from the machine fig 7 10 Installation 1 To install the fuel tank reverse the removal procedure Footwell Removal 1 Raise and support the lift arms as described on page...

Page 50: ...lation 1 To install the footwell reverse the removal procedure Foot Throttle Assembly Removal Note The foot throttle assembly may be removed with the footwell still installed in the machine 1 Perform...

Page 51: ...from hood spring tension bracket on each side of machine fig 7 17 2 Attach lifting device with hood in open position as shown in 7 18 3 Remove the allen head bolts from each side of the hood hinges fi...

Page 52: ......

Page 53: ...rsonnel working on a Compact Track Loader As a precaution disconnect the battery cables from the battery terminals tape the battery clamps and remove the key from the ignition switch prior to performi...

Page 54: ...ow clearance to remove the shroud and fan fig 8 3 2 Remove the bolts 6 securing the radiator and shroud to the radiator support fig 8 4 3 Push the shroud forward to allow access to the fan mounting bo...

Page 55: ...8 8 5 Remove the upper hydraulic cooler hose Cap or plug the exposed ends of the engine cooler and hose upon removal fig 8 9 6 Loosen and disconnect the lower hydraulic line from the cooler Cap and pl...

Page 56: ...d ends of the radiator and hose fig 8 11 8 12 8 Tilt the radiator rearward and then remove it from the machine fig 8 13 9 Tilt the fan shroud rearward and remove it from the machine fig 8 14 Installat...

Page 57: ...n procedures are provided for the following hydraulic components Hydraulic Reservoir tank Suction Screen Note Procedures are provided for only those hydraulic components listed above However exploded...

Page 58: ...Using one wrench keep the pilot tube steady to ensure it does not twist with another wrench separate the tubes Then remove the pressure tube from the machine fig 9 4 9 Loosen the hose clamp on bottom...

Page 59: ...cted to the hydraulic filter Then remove cooler inlet tube from the check valve adapter fig 9 9 Both tubes can then be removed from the machine 14 Remove both the auxiliary inlet and return hoses from...

Page 60: ...the tubes to be removed 18 Remove the hydraulic oil fill tube and other hoses from the top of the tank on each side fig 9 14 19 Disconnect the lower hoses on the back of the tank on each side fig 9 15...

Page 61: ...any tubes hoses connected to the flange weldment that may interfere with removal 3 Remove the bolts and washers 12 securing the flange to the hydraulic reservoir 4 Slide the assembly out of the reser...

Page 62: ......

Page 63: ...ttery terminals tape the battery clamps and remove the key from the ignition switch prior to performing any service work on a Compact Track Loader Place a Do Not Operate tag prominently on the machine...

Page 64: ...the lower portion of the boot to the joystick body then lift it upwards figure 10 2 5 Remove the four bolts to disconnect the joystick from the mount fig 10 3 6 Disconnect wire harness from joystick f...

Page 65: ...bolts 3 securing the loader valve to the chassis then remove the valve fig 10 9 Note The carriage bolts have a partial square shank that mates with a square hole in the chassis to keep them from rota...

Page 66: ......

Page 67: ...hydraulic component service according to the procedure described on page 4 14 Removal and Installation Removal and installation procedures are provided for the following hydraulic components Charge Pu...

Page 68: ...rt debris from entering the engine during operation Auxiliary Pump Removal 1 Raise and support lift arms as described on page 4 1of this manual 2 Turn the ignition switch to the OFF position and remov...

Page 69: ...ing disassembly plug and cap hoses and fittings to prevent fluid loss and or contamination 1 Perform the auxiliary pump removal procedure found in this chapter 2 Disconnect the case drain hose from th...

Page 70: ...moving the hose once the tandem pump has been removed 7 Attach a lifting device to elevate and secure the tandem pump as it is disconnected from the engine Lift up to approximately 1 2 fig 11 12 8 Det...

Page 71: ...rocedure from page 4 5 of this manual Note Label the drive hoses drive motor and drive table to ensure correct installation and proper orientation during reassembly 3 Remove the hoses from the drive m...

Page 72: ...sliding it away from the chassis and then out of the drive table fig 11 19 Installation 1 To install the drive motor into the undercarriage reverse the removal procedure Compact Track Loader 11 Hydrau...

Page 73: ...ompact Track Loader As a precaution disconnect the battery cables from the battery terminals tape the battery clamps and remove the key from the ignition switch prior to performing any service work on...

Page 74: ...ll it away from the studs fig 12 5 4 Remove the tension springs that secure the middle pipe section to the head upper pipe and muffler inlet lower pipe fig 12 6 5 Remove the upper and middle pipe sect...

Page 75: ...th a rubber mallet or dead blow hammer to loosen the joints fig 12 10 Note Use caution not to damage the pipe or connection point during removal Note Use caution when striking the pipes with a mallet...

Page 76: ...e yellow slide lock on the air cleaner housing outward as shown Next turn the cover approximately 1 8 turn CCW and pull to remove fig 12 15 3 Remove the primary element filter fig 12 16 4 Remove the s...

Page 77: ...to starting this procedure 2 Remove the hood assembly as described on page 7 5 of this manual 3 Raise and support the operator enclosure cab as described on page 4 2 of this manual 4 Perform steps 2...

Page 78: ...r from the ECU computer located behind the oil dip stick on the right side of the engine compartment and then loosen the center bolt on the connector to allow it to be unplugged fig 12 25 12 Remove th...

Page 79: ...17 Attach a device that is capable of safely lifting the engine to the lifting points located on the top of the front and back of the engine Then slide the engine rearward and upward to clear the radi...

Page 80: ......

Page 81: ...switch prior to performing any service work on a Compact Track Loader Place a Do Not Operate tag prominently on the machine to inform personnel that the machine is being worked on Removal and Installa...

Page 82: ...ring wheel removal replacement it is necessary to remove inspect and clean all components prior to reassembly to ensure proper function 5 Remove both wheels from the hub fig 13 5 Note Take care not to...

Page 83: ...ress to push the axle and far side bearing out of the hub as shown fig 13 8 13 9 7 If it is necessary to remove the other bearing for replacement press it out as well If not you may leave this bearing...

Page 84: ...od seal fig 13 13 13 Once the seals are in place wipe the mating surfaces of the face seals with a clean shop cloth and alcohol in a circular motion ending in a gentle sweep from the inside to the out...

Page 85: ...it with 2 ounces of 10W 30 API CH 4 engine oil Then reinstall the plug fig 13 21 13 22 22 Repeat this procedure on the other half of the bogie assembly if necessary prior to installing the two halves...

Page 86: ...below Note If you are removing the inner front hub assembly you will have to slide the axle item 41 out of the main rail weldment to remove it fig 13 24 13 25 Note If you are removing the outer or re...

Page 87: ...ed press the rear bear ing race out of the assembly from the front of the hub with tools 0403 337 and 0403 333 fig 13 31 8 Press the bearing sleeve out of the rear bearing using tool 0403 336 fig 13 3...

Page 88: ...roughly then wipe them dry to ensure a good seal when assembled 12 Once components are clean and dry install half of the rear face seal into the bearing sleeve Make sure to work the rubber seal down i...

Page 89: ...clean installed and oiled into the hub with tool 0403 336 until seated fig 13 42 19 Flip the hub over support the bearing sleeve from the bottom with tool 0403 335 and set it onto the press for cente...

Page 90: ...cation fig 13 48 26 Remove the allen plug in the center portion of the hub fig 13 49 27 Add 2 oz of 10W 30 API CH 4 engine oil to the hub as shown then reinstall the plug and tighten fig 13 50 28 The...

Page 91: ...ure the drive hose guides located on both the right and left sides of the chassis fig 13 54 5 Support each undercarriage with a suitable lifting device then slide each of the undercarriages out ward a...

Page 92: ...steady on the lifting device as they are lowered Installation 1 To install rear and front axles reverse the removal procedure Note Before installing each undercarriage onto the rear and front axles c...

Page 93: ...a Do Not Operate tag prominently on the machine to inform personnel that the machine is be ing worked on The hydraulic system fluid should be changed follow ing any hydraulic component service accordi...

Page 94: ...e hoses and fittings to prevent fluid loss and or sys tem contamination fig 14 3 4 Remove the bolts securing the front and rear lift arm cylinder pivot pins to the lift arm and lift arm tower fig 14 4...

Page 95: ...procedure Bucket Tilt Cylinder Removal 1 Raise the lift arms and support them with the lift arm brace as described on page 4 1 fig 14 8 2 Place a suitable catch container beneath the cylin der fittin...

Page 96: ...to be removed fig 14 13 8 Use a pry bar to pry the lower cylinder eyelet out of the upper Q A mount as shown fig 14 14 9 Use a hammer and a brass punch to tap the upper pin most of the way out of the...

Page 97: ...With the machine off and cool and with all hydraulic actuators relaxed loosen the pressure release valve on the top of the auxiliary quick cou pler block fig 14 18 2 Once loose remove the valve from t...

Page 98: ......

Page 99: ...tery terminals tape the battery clamps and remove the key from the ignition switch prior to per forming any service work on a Compact Track Loader Place a Do Not Operate tag prominently on the machine...

Page 100: ...e locking pin assembly out of the quick attach fig 15 6 Note At this time the locking pin assembly compo nents are easily accessible for replacement Inspect them for visible wear or damage and replace...

Page 101: ...are four pivot pins that connect the quick attach to the lift arm and cylinders All four pins are removed in a similar manner Installation 1 To install the quick attach pivot pins reverse the removal...

Page 102: ......

Page 103: ...rs Lift Arm Control Valve Drive Pump Reliefs Drive Pump Solenoids Spools Auxiliary Pump Note Procedures are provided for only those components listed above However exploded parts diagrams exist in the...

Page 104: ...eakage and impaired func tion Defective components must be repaired or replaced 7 With the piston and rod removed from the cylinder inspect the cylinder bore for scratches or other damage If any are p...

Page 105: ...move the end gland outer seal from the end gland fig 16 10 16 Thoroughly clean all parts to prevent contamina tion of hydraulic oil when reinstalled Assembly 1 Install new seals and components in plac...

Page 106: ...seals for damage replace if necessary fig 16 15 5 Remove the spool covers and inspect the seals for damage replace if necessary fig 16 16 16 17 6 Once the spool covers have been removed the spool may...

Page 107: ...rings for damage replace if necessary fig 16 23 11 Remove reliefs from valve inspect relief and o rings for damage replace if necessary fig 16 24 Assembly 1 Install new seals and components in place...

Page 108: ...the valve over then tighten the nut to increase the pressure setting CW or loosen it to decrease the pressure setting CCW fig 16 28 Drive Pump Solenoid Spool Disassembly 1 Make sure the machine isoff...

Page 109: ...ing fig 16 32 3 Inspect o rings for proper shape and condition Replace if necessary fig 16 33 4 Remove the Allen bolts securing the cover onto the pump fig 16 34 5 Lift the cover off to expose the pum...

Page 110: ...7 8 Remove the piston barrel assembly and inspect the slipper faces for scratches or any other dam age that can be felt with a fingernail fig 16 38 Assembly 1 To reassemble reverse the disassembly pro...

Page 111: ...ounts of debris found within the filters are to be expected but If there is significant metallic debris found in either filter certain components of your hydraulic system may be contaminated To inspec...

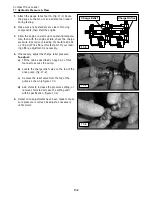
Page 112: ...ecessary 4 If necessary adjust the charge relief pressure To adjust a Tilt the cab as described on page 4 2 of this manual to access the pump b Locate the charge relief valve on the top of the drive p...

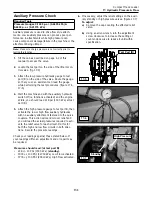
Page 113: ...tivate the low or high flow auxiliary hydraulics with no auxiliary attachment fastened to the quick couplers This action will send oil over relief and you will read the actual pressures required to ac...

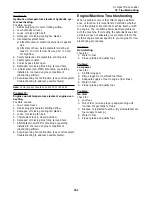
Page 114: ...Make certain all couplers fittings and hoses used during this process are clean and free of contaminants that may potentially cause damage to the hydraulic pump and or system components Drive pressur...

Page 115: ...ferent circuits pumps perform step 8 for both 10 If both readings are low on one pump disconnect the drive hoses from the suspected ports and plug them at the pump Cap the hoses to prevent con taminat...

Page 116: ......

Page 117: ...lowing items Track tension Fluid levels Fan belt tension and condition Hoses no visible sign of wear Fittings no apparent leaks Battery cables Fuse panel fuses in place and operational Controls for ne...

Page 118: ...iliary flow hydraulics do not work check for a Main auxiliary relief malfunction check pres sures If the possible causes found here do not appear to address your problem refer to the Control system tr...

Page 119: ...sed position 6 Damaged or missing brush ring around fan 7 Aftermarket non OEM shrouding or guarding installed in or around engine compartment obstructing airflow 8 Auto Reversing fan malfunction see c...

Page 120: ...inputs off Propel disabled Switch faulty wiring connection faulty switch out of adjustment Restore connections adjust or replace switches then cycle power by turning the key off then back on Lap Bar S...

Page 121: ...hen cycle power by turning the key off then back on Drive Enable Solenoid short circuit to power Propel disabled Faulty connections or wires to or from drive enable solenoid faulty solenoid Restore co...

Page 122: ...ey off then back on Loss of communications between Main Controller and Output Module Boom control disabled Faulty connections or wires between main controller and output module Restore communications...

Page 123: ...adjustment Restore connections adjust or replace switch then cycle power by turning the key off then b on Bucket Curl solenoid short circuit Bucket curl dump disabled Work enable solenoid de energized...

Page 124: ...isabled Parameter values not in proper low to high sequence Perform High flow female calibration procedure Lap Bar Switch Fault both inputs off Load sharing disabled Switch faulty wiring connection fa...

Page 125: ...w flow male disabled Parameter setting out of valid range Perform low flow male end current calibration procedure Low Flow Female not calibrated Low flow female disabled Parameter setting out of valid...

Page 126: ...lt Quick attach output de energized Solenoid shorted to battery faulty wires connections Restore connections then cycle power by turning the key off then back on Work Enable solenoid fault Quick attac...

Page 127: ...machine Download the service tool by visiting www sauer danfoss com Steps 1 Select Products 2 Select Mobile Electronics 19 Service Tool 19 1 Personal Safety Improper or incomplete maintenance repair...

Page 128: ...3 Select PLUS 1TM GUIDE 4 Select PLUS 1TM GUIDE Downloads 5 Select PLUS 1TM GUIDE Service Tool Software License 6 Select exe file 7 Select Save 19 2 Compact Track Loader 19 Service Tool...

Page 129: ...manager 15 Once the license manager window appears select get license from the options at the top of the win dow This should automatically load a license help pdf document that will walk you through...

Page 130: ...machine parameters click the upload parameters button in the top toolbar to read the parameters stored in the onboard computer through the service tool Note To ensure your machine is connected properl...

Page 131: ...nable screens display components systems and sensors that affect the particular function they are associated with ground drive propel work valve boom bucket etc If there is a problem with one of the p...

Page 132: ...there is a prob lem with one of the prerequisites for normal operation they would be displayed in red In most cases this indicates that there is a malfunction of some sort or a condition that requires...

Page 133: ...d These values affect operating characteristics and should be changed only when following the calibration procedure for the particular function see chapter 00 This will ensure you are not altering a v...

Page 134: ...opriate cali bration procedure then select it by clicking the down load box to the left of the row check mark Once selected press the download parameters button to establish the new value within the o...

Page 135: ...e to download Locate it on your computer and click open The DownloadFile Tab will then appear as shown at right Click start download to begin the process 5 A confirmation window will then appear ensur...

Page 136: ......

Page 137: ...erex Long Life 50 50 Antifreeze Coolant Capacity 4 3 gallons 16 3l P N 0300 766 1 gallon P N 0402 841 6 gallons Hydraulic Oil Mobil DTE 10 Excel 46 Service Capacity 22 gal 83 3l incl filters P N 0404...

Page 138: ......

Page 139: ...r port material is non ferrous Thread Size Standard Torque 1 4 9 2 lb ft 5 16 18 4 lb ft 3 8 35 7lb ft 7 16 50 11 lb ft 1 2 75 15 lb ft 9 16 120 22 lb ft 5 8 160 30 lb ft 3 4 275 37 lb ft 7 8 460 60 l...

Page 140: ......

Page 141: ......

Page 142: ...Terex Construction Americas 8800 Rostin Road Southaven MS 38671 888 201 6008 662 393 1800 www terex com...

Reviews: