


March 2022
Service Manual
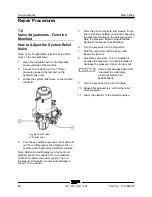
Repair Procedures
Part No. 1312899GT
GR
™
-20J • GR
™
-26J
51
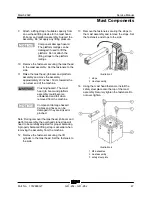
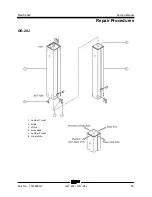
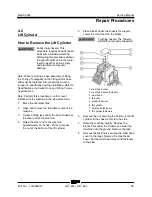
8 Slide the number 2 mast and the number
3 mast towards the top of the number 1 mast
to gain the access to the stops at the bottom
of the number 1 mast.
9 Remove the fasteners securing stops to the
inside of the number 1 mast. Remove the
stops. Set the fasteners and stops to the side.
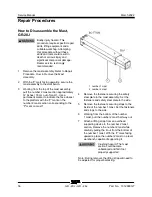
10 Push the number 3 mast fully into the number
2 mast. Working from the bottom of the
number 1 mast, pull the number 2 mast and
the number 3 mast half way out.
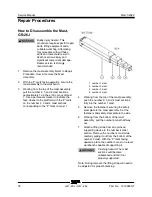
11 Attach a lifting strap from an overhead crane
to the number 2 mast section. Remove both
the number 2 mast and the number 3 mast
while carefully pulling the assembly out from
the bottom of the number 1 mast. With the 'P'
mark facing upwards, place the number
2 mast and the number 3 mast assembly on a
level workbench capable of supporting it.
Note: During removal, the lifting strap will need to
be adjusted for proper balancing.
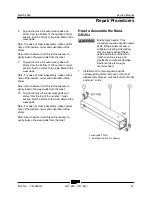
12 Slide the number 3 mast towards the top of
the number 2 mast to gain the access to the
stops at the bottom of the number 2 mast.
13 Remove the fasteners securing stops to the
inside of the number 2 mast. Remove the
stops. Set the fasteners and stops to the side.
14 Working from the bottom of the number
2 mast, pull the number 3 mast half way out.
15 Attach a lifting strap from an overhead
supporting device to the number 3 mast
section. Remove the number 3 mast while
carefully pulling the it out from the bottom of
the number 2 mast. With the 'P' mark facing
upwards, place the number 3 mast on a level
workbench capable of supporting it.
Note: During removal, the lifting strap will need to
be adjusted for proper balancing.
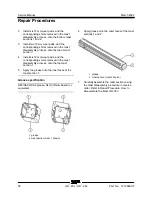
16 Tag and remove the outer wear pads and
shims from the bottom of the number 4 mast
section. Set the shims to the side. Discard the
wear pads.
Note: For ease of mast reassembly, make careful
note of the location, order and orientation of the
shims.
Note: Use a hammer and chisel if necessary to
gently loosen the wear pads from the mast.
17 Tag and remove the outer wear pads and
shims from the bottom of the number 3 mast
section. Set the shims to the side. Discard the
wear pads.
Note: For ease of reassembly of the mast, make
careful note of the location, order and orientation
of the shims.
Note: Use a hammer and chisel if necessary to
gently loosen the wear pads from the mast.
Summary of Contents for Genie GR-20J
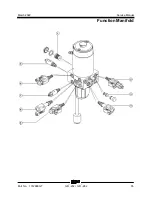
Page 77: ...March 2022 Service Manual Function Manifold Part No 1312899GT GR 20J GR 26J 65 ...
Page 113: ...March 2022 Service Manual 101 Electrica l Schemati cs Electrical Schematic GRJ from GRJL 2298 ...
Page 116: ...Service Manual March 2022 104 Electrical Schematic GRJ from GRJL 2298 ...
Page 117: ...March 2022 Service Manual 105 GCON LED Panel GRJ from GRJL 2298 ...
Page 120: ...Service Manual March 2022 108 Temperature Sensor Harness GRJ from GRJL 2298 ...
Page 121: ...March 2022 Service Manual 109 Options GRJ from GRJL 2298 ...
Page 127: ......


