TEQ ZW750 User Manual Download Page 5

5

arrangeMent

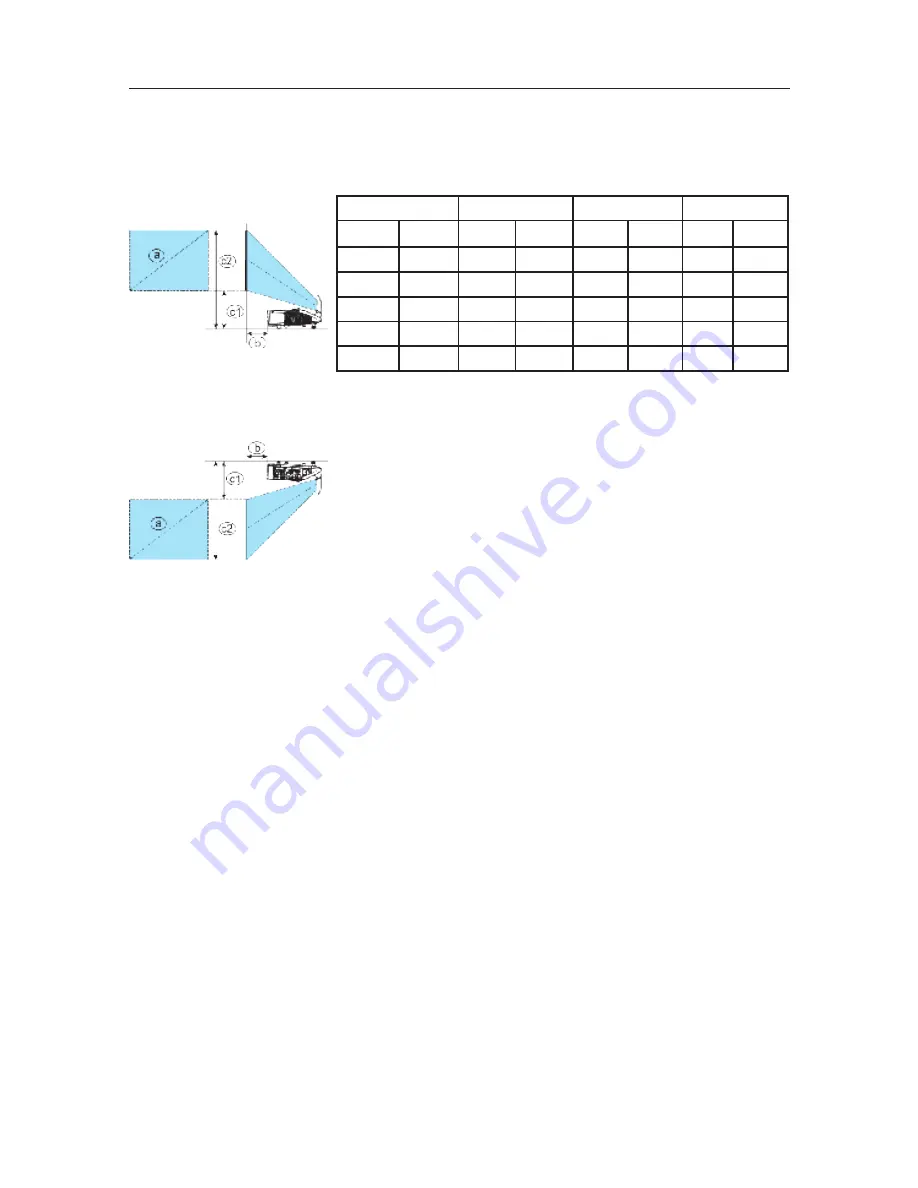
Refer to the illustrations and tables below to determine screen size and projection 

distance. The values shown in the table are calculated for a full size screen: 1280 x 800

(a) Screen size (diagonal)  (b) Projection distance (±8%)   (c1) (c2) Screen height (±8%)

n

  On a horizontal surface 

n

  Mounted on the wall or ceiling

n

  Keep a space of 30 cm or more between the sides of the 

projector and other objects such as walls. Do not place or 

attach anything that will block the lens or vent holes.

n

  In the case of a special installation such as on the wall 

or ceiling, the specified mounting accessories (


20) and service may be required. Before installing the 

projector, consult Teq.

n

  The screen position may shift after installation if the projector is mounted on the wall or 

ceiling, due to the flexibility of the plastic projector body. If readjustment is necessary, 

consult Teq.

n

  The projected image position and/or focus may change during warm-up (approx. 30 

minutes after the lamp is turned on) or when the ambient conditions change. Readjust 

the image position and/or focus as necessary.

n

  Since the projector features an ultra short throw, be aware that you must select a screen 

carefully to achieve optimal performance.

  -  A soft screen, such as a pull-down screen, may cause serious distortion of a projected 

image. A hard screen, such as a board screen, is recommended for use with this 

projector.

  -  A high-gain screen, such as a bead screen that has narrow viewing angle, is not 

suitable for this projector. A low-gain screen (around 1.0), such as a matte screen that 

has wide viewing angle, is recommended for use with this projector.

  -  A screen with a weave pattern may cause moiré on the projected image, which is not 

a failure of the projector. A screen that has less moiré effects is recommended for use 

with this projector.

(a) Screen size (diagonal)

(b) Projection distance

(c1) Screen height

(c2) Screen height

type(inch)

m

m

inch

m

inch

m

inch

60

1.5

0.120

4.7

0.295

11.6

1.102

43.4

70

1.8

0.188

7.4

0.332

13.1

1.274

50.2

80

2.0

0.256

10.1

0.369

14.5

1.446

56.9

90

2.3

0.324

12.8

0.407

16.0

1.618

63.7

100

2.5

0.392

15.4

0.444

17.5

1.791

70.5

Summary of Contents for ZW750

Page 1: ...s provided with this product and the product means this projector and all the accessories came with the projector Contents Introduction 2 Warnings 2 Important Safety Instruction 2 Regulatory Notices 3...

Page 2: ...he product away from children and pets n Unplug the projector from the power outlet if the projector is not being used for an extended period n Do not open or remove any portion of the product unless...

Page 3: ...terference that may cause undesired operation This equipment has been tested and found to comply with the limits for a Class A digital device pursuant to Part 15 of the FCC Rules These limits are desi...

Page 4: ...Cadmium or more than 0 004 Lead Contents of package Your projector should come with the items shown below Make sure all the items are included Contact Teq immediately if any items are missing 1 Remot...

Page 5: ...ter the lamp is turned on or when the ambient conditions change Readjust the image position and or focus as necessary n Since the projector features an ultra short throw be aware that you must select...

Page 6: ...nly use the specified mounting accessories and leave installing and removing the projector with the mounting accessories to Teq n Read and keep the user s manual in a safe place CAUTION n Avoid placin...

Page 7: ...pt component video signals n To use the projector s network functions connect the LAN port to the computer s LAN port or to an access point that is connected to the computer with wireless LAN using a...

Page 8: ...a damaged accessory Be careful not to damage the accessories Route a cable so that it is neither stepped on nor pinched out CAUTION n Do not turn on or off the projector while connected to a device in...

Page 9: ...ll light steady orange Please remember that when the DIRECT POWER ON function is activated the connection of the power supply will turn on the projector WARNING n Please use extra caution when connect...

Page 10: ...d assemble the cable cover 3 Insert the three knobs on the cable cover into the three holes on the projector as shown in the figure Pass the cables through the holes on the bottom of the cable cover C...

Page 11: ...60 degrees to right and left and within 3 meters n Prevent the remote sensors from being hit by a strong ray It may cause a malfunction WARNING n Always handle the batteries with care and use them on...

Page 12: ...ion lamp lights since the projection lamp ray may cause a trouble on your eyes n Be careful not to pinch your finger with the lens door to prevent an injury n Do not place the projector vertically wit...

Page 13: ...WARNING n Keep the spacers away from children and pets If swallowed consult a physician immediately for emergency treatment NOTE n The adjustment angle can be adjusted up to plus or minus 1 each of fr...

Page 14: ...rom the COMPUTER IN1 COMPUTER IN2 LAN USB TYPE A or USB TYPE B port Focusing Use the FOCUS and FOCUS buttons on the projector or remote control to adjust the screen focus Selecting an aspect ratio Eac...

Page 15: ...or buttons according to the dialog Press the KEYSTONE button again to finish this operation Adjusting the volume Use the VOLUME buttons to adjust the volume Muting the sound Press the MUTE button on t...

Page 16: ...complete Do not turn on the projector again on for about 10 minutes Do not turn off the projector shortly after turning it on Such operations may cause or shorten the lifetime of some parts or result...

Page 17: ...Loosen the 2 screws marked by arrow of the lamp and slowly pick up the lamp by the handle Never loosen any other screws 5 Insert the new lamp and firmly retighten the 2 screws of the lamp that were lo...

Page 18: ...the gas or fine particles that come out from the projector s vent holes Do not to get particles in your eyes or mouth n Before replacing the lamp turn off the projector and unplug the power cord then...

Page 19: ...to take it off from the projector 4 Use a vacuum cleaner for the filter vent of the projector 5 Take the fine meshed filter out while holding the filter cover It is recommended to leave the coarse me...

Page 20: ...ter or the filter cover It may result in a fire or malfunction to the projector n Clean the air filter periodically If the air filter becomes clogged by dust or the like internal temperatures will ris...

Page 21: ...n the direction indicated CLOSE NOTE n The internal clock will be initialized by removing the battery WARNING n Be careful handling a battery as a battery may cause explosion cracking or leakage which...

Page 22: ...lease take the following procedure 1 Insert the power cord with the lens door opened 2 The power indicator will light in orange and the lens door will close automatically Do not touch the lens door wh...

Page 23: ...pin mini x1 COMPUTER IN2 D sub 15 pin mini x1 Computer output port MONITOR OUT D sub 15 pin mini x1 Video input port S VIDEO mini DIN 4 pin x1 VIDEO RCA x1 HDMI HDMI connector 1 Audio input output por...

Page 24: ...n Adobe and Acrobat Reader are registered trademarks of Adobe Systems Incorporated n Microsoft Internet explorer Windows Windows NT and Windows Vista are registered trademarks of Microsoft Corporation...

Reviews: