TEQ ZW750 User Manual Download Page 22

22

CarIng For the MIrror and lenS

If the projection mirror or lens is flawed, soiled or fogged, it 

may cause deterioration of display quality. Please carefully 

take care of the mirror and lens.
1.  Turn off the projector and unplug the power cord from the 

power outlet. Then, let the projector cool sufficiently.

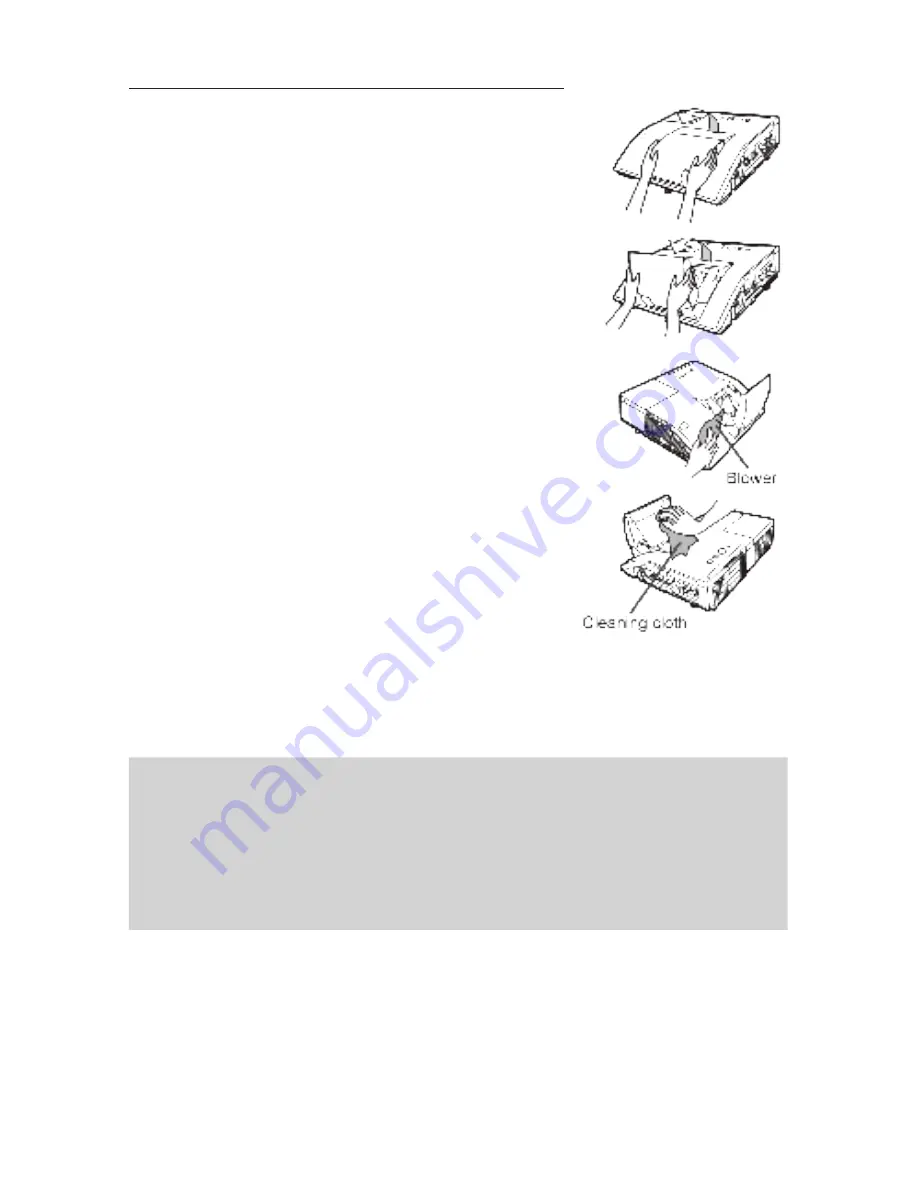
2.  The lens door can be opened manually. Please hold both 

sides of the lens door and slowly open it until it is locked 

with clicking sound.

3.  Softly wipe the mirror and lens with a damped soft 

cleaning cloth. Be careful not to damage the mirror or 

lens. For around edge of the mirror and lens, where might 

be difficult to be wiped out, please use an air blower.

4.  To close the lens door properly, please take the 

following procedure:

  (1)  Insert the power cord with the lens door opened.
  (2)  The power indicator will light in orange, and the lens door 

will close automatically. Do not touch the lens door when 

the door is closing. Do not allow anything to obstruct the 

lens door.

NOTE

 When the lens door is closed manually, it may not shut 

properly.
 The lens door may not close when the LENS DOOR LOCK function of the SERVICE item in 

the OPTION menu is set to ON.

WARNING

n

  Before caring for the projection mirror and lens, turn off the projector and unplug the power 

cord, then cool the projector sufficiently.

n

  Do not use a vacuum cleaner to clean the projection mirror or lens.

n

  Do not use cleaners or chemicals other than those specified in this manual. Outside 

chemicals may cause serious damage to the mirror or lens.

CAUTION

n

  Be careful not to pinch your finger with the lens door, to prevent an injury.

Summary of Contents for ZW750

Page 1: ...s provided with this product and the product means this projector and all the accessories came with the projector Contents Introduction 2 Warnings 2 Important Safety Instruction 2 Regulatory Notices 3...

Page 2: ...he product away from children and pets n Unplug the projector from the power outlet if the projector is not being used for an extended period n Do not open or remove any portion of the product unless...

Page 3: ...terference that may cause undesired operation This equipment has been tested and found to comply with the limits for a Class A digital device pursuant to Part 15 of the FCC Rules These limits are desi...

Page 4: ...Cadmium or more than 0 004 Lead Contents of package Your projector should come with the items shown below Make sure all the items are included Contact Teq immediately if any items are missing 1 Remot...

Page 5: ...ter the lamp is turned on or when the ambient conditions change Readjust the image position and or focus as necessary n Since the projector features an ultra short throw be aware that you must select...

Page 6: ...nly use the specified mounting accessories and leave installing and removing the projector with the mounting accessories to Teq n Read and keep the user s manual in a safe place CAUTION n Avoid placin...

Page 7: ...pt component video signals n To use the projector s network functions connect the LAN port to the computer s LAN port or to an access point that is connected to the computer with wireless LAN using a...

Page 8: ...a damaged accessory Be careful not to damage the accessories Route a cable so that it is neither stepped on nor pinched out CAUTION n Do not turn on or off the projector while connected to a device in...

Page 9: ...ll light steady orange Please remember that when the DIRECT POWER ON function is activated the connection of the power supply will turn on the projector WARNING n Please use extra caution when connect...

Page 10: ...d assemble the cable cover 3 Insert the three knobs on the cable cover into the three holes on the projector as shown in the figure Pass the cables through the holes on the bottom of the cable cover C...

Page 11: ...60 degrees to right and left and within 3 meters n Prevent the remote sensors from being hit by a strong ray It may cause a malfunction WARNING n Always handle the batteries with care and use them on...

Page 12: ...ion lamp lights since the projection lamp ray may cause a trouble on your eyes n Be careful not to pinch your finger with the lens door to prevent an injury n Do not place the projector vertically wit...

Page 13: ...WARNING n Keep the spacers away from children and pets If swallowed consult a physician immediately for emergency treatment NOTE n The adjustment angle can be adjusted up to plus or minus 1 each of fr...

Page 14: ...rom the COMPUTER IN1 COMPUTER IN2 LAN USB TYPE A or USB TYPE B port Focusing Use the FOCUS and FOCUS buttons on the projector or remote control to adjust the screen focus Selecting an aspect ratio Eac...

Page 15: ...or buttons according to the dialog Press the KEYSTONE button again to finish this operation Adjusting the volume Use the VOLUME buttons to adjust the volume Muting the sound Press the MUTE button on t...

Page 16: ...complete Do not turn on the projector again on for about 10 minutes Do not turn off the projector shortly after turning it on Such operations may cause or shorten the lifetime of some parts or result...

Page 17: ...Loosen the 2 screws marked by arrow of the lamp and slowly pick up the lamp by the handle Never loosen any other screws 5 Insert the new lamp and firmly retighten the 2 screws of the lamp that were lo...

Page 18: ...the gas or fine particles that come out from the projector s vent holes Do not to get particles in your eyes or mouth n Before replacing the lamp turn off the projector and unplug the power cord then...

Page 19: ...to take it off from the projector 4 Use a vacuum cleaner for the filter vent of the projector 5 Take the fine meshed filter out while holding the filter cover It is recommended to leave the coarse me...

Page 20: ...ter or the filter cover It may result in a fire or malfunction to the projector n Clean the air filter periodically If the air filter becomes clogged by dust or the like internal temperatures will ris...

Page 21: ...n the direction indicated CLOSE NOTE n The internal clock will be initialized by removing the battery WARNING n Be careful handling a battery as a battery may cause explosion cracking or leakage which...

Page 22: ...lease take the following procedure 1 Insert the power cord with the lens door opened 2 The power indicator will light in orange and the lens door will close automatically Do not touch the lens door wh...

Page 23: ...pin mini x1 COMPUTER IN2 D sub 15 pin mini x1 Computer output port MONITOR OUT D sub 15 pin mini x1 Video input port S VIDEO mini DIN 4 pin x1 VIDEO RCA x1 HDMI HDMI connector 1 Audio input output por...

Page 24: ...n Adobe and Acrobat Reader are registered trademarks of Adobe Systems Incorporated n Microsoft Internet explorer Windows Windows NT and Windows Vista are registered trademarks of Microsoft Corporation...

Reviews: