background image

OPERATION

Tennant 5540/5560 (08--05)

11

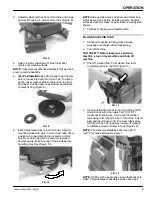
NOTE:

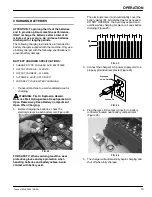
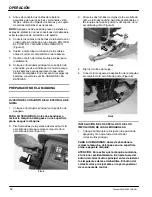
To increase or decrease the maximum solution

flow, turn solution flow adjustment knob (for

conventional scrubbing only). Turn knob clockwise to

decrease solution flow or counterclockwise to increase

(Figure 17).

FIG. 17

6. Slowly rotate control grips forward to begin

scrubbing. The machine will continue to gain

speed the further you rotate grips. To drive

machine in reverse, simply rotate control grips

backwards.

ATTENTION: Always start machine out slowly to

prevent machine from leaping forward.

7. View amount of solution flow on floor and adjust

solution control lever to desired solution flow (for

conventional scrubbing only).

8. To stop machine, release control grips.

WHILE OPERATING MACHINE

FOR SAFETY: When using machine, go slow on

inclines and slippery surfaces.

WARNING: Fire Or Explosion Hazard. Do Not

Pick Up Flammable Materials Or Reactive Metals.

1. Overlap each scrubbing path by 2 inches (5 cm).
2. Pour a recommended foam control solution into

the recovery tank if excessive foam appears.

ATTENTION: Do not allow foam or water to enter

the float shut-off screen, vacuum motor damage

will result. Foam will not activate the float shut-off

screen.

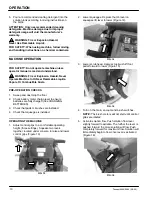
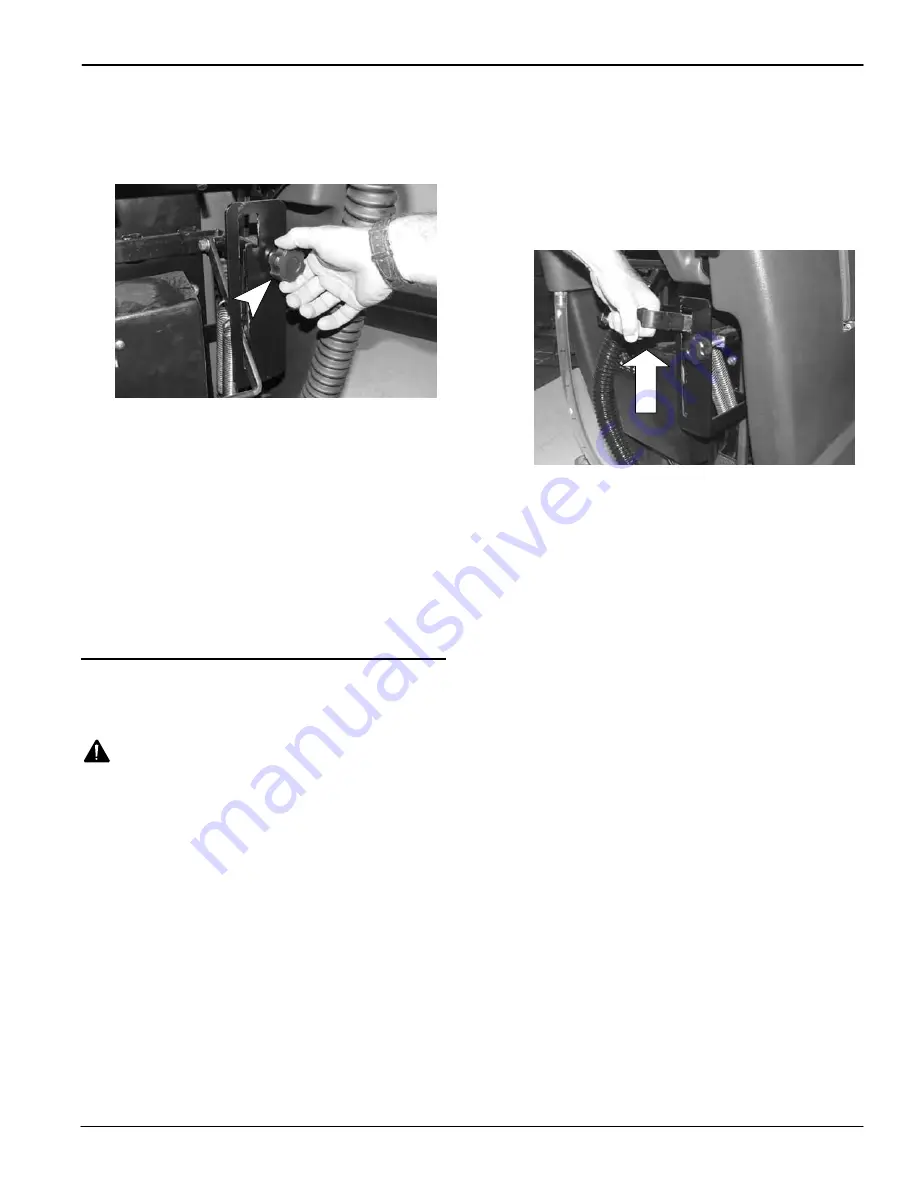
3. If more scrubbing pressure is needed for small

heavily soiled areas, follow steps below:
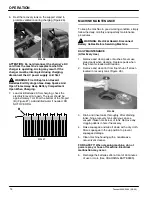
a. Lower brush.
b. Lift brush pressure lever to the locked position

(Figure 18).

NOTE:

Brush MUST be down to allow brush pressure

lever to be lifted to the locked position. Do not leave

lever in the lock position when brushes are raised.

FIG. 18

4. If squeegee leaves streaks, raise and wipe blades

with a cloth. Pre--sweep area to prevent streaking.

5. Before stopping or turning machine around, pull

back on solution control lever to shut off solution

flow.

6. During brief stops, you do not have to turn off

brush switch, the brush will automatically stop

when control grips are released.

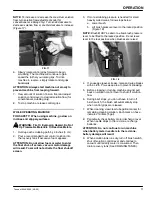
7. While cleaning, view clear tube gallon marker for

remaining cleaning solution. Each mark on hose

indicates 19 liters (5 gal).

8. Periodically check battery meter discharge level.

When needle drops to the red zone, recharge

batteries.

ATTENTION: Do not continue to run machine

when battery meter needle is in the red zone,

battery damage will result.

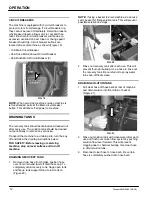
9. When solution tank runs dry, turn off brush switch,

shut off solution control lever and continue to

vacuum until all dirty water is consumed. Then

drain recovery tank (See DRAINING TANKS).

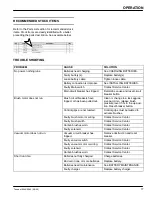
Summary of Contents for 5540

Page 1: ...utomatic Floor Scrubber Fregadora Automática 5540 5560 Operator and Parts Manual Manual del Operador y Piezas 607508 Rev 04 12 06 Model No 607506 5540 607507 5540 Quick Ship Pack 607541 5560 607542 5560 Quick Ship Pack ...

Page 2: ...tained at minimum costs if S The machine is operated with reasonable care S The machine is maintained regularly per the maintenance instructions provided S The machine is maintained with manufacturer supplied or equivalent parts PROTECT THE ENVIRONMENT Please dispose of packaging materials old machine components such as batteries hazardous fluids such as antifreeze and oil in a safe environmentall...

Page 3: ...13 MACHINE MAINTENANCE 14 DAILY MAINTENANCE 14 MONTHLY MAINTENANCE 15 QUARTERLY MAINTENANCE 15 BATTERY MAINTENANCE 15 DRIVE CHAIN MAINTENANCE 16 TRANSPORTING MACHINE 16 STORING MACHINE 16 RECOMMENDED STOCK ITEMS 17 TROUBLE SHOOTING 17 SPECIFICATIONS 19 ELECTRICAL DIAGRAM 39 PARTS LIST 40 REPLACEMENT BRUSHES AND PAD DRIVER GROUP 40 RECOVERY TANK GROUP 42 CHASSIS GROUP 44 CONTROL CONSOLE GROUP 46 LE...

Page 4: ... And Open Flame Away Keep Battery Compartment Open When Charging WARNING Electrical Hazard Disconnect Battery Cables Before Servicing Machine The following information signals potentially dangerous conditions to the operator or equipment FOR SAFETY 1 Do not operate machine With flammable liquids or near flammable vapors as an explosion or flash fire may occur Unless trained and authorized Unless o...

Page 5: ...r Use tie down straps to secure machine to truck or trailer SAFETY LABELS The safety labels appear on the machine in the locations indicated Replace labels if they are missing or become damaged or illegible WARNING LABEL LOCATED ON THE RECOVERY TANK BATTERY CHARGE LABEL LOCATED IN BATTERY COMPARTMENT WARNING Fire Or Explosion Hazard Batteries Emit Hydrogen Gas Keep Sparks And Open Flame Away Keep ...

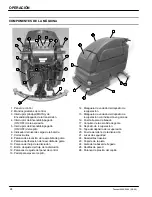
Page 6: ...kers 8 Squeegee Lift Lever 9 Squeegee Release Lever 10 Solution Flow Lever 11 Solution Flow Adjustment Knob 12 Adjustable Control Console Levers 13 Scrub Head Lift Foot Pedal 14 Recovery Tank Drain Hose 15 Solution Tank Drain Hose with Gallon Markers 16 Rear Fill Port 17 Squeegee Assembly 18 Recovery Tank 19 Recovery Tank Lid 20 Solution Fill Door 21 Safety Lights 22 Rear Casters 23 Skirt Housing ...

Page 7: ...en Flame Away Keep Battery Hood Open When Charging FOR SAFETY When servicing machine wear protective gloves and eye protection when handling batteries and battery cables Avoid contact with battery acid Battery Specifications Four 6 volt deep cycle 305 amp hour batteries Part Number 606991 Maximum battery dimensions are 178mm 7 in W x 308mm 12 13 in L x 356mm 14 in H 1 Turn all switches to the off ...

Page 8: ... machine stop on level surface and turn off machine 2 Pull back on squeegee lift lever to raise squeegee mount bracket Figure 4 FIG 4 3 Loosen two thumb knobs on squeegee and slide squeegee into slots at rear of squeegee mount bracket Figure 5 FIG 5 4 Tighten thumb knobs securely 5 Connect the vacuum hose from the machine to the squeegee assembly Figure 6 FIG 6 INSTALLING BRUSHES OR PAD DRIVERS 1 ...

Page 9: ...e pad driver and motor hub surfaces are clean before installing drivers Keeping surfaces clean will make it easier when removing pad drivers 7 Close skirt housing and refasten latch FILLING SOLUTION TANK 1 Transport machine to filling station Raise squeegee and brush when transporting 2 Turn off machine FOR SAFETY Before leaving or servicing machine stop on level surface and turn off machine 3 Shu...

Page 10: ...ery meter charge level to ensure batteries are fully charged See CHARGING BATTERIES 3 Check that pads or brushes are installed 4 Check that squeegee is installed OPERATING THE MACHINE 1 Adjust control grips to a comfortable operating height three settings Squeeze two levers together located under console to raise and lower control grips Figure 13 FIG 13 2 Lower squeegee Depress thumb lever on sque...

Page 11: ...hut off screen vacuum motor damage will result Foam will not activate the float shut off screen 3 If more scrubbing pressure is needed for small heavily soiled areas follow steps below a Lower brush b Lift brush pressure lever to the locked position Figure 18 NOTE Brush MUST be down to allow brush pressure lever to be lifted to the locked position Do not leave lever in the lock position when brush...

Page 12: ...and follow the draining instructions below FOR SAFETY Before leaving or servicing machine stop on level surface and turn off machine DRAINING RECOVERY TANK 1 Remove drain hose from holder position hose over floor drain and twist off drain hose cap To completely drain recovery tank hinge open tank and flip up tank support stand to rest tank on Figure 20 NOTE If using a bucket to drain machine do no...

Page 13: ...e Or Explosion Hazard Batteries Emit Hydrogen Gas Keep Sparks And Open Flame Away Keep Battery Compartment Open When Charging 2 Before charging the batteries check the electrolyte level in each battery cell Figure 22 FIG 22 FOR SAFETY When servicing machine wear protective gloves and eye protection when handling batteries and battery cables Avoid contact with battery acid The electrolyte level A s...

Page 14: ... working condition simply follow the daily monthly and quarterly maintenance procedures WARNING Electrical Hazard Disconnect Battery Cables Before Servicing Machine DAILY MAINTENANCE After Every Use 1 Remove and clean pads or brushes Never use soiled pads when cleaning Replace pads when they become loaded with residue 2 Remove and clean lint from float shut off screen located in recovery tank Figu...

Page 15: ...cid 1 Check the specific gravity using a hydrometer to determine the charge level and the condition of the batteries Figure 29 If one or more of the battery cells read lower than the other battery cells 0 050 or more the cell is damaged shorted or is about to fail Check the hydrometer readings against the following chart to determine the remaining battery charge level NOTE Do not take readings imm...

Page 16: ...ghten locking nut and 4 motor mount screws 6 Lubricate chain with a water resistant oil TRANSPORTING MACHINE When transporting machine by use of trailer or truck be certain to follow tie down procedures below FOR SAFETY When using machine go slow on inclines and slippery surfaces 1 Remove squeegee from machine and raise brush head Leave pad or brush installed 2 Load machine using a recommended loa...

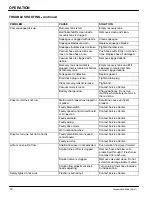
Page 17: ...d out Clean or change to a less aggres sive pad Also release brush pressure lever if it s in the up posi tion Reset breaker button Control grips are not twisted Control grips must be twisted to activate brushes Faulty brush motor or wiring Contact Service Center Faulty brush switch Contact Service Center Carbon brushes worn Contact Service Center Faulty solenoid Contact Service Center Vacuum motor...

Page 18: ...r Battery charge is low Charge batteries Do not run machine when battery meter is in the red zone Drive motor does not run Main circuit breaker has tripped or is pulled Determine cause and reset breaker Faulty Main switch Contact Service Center Faulty speed control circuit board or connection Contact Service Center Faulty solenoid Contact Service Center Faulty wiring Contact Service Center Faulty ...

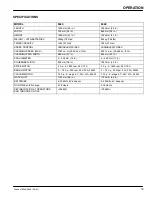
Page 19: ...m 35 000 sq ft hr CLEANING PATH WIDTH 680 mm 27 in 830 mm 33 in PAD DIAMETER 2 355 mm 14 in 2 430 mm 17 in SQUEEGEE WIDTH 965 mm 38 in 1067 mm 42 in DRIVE MOTOR 5 h p 0 1800 rpm 24V 10A 5 h p 0 1800 rpm 24V 10A BRUSH MOTOR 2 75 h p 220 rpm 24V 20A 550W 2 75 h p 220 rpm 24V 20A 550W VACUUM MOTOR 75 h p 3 stage 5 7 24V 21A 550W 75 h p 3 stage 5 7 24V 21A 550W WATER LIFT 1720 mm 68 in 1720 mm 68 in B...

Page 20: ...OPERATION 20 Tennant 5540 5560 08 05 ...

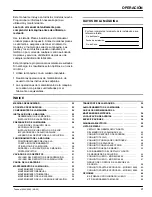
Page 21: ...MÁQUINA 25 INSTALACIÓN DE LAS BATERÍAS 25 PREPARACIÓN DE LA MÁQUINA 26 FIJACIÓN DEL CONJUNTO DE LA ESCOBILLA DE GOMA 26 INSTALACIÓN DE LOS CEPILLOS O DE LOS IMPULSORES DE LAS ALMOHADILLAS 26 LLENADO DEL DEPÓSITO DE LA DISOLUCIÓN 28 FUNCIONAMIENTO DE LA MÁQUINA 28 COMPROBACIONES PREVIAS A LA PUESTA EN FUNCIONAMIENTO 28 UTILIZACIÓN DE LA MÁQUINA 28 DURANTE LA UTILIZACIÓN DE LA MÁQUINA 30 CORTACIRCUI...

Page 22: ...TENCIA Peligro eléctrico Desconecte los cables de la batería antes de realizar reparaciones en la máquina La información siguiente señala condiciones potencialmente peligrosas para el operador o el equipo PARA SU SEGURIDAD 1 No opere la máquina Con líquidos inflamables o cerca de los vapores inflamables ya que puede ocurrir una explosión o fuego explosivo A menos que está capacitado y autorizado A...

Page 23: ...URIDAD Los adhesivos de seguridad se encuentran en las posiciones indicadas a continuación Sustituya los adhesivos si se han desprendido están deteriorados o son ilegibles ETIQUETA DE ADVERTENCIA LOCALIZADA EN EL TANQUE DE RECUPERACION ETIQUETA DE CAMBIO DE BATERIA ESTÁ SITUADA EN EL COMPARTIMIENTO DE BATERIÁ ADVERTENCIA Peligro de incendio o explosión Las baterías emiten hidrógeno Mantenga chispa...

Page 24: ... de goma 9 Palanca de liberación de la escobilla de goma 10 Palanca del flujo de la disolución 11 Botón de ajuste del flujo de la disolución 12 Palancas de ajuste del panel de control 13 Pedal para elevar el cepillo 14 Manguera de vaciado del depósito de recuperación 15 Manguera de vaciado del depósito de recuperación con indicación en galones 16 Puerta trasera de llenado 17 Conjunto de la escobil...

Page 25: ...s y llamas alejadas de la máquina Mantenga la tapa del compartimento de la batería abierto mientras realiza la operación de carga PARA SU SEGURIDAD Al revisar la máquina utilice guantes y gafas de protección cuando manipule las baterías y sus cables Evite el contacto con el ácido de la batería Especificaciones de la batería Cuatro baterías de 6 voltios de ciclo profundo de 305 amp hora pieza númer...

Page 26: ...1 Coloque el interruptor principal en la posición de apagado PARA SU SEGURIDAD Antes de abandonar o revisar la máquina deténgase en una superficie plana apague la máquina 2 Tire hacia atrás de la palanca de elevación de la escobilla de goma para elevar el soporte de la escobilla de goma Figura 4 FIG 4 3 Afloje los dos tornillos de orejas de la escobilla de goma e introduzca dicha escobilla deslizá...

Page 27: ...sor retire el cierre central de plástico del impulsor de la almohadilla Coloque la almohadilla en el centro del impulsor de la almohadilla y vuelva a colocar y fijar el cierre central Figura 9 FIG 9 6 Conecte los impulsores del cepillo de la almohadilla a los cubos del motor Alinee los 3 pernos de montaje con las ranuras del cubo del motor Gire rápidamente el impulsor hacia el sujetador de resorte...

Page 28: ...s tuberías de la disolución 5 Vierta un detergente recomendado en el depósito de disolución siguiendo las instrucciones de uso indicadas en el envase ATENCIÓN Utilice únicamente productos de limpieza recomendados NO utilice sustitutos Consulte a un distribuidor autorizado acerca de los productos recomendados ADVERTENCIA Peligro de incendio o explosión No utilizar NUNCA líquidos inflamables PARA SU...

Page 29: ...mente para que el flujo sea máximo La disolución empezará a fluir inmediatamente después de activar la palanca Figura 16 FIG 16 NOTA Para aumentar o disminuir el flujo máximo de la disolución gire el botón de ajuste del flujo de la disolución para fregado convencional Gire el botón en el sentido de las agujas del reloj para reducirlo y en sentido contrario para incrementar el flujo Figura 17 FIG 1...

Page 30: ...queda en el depósito de la disolución durante la operación de limpieza a través del tubo indicador transparente Cada marca de la manguera indica 19 litros 8 Controle periódicamente el nivel de carga de la batería Recargue las baterías cuando la aguja se encuentre en la zona roja ATENCIÓN No siga utilizando la máquina cuando la aguja del indicador de carga de la batería se encuentre en la zona roja...

Page 31: ...re VACIADO DEL DEPÓSITO DE LA DISOLUCIÓN 1 Extraiga la lengüeta de la manguera transparente con marcas de la parte posterior de la máquina tirando de ella y vacíe la disolución limpiadora en el desagüe o en un cubo Figura 21 FIG 21 2 Aclare el depósito de la disolución con agua limpia después de cada uso y aclare el sistema de tuberías de la disolución empujando la palanca del flujo de disolución ...

Page 32: ...CESO el nivel del líquido puede expandirse y desbordarse al cargar Coloque de nuevo las tapas de los elementos antes de la operación de carga Figura 23 A B FIG 23 3 Conecte el cable de alimentación eléctrica de CA del cargador a un enchufe con toma de tierra adecuada Figura 24 ENCHUFE CONECTADO A TIERRA 3 ORIFICIOS CLAVIJA DE CONEXION A TIERRA FIG 24 4 Enchufe el conector de salida CC del cargador...

Page 33: ...ndidad Después de aclarar los depósitos desplace lateralmente el depósito de recuperación sobre su bisagra hasta poder ver el orificio de entrada de la aspiración situado en la parte posterior del depósito En caso necesario retire los restos que puedan bloquear dicho orificio 4 Levante la escobilla de goma y límpiela con un paño seco Guarde la escobilla de goma en la posición elevada para evitar q...

Page 34: ... densímetro para determinar el nivel de carga y el estado de las baterías Figura 29 Si el valor de uno o más elementos de la batería es inferior al de los otros elementos de la batería 0 050 ó más este elemento está deteriorado en cortocircuito o a punto de fallar Compare los valores obtenidos con el densímetro con los del siguiente esquema para determinar el nivel de carga que queda en la batería...

Page 35: ...a siga los pasos indicados a continuación 1 Coloque el interruptor principal en la posición de apagado y tire hacia fuera del botón del cortacircuitos principal 2 Localice y afloje los cuatro tornillos de fijación del motor a la derecha de la máquina desde el lado del operario No extraiga los tornillos 3 Afloje la tuerca de bloqueo del tensor Figura 32 FIG 32 4 Gire el tensor en el sentido de las ...

Page 36: ... LOCALIZACIÓN DE AVERÍAS PROBLEMA CAUSA SOLUCIÓN No hay alimentación no funciona nada Las baterías necesitan ser cargadas Consultar el apartado de CARGA DE LAS BATERÍAS Batería s defectuosa s Sustituir la s batería s Cable de la batería flojo Apretar los cables flojos Las baterías están mal conectadas Consultar el apartado de INSTALACIÓN DE LAS BATERÍAS Defectuoso principal interruptor Contactar c...

Page 37: ...guera si está dañada Manguera de aspiración bloqueada por restos Retirar los restos que la bloquean Funcionamiento defectuoso de las escobilla de goma continuación Entrada al depósito de recupera ción bloqueada La entrada se encuentra en la parte inferior del depósito de recuperación Vaciar el depósito de recuperación y levantarlo lateralmente para localizar el orificio de entrada retirar los rest...

Page 38: ...Las luces de seguridad no funcionan Bombilla fundida Contactar con el Servicio Técnico ESPECIFICACIONES MODELO 5540 5560 LONGITUD 1500 mm 59 pulg 1500 mm 59 pulg ANCHURA 740 mm 29 pulg 890 mm 35 pulg ALTURA 1040 mm 41 pulg 1040 mm 41 pulg PESO CON BATERÍAS 352kg 760 lbs 355kg 765 lbs CAPACIDAD DE LOS DEPÓSITOS 102 L 27 Gal 102 L 27 Gal CONTROL DE LA VELOCIDAD Variable delante detrás Variable delan...

Page 39: ...S BLK 36 BLK 14 BLK 26 BLUE 5 RED 28 BLK 10 RED 7 BLK 9 RED 4 RED 3 RED 13 SPEED CONTROL CIRCUIT BOARD 17 24 RED 8 27 21 RED 35 RED RED 25 23 RED 6 RED MAIN BREAKER 20 SOL 1A SOL 2A VAC DRIVE BREAKER SOL 3A RIGHT BRUSH BREAKER LEFT BRUSH BREAKER BLK BLK 15 BLK 31 WHT ORG 32 ORG POTENTIOMETER RED RED RED RED RED 16 RED BRUSH CONTACTOR RED BRN ORG BLU WHT RED RED M5 M6 M7 VACUUM CONTACTOR BLK BLK 41...

Page 40: ...PARTS LIST LISTA DE PIEZAS Tennant 5540 5560 10 00 40 REPLACEMENT BRUSHES AND PAD DRIVER GROUP CEPILLO DEL REEMPLAZO Y GRUPO DEL MANDO DE LA ALMOHADILLA 1 2 6 5 4 3 ...

Page 41: ...240230 DBRUSH 17 POLY SCRUB PK 2 5560 2 240235 DBRUSH 17 NYLON GRIT PK 2 5560 2 240237 DBRUSH 17 DYNA SCRUB PK 2 5560 2 240241 DBRUSH 17 SCRUB STRIP PK 2 5560 2 Y 2 240238 LUGS W SCREWS SET OF 3 6 ASSEMBLY CONJUNTO Y INCLUDED IN ASSEMBLY INCLUIDO EN EL CONJUNTO D RECOMMENDED STOCK ITEMS ARTICULOS RECOMENDADOS PARA MANTENER EN EXISTENCIA REF PART DESCRIPTION QTY 3 240232 DASM 14 PAD DRIVER 5540 2 2...

Page 42: ...PIEZAS Tennant 5540 5560 08 05 42 RECOVERY TANK GROUP CONJUNTO DESPOSITO RECUPERAR 6 8 13 14 16 17 15 15 16 32 33 24 26 27 28 18 19 29 30 5 11 3 4 2 1 7 10 14 9 12 30 29 19 31 20 21 22 23 36 Before SN 10132464 31 34 35 25 ...

Page 43: ...LOCK 2 16 16931 SCREW M8X1 25X20 HEXHD 2 ASSEMBLY CONJUNTO Y INCLUDED IN ASSEMBLY INCLUIDO EN EL CONJUNTO D RECOMMENDED STOCK ITEMS ARTICULOS RECOMENDADOS PARA MANTENER EN EXISTENCIA REF PART DESCRIPTION QTY 17 140960 CABLE REC TANK SUPPORT 1 18 230938 HINGE REC TANK 1 19 363503 SCREW M6X1 0X12 PANHD 11 20 1010143 DASSEMBLY DRAIN HOSE 1 Y 21 1008639 DASSEMBLY CAP DRAIN HOSE 1 Y22 1008637 DO RING 1...

Page 44: ...EZAS Tennant 5540 5560 08 05 44 CHASSIS GROUP CONJUNTO TELAIO 1 49 31 33 32 28 30 29 26 23 25 24 22 19 31 35 5 7 8 9 10 11 12 20 21 13 14 15 16 17 18 37 38 39 36 40 41 34 2 42 43 44 24 46 47 48 45 Before SN 10183106 4 6 27 3 ...

Page 45: ...1 24 140027 WASHER 5 16 FLAT 2 25 140015 WASHER 5 16 LOCK 1 ASSEMBLY CONJUNTO Y INCLUDED IN ASSEMBLY INCLUIDO EN EL CONJUNTO D RECOMMENDED STOCK ITEMS ARTICULOS RECOMENDADOS PARA MANTENER EN EXISTENCIA REF PART DESCRIPTION QTY 26 578237000 SCREW M8X1 25X18 HXHDCP 1 27 140706 RIVET POP 1 8 3 28 1012965 DCAP PORT SOLUTION FILL 1 29 01683 WASHER FLAT 10 1 30 140340 SCREW PAN 10 24 X 0 62 1 31 150529 ...

Page 46: ... Tennant 5540 5560 08 05 46 CONTROL CONSOLE GROUP CONJUNTO CONSOLA DE CONTROLES 17 1 2 2 3 4 5 6 7 9 10 12 11 13 14 15 16 17 18 19 20 21 23 22 25 24 26 27 28 29 30 34 31 32 33 35 36 37 38 39 40 41 40 45 44 46 15 16 43 42 47 8 48 ...

Page 47: ...4 TRSPHL 1 22 611986 WRAP LOOM 50DX1 5 1 23 600646 HARNESS HOUSING 1 24 230613 TUBE HANDLE ADJUSTMENT 1 D RECOMMENDED STOCK ITEMS ARTICULOS RECOMENDADOS PARA MANTENER EN EXISTENCIA REF PART DESCRIPTION QTY 25 230649 PIN HANDLE ADJUSTMENT 2 26 230648 PIN HANDLE ADJUSTMENT LOCK 2 27 140415 SPRING LOCK PIN 1 28 140351 SCREW M12X1 75X70 HXHDCP 2 29 140024 WASHER 1 2 LOCK 2 30 3148 816 WASHER 875X 515X...

Page 48: ...OUP CONJUNTO DE PALANCAS 1 2 5 6 4 3 5 7 9 8 10 9 11 12 7 9 8 10 9 14 17 15 16 13 1 18 25 24 23 26 21 22 20 19 1 28 27 21 20 33 20 20 20 21 33 31 27 21 33 20 21 20 33 20 35 17 16 15 34 17 15 16 36 32 37 38 5 39 40 41 42 41 5 46 45 4 3 43 44 47 48 49 50 29 30 27 20 ...

Page 49: ...QUEEGEE LIFT 1 24 230659 LATCH SQUEEGEE HANDLE 1 25 200817 DGRIP HANDLE 095X7 8X1 3 8 1 26 240208 DKNOB HEIGHT ADJUSTMENT 1 D RECOMMENDED STOCK ITEMS ARTICULOS RECOMENDADOS PARA MANTENER EN EXISTENCIA REF PART DESCRIPTION QTY 27 02994 SCREW 3 8 16X3 4 HEXHD 3 28 230658 HANDLE SQUEEGEE LEVER 1 29 140016 WASHER 1 4 LOCK 1 30 01697 SCREW 1 4 20X5 8 HEXHD 1 31 140231 SCREW 3 8 16X1 1 2 HEXHD 1 32 2306...

Page 50: ...PARTS LIST LISTA DE PIEZAS Tennant 5540 5560 12 06 50 ELECTRICAL PANEL GROUP CONJUNTO CONSOLA ELÉCTRICO 4 1 2 3 5 6 7 8 7 6 5 9 10 11 12 13 14 16 14 22 21 20 17 18 19 23 14 16 24 25 26 15 6 5 27 28 ...

Page 51: ...12 605905AM DSOLENOID 24VDC 3 13 604486 DDIODE ASSY SPLICED 1 D RECOMMENDED STOCK ITEMS ARTICULOS RECOMENDADOS PARA MANTENER EN EXISTENCIA REF PART DESCRIPTION QTY 14 140197 SCREW 10 24X3 8 TRSPHL 10 15 630016 RING RETAINING 1 16 19066 WASHER 10 FLAT 8 17 611756 COVER ELECTRICAL PANEL 1 18 600651 DECAL CIRCUIT BREAKER CE 1 19 140197 SCREW 10 24X3 8 TRSPHL 2 20 230553 BRACKET CIRCUIT BREAKER 1 21 1...

Page 52: ...ONJUNTO RUEDA DE MANDO 1 2 4 8 9 10 11 12 14 13 15 16 17 18 20 21 19 22 23 25 26 27 24 29 30 31 32 30 34 33 28 47 45 44 46 48 43 42 39 41 40 38 7 5 28 67 11 3 49 50 51 55 53 52 56 54 53 57 58 59 59 58 57 60 61 62 61 63 64 65 66 35 53 66 35 28 48 61 61 10 12 53 52 37 36 6 68 ...

Page 53: ...RACKET WHEEL SUPPORT 1 33 140525 NUT 3 8 16 HEX 1 34 103007 DWHEEL 4 X 1 1 ASSEMBLY CONJUNTO Y INCLUDED IN ASSEMBLY INCLUIDO EN EL CONJUNTO D RECOMMENDED STOCK ITEMS ARTICULOS RECOMENDADOS PARA MANTENER EN EXISTENCIA REF PART DESCRIPTION QTY 35 140510 NUT 1 4 20 HEXJAM 6 36 230941 BRACKET FRONT LIFT GUIDE 1 37 140015 WASHER 5 16 LOCK 2 38 15675 SCREW M8X1 25X16 HEXHD 2 39 606426 DKIT CHAIN LINKS 1...

Page 54: ...Tennant 5540 5560 08 05 54 BRUSH DRIVE AND SOLUTION HOSE GROUP ACCIONAMIENTO DEL CEPILLO Y GRUPO DE MANGUERA DE SOLUCIÓN 6 1 4 2 3 7 8 9 11 10 12 13 14 20 21 19 18 17 15 16 11 11 11 29 27 27 28 26 25 24 23 22 31 32 33 30 13 12 5 ...

Page 55: ... DRIVE 2 15 606915 SCREW 10 16X3 8 HIGH LOW 4 16 613440 HOSE PVC WIR 0 38ID 0 62OD 9 0L CLR 1 17 230651 CLAMP BRUSH PLATE 2 ASSEMBLY CONJUNTO Y INCLUDED IN ASSEMBLY INCLUIDO EN EL CONJUNTO D RECOMMENDED STOCK ITEMS ARTICULOS RECOMENDADOS PARA MANTENER EN EXISTENCIA REF PART DESCRIPTION QTY 18 140417 CLIP SPRING 2 19 25732 WASHER 1 25 X 359 X 093 4 20 140015 WASHER 5 16 LOCK 2 21 140219 SCREW 5 16 ...

Page 56: ...0 7X8 PANPHL 2 YY 6 02938 WASHER 8 LOCK 2 Y 7 49800 DLATCH HOOD W KEEPER 1 ASSEMBLY CONJUNTO Y INCLUDED IN ASSEMBLY INCLUIDO EN EL CONJUNTO D RECOMMENDED STOCK ITEMS ARTICULOS RECOMENDADOS PARA MANTENER EN EXISTENCIA REF PART DESCRIPTION QTY YY 8 09739 NUT M5X0 8 NYLOCK 3 YY 9 07514 WASHER 10 LOCK 6 YY10 578237000 SCREW M8X1 25X18 HXHDCP 2 YY 11 140015 WASHER 5 16 LOCK 2 YY12 140027 WASHER 5 16 FL...

Page 57: ...M4X0 7X8 PANPHL 2 YY 6 02938 WASHER 8 LOCK 2 Y 7 49800 DLATCH HOOD W KEEPER 1 ASSEMBLY CONJUNTO Y INCLUDED IN ASSEMBLY INCLUIDO EN EL CONJUNTO D RECOMMENDED STOCK ITEMS ARTICULOS RECOMENDADOS PARA MANTENER EN EXISTENCIA REF PART DESCRIPTION QTY YY 8 09739 NUT M5X0 8 NYLOCK 6 YY 9 07514 WASHER 10 LOCK 8 YY10 578237000 SCREW M8X1 25X18 HXHDCP 2 YY 11 140015 WASHER 5 16 LOCK 2 YY12 140027 WASHER 5 16...

Page 58: ...PARTS LIST LISTA DE PIEZAS Tennant 5540 5560 08 05 58 SQUEEGEE CONTROL GROUP GROUPO DE CONTROL DE LA ESCOBILLA DE GOMA 1 9 10 11 12 13 14 15 3 19 4 2 17 18 16 5 4 7 20 23 22 21 5 4 11 6 6 8 ...

Page 59: ...EXLK 2 9 140237 SCREW 1 2 13X1 HEXHD 2 10 140024 WASHER 1 2 LOCK 2 11 3148 816 WASHER 1 2 FLAT 4 12 140139 SLEEVE 625D 500B 25L 2 D RECOMMENDED STOCK ITEMS ARTICULOS RECOMENDADOS PARA MANTENER EN EXISTENCIA REF PART DESCRIPTION QTY 13 140546 NUT 5 16 18 NYLCK 2 14 611777 BRACKET SQUEEGEE PIVOT 1 15 140219 SCREW 5 16 18X1 HEXHD 2 16 01697 SCREW 1 4 20X5 8 HEXHD 1 17 140016 WASHER 1 4 LOCK 1 18 1400...

Page 60: ...A DE PIEZAS Tennant 5540 5560 08 05 60 CURVED SQUEEGEE GROUP 5540 Model CONJUNTO PALETA ENCORUADO Modelo 5540 12 1 3 10 2 8 10 11 13 6 16 7 13 6 6 13 11 10 8 10 6 13 7 9 17 16 14 15 6 6 19 4 4 9 17 5 5 18 20 21 22 21 ...

Page 61: ...BER TAN 965MM 38 IN 1 ASSEMBLY CONJUNTO Y INCLUDED IN ASSEMBLY INCLUIDO EN EL CONJUNTO D RECOMMENDED STOCK ITEMS ARTICULOS RECOMENDADOS PARA MANTENER EN EXISTENCIA NOTE TWO SQUEEGEE SPACERS ARE REQUIRED WITH REAR URETHANE BLADE 611713 SE REQUIEREN DOS SEPARADORES DE ESCOBILLA CON LA HOJA DE URETANO 611713 REF PART DESCRIPTION QTY Y 3 611661 CASTING SQUEEGEE 1 Y 4 140799 SCREW 5 16 18X1 1 2 TRSPHL ...

Page 62: ...A DE PIEZAS Tennant 5540 5560 08 05 62 CURVED SQUEEGEE GROUP 5560 Model CONJUNTO PALETA ENCORUADO Modelo 5560 12 1 3 10 2 8 10 11 13 6 16 7 13 6 6 13 11 10 8 10 6 13 7 9 17 16 14 15 6 6 19 4 4 9 17 5 5 18 20 21 22 21 ...

Page 63: ...ARTICULOS RECOMENDADOS PARA MANTENER EN EXISTENCIA NOTE TWO SQUEEGEE SPACERS ARE REQUIRED WITH REAR URETHANE BLADE 611457 SE REQUIEREN DOS SEPARADORES DE ESCOBILLA CON LA HOJA DE URETANO 611457 REF PART DESCRIPTION QTY Y 3 611401 CASTING SQUEEGEE 1 Y 4 140799 SCREW 5 16 18X1 1 2 TRSPHL 2 Y 5 140015 WASHER 5 16 LOCK 2 Y 6 1011094 DKNOB 6 Y 7 130164 PLUG DOME 3 8 2 Y 8 1014918 DWHEEL RUBBER 3 X1 2 Y...

Page 64: ...OPTIONS OPCIONES 64 Tennant 5540 5560 12 06 ES EXTENDED SCRUB KIT ES FREGADO PROLONGADO JUEGO 1 2 1 3 4 5 6 7 8 9 10 11 8 12 13 15 14 16 17 8 8 ...

Page 65: ...ID 0 60OD 6 0L CLR 1 Y 8 54333 CLAMP HOSE 0 31 0 88D 4 Y 9 210044 VALVE CHECK 1PSI 06BM 06BM 1 ASSEMBLY CONJUNTO Y INCLUDED IN ASSEMBLY INCLUIDO EN EL CONJUNTO D RECOMMENDED STOCK ITEMS ARTICULOS RECOMENDADOS PARA MANTENER EN EXISTENCIA REF PART DESCRIPTION QTY Y 10 607103 HOSE PVC BRD 0 38ID 0 60OD 15 0L CLR 1 Y 11 150415 FITTING E90 PM04 BM06 1 Y 12 578008000 SCREW M5X0 8X30 PANPHL 1 Y 13 630145...

Page 66: ... Y 605257 DRING LOCK 1 Y 600828 DNUT WAND COUPLING 1 Y 2 13840 DSQUEEGEE ASSEMBLY PUSH PULL 355 MM 14 IN 1 Y 3 605137 DBLADES REPLACEMENT SET 4 1 ASSEMBLY CONJUNTO Y INCLUDED IN ASSEMBLY INCLUIDO EN EL CONJUNTO D RECOMMENDED STOCK ITEMS ARTICULOS RECOMENDADOS PARA MANTENER EN EXISTENCIA REF PART DESCRIPTION QTY Y 4 160481 DHOSE VAC 1 1 2X3 M 10 FT 1 Y 5 160451 DCONNECTOR 1 1 2 VAC HOSE 1 ...

Reviews: