background image

OPERATION

EN

Tennant 2550 (05--06)

3

TABLE OF CONTENTS

SAFETY PRECAUTIONS

4

. . . . . . . . . . . . . . . . . . . .

MACHINE COMPONENTS

5

. . . . . . . . . . . . . . . . . . .

CONTROL PANEL SYMBOLS

5

. . . . . . . . . . . . . . .

MACHINE INSTALLATION

6

. . . . . . . . . . . . . . . . . . .

UNCRATING MACHINE

6

. . . . . . . . . . . . . . . . . .

INSTALLING BATTERIES

6

. . . . . . . . . . . . . . . .

MACHINE SETUP

7

. . . . . . . . . . . . . . . . . . . . . . . . . .

INSTALLING PAD

7

. . . . . . . . . . . . . . . . . . . . . . .

INSTALLING DUST CONTROL BAG

7

. . . . . . .

ADJUSTING CONTROL GRIP HEIGHT

7

. . . .

MACHINE OPERATION

8

. . . . . . . . . . . . . . . . . . . . .

PRE--OPERATION

8

. . . . . . . . . . . . . . . . . . . . . . .

BURNISHING WITH THE MACHINE

8

. . . . . . .

WHILE OPERATING MACHINE

9

. . . . . . . . . . .

EMERGENCY STOP SWITCH

9

. . . . . . . . . . . .

CIRCUIT BREAKERS

9

. . . . . . . . . . . . . . . . . . . .

CHARGING BATTERIES

9

. . . . . . . . . . . . . . . . . . . .

MACHINE MAINTENANCE

10

. . . . . . . . . . . . . . . . . .

DAILY MAINTENANCE

11

. . . . . . . . . . . . . . . . . . .

WEEKLY MAINTENANCE

11

. . . . . . . . . . . . . . . .

MONTHLY MAINTENANCE

11

. . . . . . . . . . . . . . .

QUARTERLY MAINTENANCE

11

. . . . . . . . . . . .

BATTERY MAINTENANCE

12

. . . . . . . . . . . . . . .

TRANSPORTING MACHINE

12

. . . . . . . . . . . . . . . . .

STORING MACHINE

12

. . . . . . . . . . . . . . . . . . . . . . . .

RECOMMENDED STOCK ITEMS

12

. . . . . . . . . . . . .

TROUBLE SHOOTING

13

. . . . . . . . . . . . . . . . . . . . . .

SPECIFICATIONS

14

. . . . . . . . . . . . . . . . . . . . . . . . . .

Summary of Contents for 2550

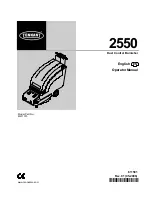
Page 1: ...Operator Manual Dust Control Burnisher English EN 2550 611581 Rev 01 05 2006 Model Part No M611373 611581 www tennantco com ...

Page 2: ...mentally way according to your local waste disposal regulations Always remember to recycle TENNANT N V Industrielaan 6 5405 AB P O Box 6 5400 AA Uden The Netherlands europe tennantco com www tennantco com Specifications and parts are subject to change without notice Copyright E2001 2006 Tennant Company All rights reserved MACHINE DATA Please fill out at time of installation for future reference Mo...

Page 3: ...L BAG 7 ADJUSTING CONTROL GRIP HEIGHT 7 MACHINE OPERATION 8 PRE OPERATION 8 BURNISHING WITH THE MACHINE 8 WHILE OPERATING MACHINE 9 EMERGENCY STOP SWITCH 9 CIRCUIT BREAKERS 9 CHARGING BATTERIES 9 MACHINE MAINTENANCE 10 DAILY MAINTENANCE 11 WEEKLY MAINTENANCE 11 MONTHLY MAINTENANCE 11 QUARTERLY MAINTENANCE 11 BATTERY MAINTENANCE 12 TRANSPORTING MACHINE 12 STORING MACHINE 12 RECOMMENDED STOCK ITEMS ...

Page 4: ...arting machine Make sure all safety devices are in place and operate properly 3 When using machine Go slow on inclines and slippery surfaces Use care when reversing machine Always follow safety and traffic rules Report machine damage or faulty operation immediately 4 Before leaving or servicing machine Stop on level surface Turn off machine Set parking brake 5 When servicing machine Avoid moving p...

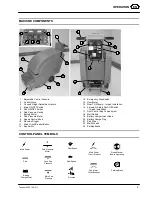
Page 5: ...t Breaker Button 12 Key Switch 13 Emergency Stop Switch 14 Hour Meter 15 Rear Tilt Wheels for pad installation 16 Automatic Safety Shut Off Switch for pad installation 17 Dust Control Bag Compartment 18 Wall Rollers 19 Battery Compartment Hood 20 Battery Charge Plug 21 Pad Driver 22 Main Wheels 23 Parking Brake CONTROL PANEL SYMBOLS Main Power Pad Motor Circuit Breaker Main Power Circuit Breaker R...

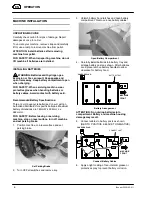
Page 6: ... for specific batteries Maximum battery dimensions are 78mm W x 394mm L x 362mm H FOR SAFETY Before leaving or servicing machine stop on level surface turn off machine and set parking brake 1 Position machine on a level surface and set parking brake Set Parking Brake 2 Turn OFF all switches and remove key 3 Unlatch battery hood latches and open battery compartment Remove loose battery cables Open ...

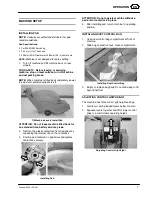
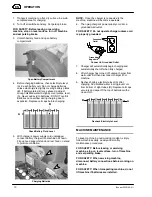
Page 7: ...extended time battery acid may leak 2 Remove the plastic centerlock from pad driver by squeezing the retainer clip on the centerlock 3 Position pad centered on pad driver and replace centerlock securely Installing Pad ATTENTION Do not operate machine without a pad and or centerlock in place 4 After installing pad return machine to operating position INSTALLING DUST CONTROL BAG 1 Open dust control ...

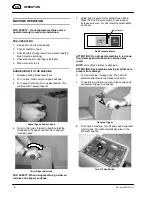
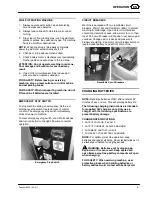
Page 8: ...desired cleaning speed Twist Grips to Burnish FOR SAFETY When using machine go slow on inclines and slippery surfaces 5 Adjust pad pressure meter within Green Zone Press the Pad Pressure switch to decrease or increase pressure For best results adjust needle as shown Meter Needle GREEN ZONE RED ZONE Pad Pressure Meter ATTENTION Do not operate machine in red zone floor damage and brush motor overloa...

Page 9: ...d turn red button to the right Resume to normal operation Emergency Stop Switch CIRCUIT BREAKERS Machine is equipped with two resettable circuit breakers Main 15A and Pad Motor 80A to protect machine from damage If pad motor circuit breaker should trip determine cause allow motor to cool then reset Pad circuit breaker will trip due to excessive pad overload Change pad or reduce pad pressure if bre...

Page 10: ...rging Batteries NOTE Once the charger is connected to the machine machine will become inoperable 6 Then plug charger s power supply cord into a grounded wall outlet FOR SAFETY Do not operate charger unless cord is properly grounded Grounded Grounding Edge hole Outlet Connect to Grounded Outlet 7 Charger will automatically begin charging and automatically shut off when fully charged 8 After charger...

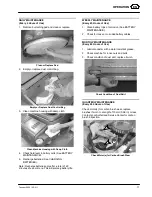
Page 11: ...tes of use or more This will prolong battery life WEEKLY MAINTENANCE Every 20 Hours of Use 1 Clean battery tops of corrosion See BATTERY MAINTENANCE 2 Check for loose or corroded battery cables MONTHLY MAINTENANCE Every 80 Hours of Use 1 Lubricate caster with a water resistant grease 2 Check machine for loose nuts and bolts 3 Check condition of dust skirt replace if worn Check Condition of Dust Sk...

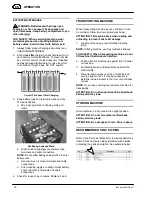
Page 12: ...ost protectant to terminals and cable connections 4 Check for loose or worn cables Replace if worn TRANSPORTING MACHINE When transporting machine by use of trailer or truck be certain to follow tie down procedures below ATTENTION Tilt machine back when loading and unloading to prevent dust skirt damage 1 Load machine using a recommended loading ramp NOTE If lifting machine you must remove batterie...

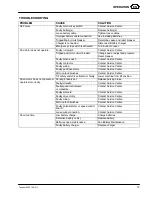
Page 13: ...Center Faulty wiring Contact Service Center Faulty pad drive motor Contact Service Center Worn carbon brushes Contact Service Center Tilt safety switch is activated or faulty Lower machine from tilt position Drive motor does not operate or operates incorrectly Parking brake is set Release parking brake Faulty roll switch Contact Service Center Faulty speed control board or connection Contact Servi...

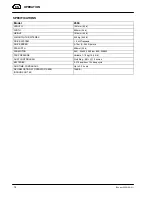
Page 14: ...5 Kg 540 lb DRIVE SYSTEM 15 kWTransaxle DRIVE SPEED 0 73m 0 240 ft per min PAD WIDTH 508mm 20 in PAD MOTOR 36V 22kW 2000 rpm 80A 2238W PAD PRESSURE Variable 7 19 kg 15 40 lb DUST CONTROL BAG Cloth Bag 98 1 0 micron BATTERIES 3 215amp hour 12v deep cycle RUN TIME CONTINUOUS Up to 2 2 hours DECIBEL RATING AT OPERATOR S EAR INDOORS ON TILE 70dB A ...

Reviews: