background image

EN

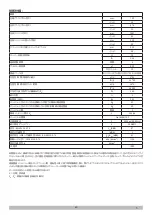
TECHNICAL  CHARACTERISTICS:

Description

Width-including side brush

mm

700

Inch

28

Length-including side brush

mm

870

Inch

34

Height-including handle

mm

1067

Inch

42

Machine height w/ handle folded

mm

510

Inch

20

Cleaning Path Width (main + side brush)

mm

635

Inch

25

Hopper capacity (real)

Lt

35

ft

3

1.25

Run time

h

2

Filtering surface

m

2

0,95

sq.ft

10

Filtration

99.5% efficient for particles up to 2 

microns

Productivity (for Hour) Theoretically Max

m

2

/h

1742

ft

2

/h

18750

Productivity (for Hour) Estimate Coverage

m

2

/h

1672

ft

2

/h

18000

Overall power of machine in average operating conditions (P

M

)

W

165

Maximum slope

%

2

Gross weight (GVW)

kg

103

Transport weight of the machine with battery and empty debris bin

kg

63

Transport weight of the machine without battery, with empty debris bin

kg

49

Number of batteries

no.

1

Machine voltage V

M

V

12V dc

Type of battery

Gel 42Ah/C20

Mains supply voltage

V

100V ac (50-60Hz)

Max current (amperes), I

A

2.9A max

Sound pressure - EN 60335-2-72

L

pA 

(dBA)

57

Measurement uncertainty

K(dBA)

3

Measured sound power (LWA) + UNCERTAINTY (KWA) - EN 60335-2-72

L

WA

+K

WA

 (dBA)

63

Vibration level (hand) - IEC 60335-2-72

ahv (m/sec

2

)

≤2.5

Measurement uncertainty, k

m/sec

2

/

IP degree

IPX0

Gross weight (GVW): maximum permissible weight with the machine fully loaded and ready for use. The gross weight of the vehicle includes, when 
applicable, detergent solution tank full of clean water, empty dirty water tank (half full in the case of recycling systems), empty dust bags, the hopper 
filled to its rated capacity, the largest recommended batteries and all accessories such as cables, hoses, detergent, mops and brushes.
Transported weight: the weight of the machine including the batteries, but excluding optionals (for example, the operator’s cabin, FOPS (Falling Object 
Protective Structure), second and third side brushes and front brush attachment), fresh water (in the case of scrubbers or combined machines) and 

the weight of a standard operator (75 kg)

Data subject to changes without prior warning

V, I: charging / supply values
V

M

 , P

M

 : machine in operation (all functions on)

5

Summary of Contents for 1251269

Page 1: ...BATTERY SWEEPER Operator s Manual EN オペレーターマニュアル JP Model Part No 1251269 SWEEPER S6 JP To view print or download the parts manual visit www tennantco com manuals www tennantco com PLDC04404 Rev 02 03 2021 ...

Page 2: ...AIN BRUSH REPLACEMENT 9 CLEANING AND SERVICING THE FILTERS 9 MAIN BRUSH BELT REPLACEMENT 10 MAIN SIDE BRUSH SELF ADJUSTMENT FEATURE 11 ADJUSTING THE SIDE BRUSH 11 REMOVING THE BATTERY 11 CONTROL PANEL DISPLAY CODES 12 RECOMMENDED SPARE PARTS 13 TABLE OF CONTENTS Tennant Company Japan 9F Industry Trade Center Yokohama Kanagawa 231 0023 Phone 81 45 640 5630 www tennant co jp com Copyright 2019 Tenna...

Page 3: ...tery WARNING Installation and connection removal of the batteries must be carried out by an TENNANT approved technician hereinaf ter referred to as qualified personnel The following information signals potentially dangerous conditions to the operator or equipment FOR SAFETY Do not operate machine In flammable or explosive areas Unless trained and authorized Unless operation manual is read and unde...

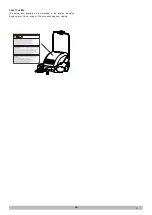
Page 4: ...EN SAFETY LABEL The safety label appears on the machine in the location indicated Replace label if it is missing or if it becomes damaged or illegible 4 ...

Page 5: ...res I A 2 9A max Sound pressure EN 60335 2 72 LpA dBA 57 Measurement uncertainty K dBA 3 Measured sound power LWA UNCERTAINTY KWA EN 60335 2 72 LWA KWA dBA 63 Vibration level hand IEC 60335 2 72 ahv m sec2 2 5 Measurement uncertainty k m sec2 IP degree IPX0 Gross weight GVW maximum permissible weight with the machine fully loaded and ready for use The gross weight of the vehicle includes when appl...

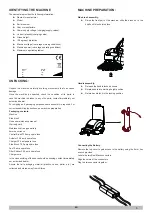
Page 6: ...nectors Align the colors of the connectors Plug the two connector together UNPACKING Unpack the machine carefully avoiding movements that can cause damage Once the machine is unpacked check the condition of its parts In case the machine is broken in any of its parts contact immediately our authorized dealer For shipping and packaging purposes some assembly is required For correct assembling instru...

Page 7: ...rking hours of the machine pressing the switch once and minutes pressing the switch twice D On Off sweeping mode switches 1 and 2 these two switches allow the machine to work with two separate sweeping mode mode 1 for light debris collection and mode 2 for heavy debris collection E Manual operating switch of the filter shaker gives the possibility in shaking the filter at any time during work This...

Page 8: ...t debris and smooth surfaces ON OFF sweeping mode button 2 for heavy debris and concrete asphalt and carpeted surfaces Notes using sweeping mode 2 will reduce the maximum machine run time OPERATIONS TO MAKE FOR CORRECT USE After having followed all operations for starting the machine you are now ready to work with the machine as a sweeper To achieve the maximum performance follow the proceedures i...

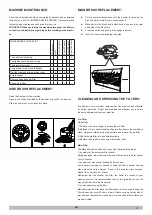
Page 9: ...ERS The filters are very important components of the machine and essential for correct operation Proper filter maintenance will allow you to obtain the best performance from your machine Pre Filter Clean Daily 1 Remove the debris hopper to access the pre filter 2 Release the two metal retaining clip arms that secure the pre filter in place Hinge the retaining clip arms outward and remove the pre f...

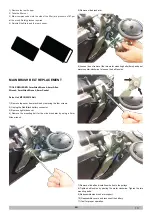
Page 10: ...ke the filter out 3 Blow compressed air into the side of the filter at a pressure of 87 psi at the most Safety glasses required 4 Reinstall the filters and the rear hopper 7 Remove old belt and install new belt onto the pulleys 8 Tighten belt tension by pivoting the motor clockwise Tighten the two mounting bolts 9 Reassemble side brush arm support 10 Reassemble covers and reconnect the battery 11 ...

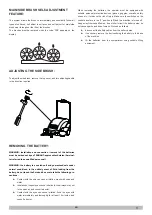
Page 11: ...luid and be sure to take the following pre cautions Contact with the skin can cause irritation wash with soap and water Inhalation of vapours can cause irritation to the airways stay out in the open air and consult a doctor Contact with the eyes can cause irritation flood the eyes with water immediately and thoroughly for at least 15 minutes and consult a doctor When removing the batteries the ope...

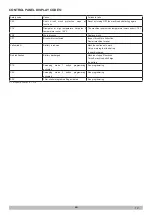
Page 12: ...lace brush SP1 Brush motor restricted Inspect brush for obstruction Restart machine to reset Yellow led lit Battery in reserve Machine continues to work Only a warning that the battery is near discharge Red led flashes Battery discharged Machine stops all functions Turn off machine and charge the battery P1 X Sweeping mode 1 button programming activated See programming P2 X Sweeping mode 2 button ...

Page 13: ...PER MECE00023 WIRE ASSY TOUCH MPVR04693 STRAP STATIC PMVR00438 GUIDE ASSY ACTUATOR MOCC00035 MOTOR SHAKR MOCC00036 MOTOR VACUUM MOCC00033 MOTOR BRUSH MAIN MOCC00037 MOTOR BRUSH SIDE MTIG00002 GEAR MOTOR SIDE BRUSH MEVR01660 CARBON BRUSH MOTOR MOCC00033 MEVR86071 CARBON BRUSH MOTOR MOCC00037 MPVR02939 STRAP BATTERY MEVR02660 FUSE T20A MAIN CARD MEVR00150 FUSE F2 5 A 250V 5X20 CHARGER MEVR00150 FUSE...

Page 14: ...ルト交換 10 メイン サイドブラシの自己調整機能 11 サイドブラシの調整 11 バッテリーを取り外します 11 コン トロールパネルディ スプレイ画面のコード表 12 推奨されるスペアパーツ 13 Tennant Company Japan 9F Industry Trade Center Yokohama Kanagawa 231 0023 Phone 81 45 640 5630 www tennant co jp com Copyright 2019 Tennant Company All rights reserved Tennant Company PO Box 10400 Clean Street Eden Prairie MN 55344 2650 Phone 800 553 8033 www tennantco com 2 ...

Page 15: ...は 火 花や裸火を避けて ください 警告 バッテリーの取り付けと接続 取り外しは 必ず TENNANT 社が承認 した技術者 以下 熟練した技術者 と呼びます が行わなければなりませ ん 次の情報は オペレーターまたは機器に対して潜在的に危険な状態を示し たものです 安全のために 次のような場合には 本機を操作しないでください 可燃物および爆発性物質が近くにある場合 オペレーターが研修を受けて承認されていない場合 オペレーターが本書を読んでいない または本書の内容を理解し ていない場合 本機が正常な動作状態にない場合 ホッパーおよび またはフィルターが所定の位置に取り付けられて いない場合 本機を起動する前に 安全装置がすべて所定の位置にあり 正常に作動することを確認 して ください 本機操作時には 煙草 マッチ 火のついた灰など燃えているまたは煙の出ている物 を本機で回収しないでください...

Page 16: ...JP り 医師に相談して ください 目と接触すると 刺激を引き起こす可能性があります 即時に目を水 で洗い 15分ほど十分に洗って医師に相談して ください 警告ラベル 警告ラベルは以下の位置に貼ってあります ラベルがなくなっているかキズ などで読めなくなった場合は 新しいラベルと取り替えて ください 4 ...

Page 17: ...ミ入れを搭載しない状態での機械の輸送重量 kg 49 バッテリーの数 数量 1 機械 バッテリー電圧 VM V 12V dc バッテリーの種類 Gel 42Ah C20 主電源電圧 V 100V ac 50 60Hz 最大電流 アンペア I A 2 9A 最大 音圧 EN 60335 2 72 LpA dBA 57 測定の不確実性 dBA 3 測定音圧 LWA 不確実性 KWA EN 60335 2 72 LWA KWA dBA 63 振動レベル 手 IEC 60335 2 72 ahv m sec2 2 5 測定不確実性 k m sec2 IP 程度 IPX0 総重量 GVW 機械が完全に装着されて使用可能な状態での最大許容重量 車両の総重量には 該当する満杯の洗剤溶液タンク 空の汚水タンク リサイ クルシステムの場合は半分 空の塵袋 定格容量に満たされたホッパー 最大の推奨バッテリーや...

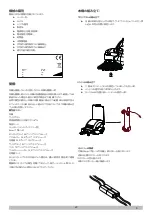
Page 18: ...テリー メンテナンスフリー型 4mm 六角レンチ センターブラシ T20アンペアスペアヒューズ アクチュエー F2 5アンペアスペアヒューズ 充電器 F2 5アンペアスペアヒューズ サイドブラシ T6 3アンペアスペアヒューズ ファン T5アンペアスペアヒューズ フィ ルターシェーカー F2 5アンペアスペアヒューズ 充電器コード 以上のうち いずれかが欠品していた場合は 直ちに販売代理店までご連絡 ください 開梱時には すべての梱包材類 プラスチック 段ボール パレッ ト等 を お 子様の手の届かない場所にまとめておいて ください 本機の組み立て サイドブラシの組み立て 本機の前部を持ち上げた状態で サイドブラシをシャフ トの方へ押 し込み 所定の位置に固定します ハンドルの組み立て 下図のとおりに ハンドルを固定しているロックを外します ハンドルを適切な高さまで持ち上げます ロックを元...

Page 19: ...稼 働時間が表示されます 1回押すと時間単位 2回押すと分単位で稼働時 間が表示されます D オン オフスイーピングモードボタン モード 1 モード 2 本機のスイー ピングモードを切り替えるボタンです モード 1ボタン は軽めのゴミの回収 に モード 2ボタン は重めのゴミの回収に使用します E フィ ルターシェーカーの手動操作ボタンにより 作業中いつでもフィ ルタ ーを振動させることができます 本機では3分ごとに自動的にフィルターが 作動しますが このボタンを押すと手動でフィ ルターを作動させることができ ます 本機では スイーピングモードがオンになると自動的にバキュームファンが 作動します そのため このボタンはスイーピングモードの作動中に 手動で バキュームファンを停止させるときに使います G 数字ディ スプレイ画面 フューズ 2 5A A コン トロールパネル B 充電フューズ ...

Page 20: ...テリーの残量がまだ充分に残っていることを確認します スイーピングモードを選択します オン オフモード 1ボタン 軽めのゴミを回収するときや 滑らかな 床面を清掃するときに使用します オン オフモード 2ボタン 重めのゴミを回収するときや コンクリー ト アスファルト カーペッ ト上を清掃するときに使用します 注 モード 2ボタンを使用すると バッテリーの最大稼働時間が短くなりま す 正しい操作方法 始動時の手順をすべて行ったら いよいよ本機をスイーパーとして操作でき る状態となります 本機の性能を最大限に発揮し また本機の故障を防ぐた めに 以下の事項を守って ください 以下を行うことが重要です ワイヤー ロープ ひも 水分 液体などの回収には 本機を使用し ないでください 大きめのゴミ 紙くず 落ち葉など を回収するときは ハンドルバー を押し下げて本機の前部を持ち上げてください 清掃作...

Page 21: ...ーの清掃と修理 本機のフィ ルター類は 本機が適正に作動するうえで非常に重要となる部品 です 適切なフィルターのメンテナンスは ご使用の機械から最高の性能を 得ることを可能にするでし ょ う プレフィルター プレフィ ルターは毎日 以下の方法で清掃を行って ください 1 プレフィ ルターに手が届く状態にするため まずホッパーを取り外します 2 プレフィ ルターを所定の位置に固定している2個の金属製クリ ップアーム を外します クリ ップアームを外側に押して プレフィ ルターを取り外します 3 ゴミ受けの中でプレフィ ルターを振って ゴミを振り落とします 4 プレフィ ルターを元の位置に戻し クリ ップアームで元通りに固定します メインフィルター メインフィ ルターは 以下の3通りのいずれかの方法で清掃して ください 1 自動フィ ルターシェーカーを使用する方法 本機の作動中は 3分おきにフ...

Page 22: ...ケット パーツリスト MTCG00019 ベルト 1 4本のネジを外して 上部カバーを機械から取り外します 2 赤 黒のバッテリーコネクタのプラグを抜きます 3 右のサイドカバーを取り外します 4 5mmアレンレンチを使用して サイドブラシアームの取り付けボルトを取 り外します 5 サイドブラシアームを取り外します 6 2本のモーター取り付けボルト 8mm を緩め 外さないでください モー ターを反時計回りに回転させてベルトの張力を緩めます 7 古くなったベルトを取り外し 新しいベルトをプーリーに取り付けます 8 モーターを時計回りに回して ベルトの張力を締め付けます 2本の取り付 けボルトを締め付けます 9 サイドブラシアームのサポート部を再度組み立てます 10 カバーを再び組み立て バッテリーを再び接続します 11 適切に動作するかテストします 10 ...

Page 23: ...の状態では安全が保障されて います 万一バッテリーから液体が漏出した場合には 液体に触れず 必ず 以下の安全措置を取って ください 皮膚と接触すると 刺激を引き起こす可能性があります 水と石鹼 で洗って ください 蒸気の吸引は気道に刺激を引き起こす可能性があります 外気に あたり 医師に相談して ください 目と接触すると 刺激を引き起こす可能性があります 即時に目 を水で洗い 15分ほど十分に洗って医師に相談して ください バッテリーを取り外すときは 怪我の危険性を減らすために 使用者は適切 な専用の保護具 手袋 ゴーグル オーバーオール 安全靴など を着用する 必要があります コントロールパネルのスイッチが 0 の位置 オフ になって いて 機械の電源が切れていることを確認します 裸火から遠ざけ バッテリ ーの極を短絡にしたり 火花を発生させたり 喫煙したりしないでください 以下のように...

Page 24: ...している 磨耗したブラシを交換して ください SP1 ブラシモーター制限 ブラシのモーターに電流が多く流れていないか検査します 本機の電源ボタンを一旦オフにしてから 再び電源ボタンをオン にして ください 黄色ランプ点灯 バッテリーの残量が少ない 本機は作動を続けます バッテリーの残量がゼロに近い ことを告げるただの警告です 赤色ランプ点滅 バッテリーの残量がゼロになった 本機の全機能が停止します 本機の電源ボタンをオフにし バッテリーを充電して ください P1 X スイーピングモード 1ボタンのプログラムが機能している 下記 プログラミングの方法 を参照して ください P2 X スイーピングモード2ボタンのプログラムが機能している 下記 プログラミングの方法 を参照して ください SF X フィ ルターシェーカーのプログラム設定が機能している 下記 プログラミングの方法 を参照して くだ...

Page 25: ...ヤーアセンブリ タッチ MPVR04693 ストラップ 静的 PMVR00438 ガイドアセンブリ アクチュエータ MOCC00035 モーター シェーカー MOCC00036 モーター バキューム MOCC00033 モーター ブラシ メイン MOCC00037 モーター ブラシ サイド MTIG00002 ギア モーター サイドブラシ MEVR01660 カーボンブラシ モーター MOCC00033 MEVR86071 カーボンブラシ モーター MOCC00037 MPVR02939 ストラップ バッテリー MEVR02660 ヒューズ T20A メインカード MEVR00150 ヒューズ F2 5 A 250V 5X20 チャージャー MEVR00150 ヒューズ F2 5 A 250V 5X20 アクチュエータ MEVR04016 ヒューズ T6 3A サイドブラシ MEVR028...

Page 26: ...mpany Japan 9F Industry Trade Center Yokohama Kanagawa 231 0023 Phone 81 45 640 5630 www tennant co jp com Tennant Company PO Box 10400 Clean Street Eden Prairie MN 55344 2650 Phone 800 553 8033 www tennantco com ...

Reviews: