


Snappi System User Manual
Document No: 053-05 v38
Page 69 of 76
June 2022
Snappi System User Manual.doc
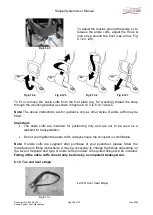
event of a puncture, you will need to purchase a set of tyre levers and a puncture
repair kit form a reputable bicycle shop. Always follow the instructions given in the
puncture repair kit.
9. Always wipe the wheelbase and seat frame dry. Never put them away damp.
10.2 Six-monthly maintenance
On a six-monthly basis, please ensure the below checks are carried out by either a
competent tradesman or approved repairer.
If you discover a fault or any signs of damage, immediately stop using the pushchair and
contact the appropriate authority for further instruction. This may be the approved repairer,
the issuing authority (e.g. a wheelchair service) or Tendercare Ltd. If you discover either
damage or a fault which is not listed below, stop using the pushchair and immediately
contact the appropriate authority. Similarly, if you have any queries or concerns, please
contact the appropriate authority. If you are unsure who to contact, contact Tendercare Ltd
directly.
1.
Fold and open the wheelbase. Check all movements through the folding range
are free, easy and unobstructed. Examine the frame for any damage.
2.
Check the operation of both the wheelbase tilt in space mechanism and the seat
back recline. Check the gas strut and the gas strut release head for any signs of
damage. In addition to the six-monthly check, as the gas strut release head is a
cast aluminium part, we recommend replacing every three years.
3.
Examine upholstery and postural accessories including harnessing for wear and
arrange for replacement if necessary.
4.
Examine nuts, bolts, pivots and frame plugs for tightness and general condition.
5.
Examine brake assembly for wear, damage and correct operation.
6.
Examine tyres for sharp objects, cuts or splits.
7.
Examine castor and wheel bearings for excessive wear.
8.
Check castors and rear wheels for free rotation, fit and accumulation of fluff and
grit. Remove any fluff and grit with a dry lint free cloth.
9.
Check the seat interface fits securely into the frame and that it is not worn or
damaged.
10. Check the interface clips to ensure they can rotate freely and that the springs
return the clips to the closed position when released.
10.3 Additional / workshop maintenance
A more detailed schedule of routine and planned maintenance is given in the appropriate
workshop manual. The workshop manual is designed for use by a competent tradesperson


