background image


Specify Advanced Settings 

101


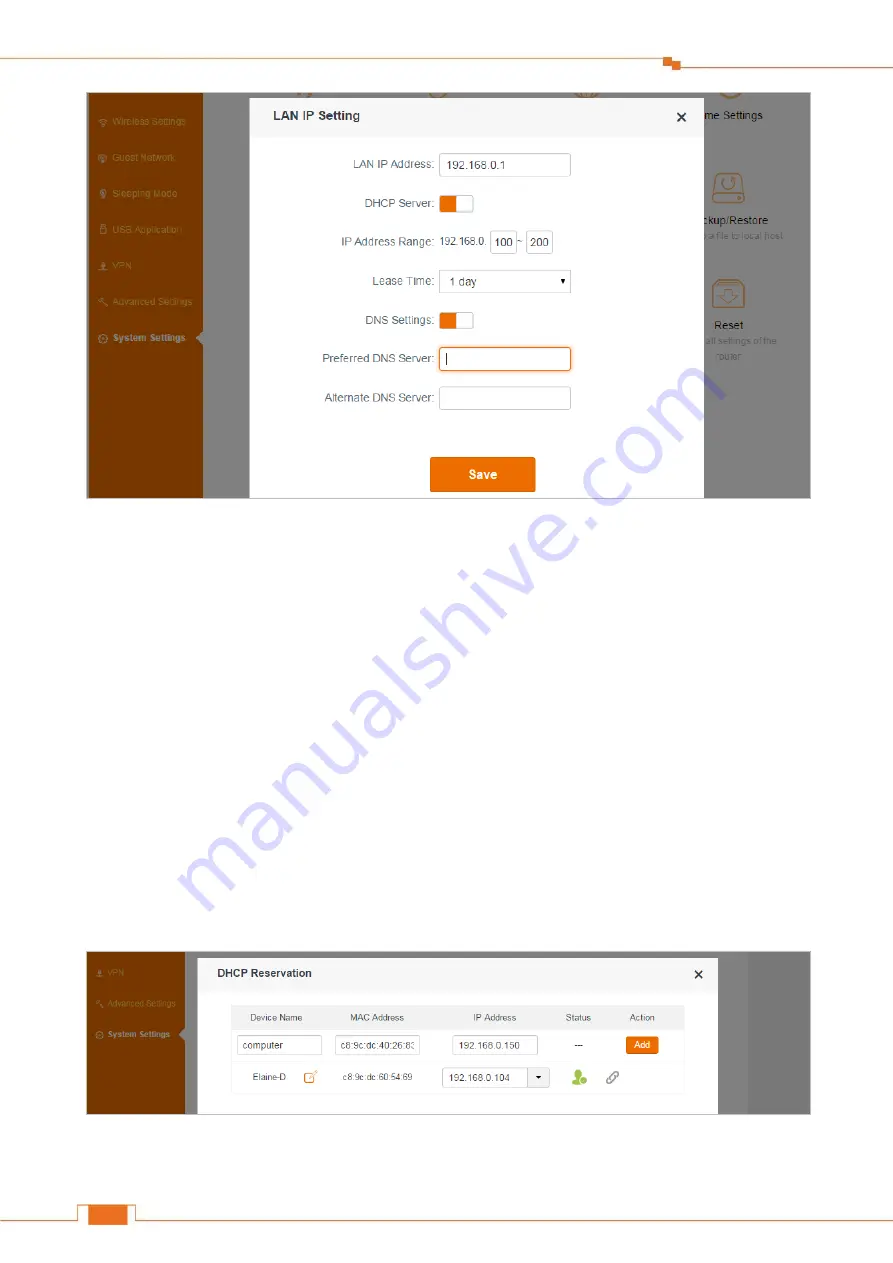
DHCP Reservation 

When you specify a reserved IP address for a computer on the LAN, that computer always receives 

the same IP address each time it accesses the router’s DHCP server. Assign reserved IP addresses to 

computers or servers that require permanent IP settings. For example, when you use DMZ or Virtual 

Server feature, you’d better specify a reserved IP address for your computer. 

To reserve an IP address:   

❶ 

Log in to the Router’s User Interface, and click

 System Settings > DHCP Reservation

❷ 

Customize a device name, like 

computer

 here.


Type the MAC address of the computer, like

 c8:9c:dc:40:26:83

 here. 


Specify a reserved IP address for the computer, like 

192.168.0.150 

here. 


Click 

Add

Summary of Contents for AC9

Page 1: ......

Page 2: ...eferences only To improve internal design operational function and or reliability Tenda reserves the right to make changes to the products without obligation to notify any person or organization of su...

Page 3: ...2 Complete the Wireless Settings 14 6 Join Your WiFi 17 Windows 8 17 Windows 7 18 iPad iPhone 20 Android 21 III Specify Advanced Settings 23 1 Internet Status 23 Change the Internet Type 24 Change the...

Page 4: ...outing 96 UPnP 98 9 System Settings 98 LAN IP Settings 99 DHCP Reservation 101 WAN Settings 102 Time Settings 104 Login Password 105 Reboot 106 Firmware Upgrade 107 Backup Restore 108 System Status 10...

Page 5: ...ront panel This section contains the following Package Contents LED Indicators Buttons Interfaces Product Label 1 Package Contents Unpack the package Your box should contain the following items AC1200...

Page 6: ...ed Blinking Data is being transmitted via the LAN port Off No connection is detected on the LAN port Internet Solid The Internet port is well connected Blinking Data is being transmitted via the Inter...

Page 7: ...release it to enable disable WiFi Reset Use the end of a paper clip or a similar object to press and hold this button for about 8 seconds until all the LEDs light up and then release it to restore fac...

Page 8: ...the address bar of a web browser to log in to the Router s Quick Setup Wizard or User Interface Only when you access the Router at the first time or restore the Router to factory default can the Route...

Page 9: ...ect and configure your Router This section contains the following Prepare Your Router Position Your Router Connect Your Router Access to the Router Quick Setup Join Your WiFi 1 Prepare Your Router Mou...

Page 10: ...cantly depending on the physical placement of your Router And pay attention to the followings Place it around the central area which your laptops smart phones and other devices usually surround and pr...

Page 11: ...a solid metal door or aluminum nails Keep it away from other materials such as glass insulated walls fish tanks mirrors brick and concrete that may also affect your wireless signal 3 Connect Your Rou...

Page 12: ...epared by yourself from the Internet side to your modem Connect the modem to the Internet port of the Router using an Ethernet cable Power on the Router Plug in your modem or put the battery back in T...

Page 13: ...lect wired or wireless connection as you like to connect your computer to the Router Wired Connection Connect an Ethernet cable included in the package to the Ethernet port of your computer and insert...

Page 14: ...don t know how to join your WiFi please refer to 6 Join Your WiFi 2 Either WiFi SSID or WiFi password is changed devices are required to reconnect with WiFi manually 3 The devices can only access the...

Page 15: ...he operation above when you access the Router at the first time please refer to the solutions in FAQ Q2 5 Quick Setup 1 After the steps above you will log in to the Router s Quick Setup Wizard if you...

Page 16: ...DHCP Static IP and PPPoE The router will detect your connection type automatically According to the detection result complete the required configuration and then click Next to go on configuring wirel...

Page 17: ...Specify Your Internet Settings 13 Static IP IP address Enter the IP address provided by your Internet Service Provider ISP into this field...

Page 18: ...this field Alternate DNS Server If your ISP provides another DNS server IP address enter it into this field If not leave this field blank Choose to clone MAC address or not and then click Next to cont...

Page 19: ...is used to connect to your wireless network WiFi while the login password is for logging in to the Router s User Interface You can check the option on the left of Set up the login password to the sam...

Page 20: ...ect from the router and you need to reconnect with the WiFi 4 When the following page appears it indicates that you have completed the Internet settings Wired Connection If you connect your computer t...

Page 21: ...connect to your wireless network via your notebook or other wireless devices We take Windows 8 Windows 7 iPad iPhone and Android as examples here Choose the corresponding configuration steps according...

Page 22: ...settings right click Wi Fi and select Connect Disconnect 2 If you cannot find your WiFi from the list ensure the Airplane Mode is not enabled on your computer Select your WiFi name from the list click...

Page 23: ...icon please move your mouse to the bottom left corner of your desktop select Start Control Panel Network and Internet Network and Sharing Center Change adapter settings right click Wireless Network Co...

Page 24: ...Specify Your Internet Settings 20 iPad iPhone Click on Settings Click Wi Fi choose your SSID enter the Wireless password and click Join...

Page 25: ...Specify Your Internet Settings 21 Android Click on Settings Click WLAN to enter your WLAN settings Enable your WLAN and select your SSID Enter your wireless password and click Connect...

Page 26: ...Specify Your Internet Settings 22 When your WiFi is connected successfully it will display Connected...

Page 27: ...twork Sleeping Mode USB Application VPN Advanced Settings System Settings 1 Internet Status In Internet Status page you can check the Internet connection status WiFi Info and the connected devices inf...

Page 28: ...lowing Quick Setup Wizard or want to change your Internet settings you can refer to the following instructions Click the Internet Settings gray roundness in the page and then the Internet Settings pag...

Page 29: ...Specify Advanced Settings 25 Change the Wireless Settings Click the Wireless Settings green roundness on the upper right and then the Wireless Settings page will pop up...

Page 30: ...Specify Advanced Settings 26...

Page 31: ...further use Hide If the Hide option is checked the wireless clients cannot search the WiFi name of the Router You need to know the WiFi name in advance and enter the WiFi name on each wireless client...

Page 32: ...e devices name and add the unknown devices to blacklist Edit the devices name Click the icon input a device name in the box and click Save Add to the blacklist If you find unknown devices in your netw...

Page 33: ...Specify Advanced Settings 29 Blacklist The devices in blacklist cannot access the Internet via the Router Click Remove button to remove the corresponding device back to Attached Devices list...

Page 34: ...dvanced Settings 30 Check system status Click the figure of router and then the System Status page will pop up You can check the Router s current network status basic info WAN status LAN Status and Wi...

Page 35: ...u insert a USB device into the router s USB port the gray USB Application roundness will turn to green Click the green roundness on the right corner and then the File Share page will pop up For the de...

Page 36: ...32 2 Internet Settings If you don t set up your Internet connection by following Quick Setup Wizard or want to change your Internet settings you can refer to this page Please refer to Complete the Int...

Page 37: ...u enjoy your WiFi Click the following icons shortcut to go to the corresponding features WiFi Name Password WiFi Schedule Wireless Repeating Channel Bandwidth Transmit Power WPS Beamforming WiFi Name...

Page 38: ...wireless clients cannot search the WiFi name of the Router You need to know the WiFi name in advance and enter the WiFi name on each wireless client manually Security Mode The router offers three sec...

Page 39: ...can have wired and wireless clients and access the Internet when it connects to the wireless base station There are two types of Wireless Repeating WISP and Universal repeater When the Router works u...

Page 40: ...which has your Internet connection then set up the second Router Router B in bridge modes And place the Router B in a different room which is your home entertainment center on the second floor Connect...

Page 41: ...e Router A Make a note of the WiFi name and password of the Router A to which this Router Router B will connected WiFi Name SSID Tenda_666666_ZL WiFi Password 66666666 Log in to the Router s User Inte...

Page 42: ...tion WiFi Name list For example if the Router A s channel is 13 but Router B s channel range is 1 11 you won t find the Router A s WiFi name in the Base Station WiFi Name list So you d better select t...

Page 43: ...whether the bridge is successful After this Router Router B auto reboots log in to this Router s Router B s User Interface and click Internet Status Check the connection status If it displays Connecte...

Page 44: ...ature are not available when the Router B is in WISP mode 2 The configuration of the Router b s wireless channel won t take effect after bridge 3 If Router B s LAN IP address is the same as that of Ro...

Page 45: ...e The DHCP of Router A MUST be enabled Make a note of the WiFi name and password of the Router A to which this Router Router B will connected WiFi Name SSID Tenda_666666_ZL WiFi Password 66666666 Log...

Page 46: ...he Base Station WiFi Name list For example if the Router A s channel is 13 but Router B s channel range is 1 11 you won t find the Router A s WiFi name in the Base Station WiFi Name list So you d bett...

Page 47: ...bridge is successful After this Router Router B auto reboots log in to this Router s Router B s User Interface and click Internet Status Check the connection status If it displays Bridged successfull...

Page 48: ...t Network Sleeping Mode Parental Control Bandwidth Control DDNS Virtual Server DMZ Remote Management IPTV Security UPnP LAN IP Settings DHCP Reservation and WAN Settings are not available when the Rou...

Page 49: ...experiment with different channels to see which the best is The recommended channel spacing between adjacent access points is four channels for example use channel 1 and 5 or 6 and 10 Bandwidth Select...

Page 50: ...ing to your needs WPS WPS Wi Fi Protected Setup allows you to join the WiFi network without typing the WiFi password You can establish a WPS connection to your wireless Router via WPS button or PIN co...

Page 51: ...ng page and tap the icon on the bottom left corner on the cellphone Then select WPS push button on the pop up subpage The cellphone s WPS feature is enabled Then the Router will negotiate with the cel...

Page 52: ...Tips The WiFi password will be changed into a random password with 63 characters if you use the PIN code to establish a WPS connection Beamforming Enabling beamforming feature can make your WiFi signa...

Page 53: ...o your private network You can create a guest network for each wireless network 2 4GHz and 5GHz To create a guest network Log in to the Router s User Interface and click Guest Network 1 Click Guest Ne...

Page 54: ...schedule your Router s working time To schedule the Router s working time Log in to the Router s User Interface and click Sleeping Mode 1 Click Sleeping Mode button to enable the feature 2 Select the...

Page 55: ...Save Tips If sleeping mode is enabled the router will work in a power saving state LEDs WiFi and USB flash drive will be in a sleeping state Here s two ways to enable WiFi if you need to use it in sle...

Page 56: ...nding features File Share Printer Service File Share The Router allows you to share files on a connected USB device from the local clients or devices from the Internet To connect a USB drive FTP Serve...

Page 57: ...t is not advisable to charge your mobile phone via the router s USB2 0 port To access the USB drive Log in to the Router s User Interface and click USB Application File Share Page Info sda When a USB...

Page 58: ...e will be changed with the WAN address The WAN users can access the FTP server using this address to access the USB device Add a guest account Guest account is for the other users except your computer...

Page 59: ...xx ftp 192 168 0 1 here in the address bar of a web browser Tap Enter on the keyboard 2 Type the User name and the Password to access the USB device and click Log In If you enter the user name and pas...

Page 60: ...e USB storage drive FTP server from WAN computer Configure your Router To allow the devices from the Internet to visit your USB storage drive you need to verify that the Allow visit from the Internet...

Page 61: ...ver from the Internet 1 Type the address ftp xxx xxx xxx xxx xx xxx xxx xxx xxx MUST be public IP address ftp 14 153 220 141 21 here in the address bar of a web browser on a computer from the Internet...

Page 62: ...Settings 58 Then you can share the files on the USB storage drive To access the USB storage drive Samba server from your LAN computer 1 Open a folder type xxx xxx xxx xxx in the address bar 192 168 0...

Page 63: ...SB device and click OK If you enter the user name and password of Administrator you can view and edit the files in the USB device If you enter the user name and password of Guest you will be limited b...

Page 64: ...rs installed with USB printer driver software can use the printer to print and scan files Before you use a USB printer you need to download a USB Printer Controller for USB printer from http down tend...

Page 65: ...of the printer 2 Note that most printers need to install driver software To install the USB Printer Controller Double click the setup icon if you download and unzip the USB Printer Controller success...

Page 66: ...Specify Advanced Settings 62 Click Finish when the following page appears The shortcut icon of the USB Printer Controller will appear on your desktop...

Page 67: ...ick USB Application Printer Service Click Printer Service button Click Save To print files Connect the USB printer to the Router s USB port Double click the shortcut icon of the USB Printer Controller...

Page 68: ...Specify Advanced Settings 64 Click the Printer and then Auto Connect Printer Set Auto Connect Printer Select your printer and click Apply...

Page 69: ...Specify Advanced Settings 65 When the page below appear it indicates that the USB printer is connected to the Router successfully Then you can print the files...

Page 70: ...t but if your printer cannot be detected by the USB Printer Controller you can contact our technical support for help 2 When you select Auto Connect Printer the USB printer can be used by several comp...

Page 71: ...corresponding features PPTP Server PPTP L2TP Client PPTP Server When the Router acts as a PPTP Server it provides a secure virtual tunnel between your home network and a remote computer Example You ha...

Page 72: ...n bits 40 or 128 according to your needs Specify a username and password for your PPTP server and click Add Click Save To establish a VPN connection To access the PPTP server you need to establish a V...

Page 73: ...Specify Advanced Settings 69 Click Set up a new connection or network Connect to a workplace Use my Internet connection VPN...

Page 74: ...ced Settings 70 Type the public WAN IP of the PPTP server such as 183 37 211 8 here in the Internet address field and click Next Type the user name and password of the PPTP server click Create and the...

Page 75: ...ecify Advanced Settings 71 If you fail to establish a VPN connection try following steps to solve the issue Click the icon on the bottom right corner of your desktop and then right click VPN Connectio...

Page 76: ...Security set the Type of VPN to Point to Point Tunneling Protocol PPTP set Data encryption to Optional encryption connect even if no encryption and click OK Go back to VPN connection page click Connec...

Page 77: ...ndow again and click Connect When the VPN Connection displays Connected it indicates that you are connected to the PPTP server successfully To access the FTP server Launch a web browser type the addre...

Page 78: ...PTP L2TP Client When acts as a PPTP L2TP client the Router helps you to establish a secure communication between the attached devices and the PPTP L2TP server provided by individual or Internet Servic...

Page 79: ...2TP Client button to enable the feature Select PPTP Click to enable MPPE Encryption and select an encryption bits 40 or 128 according to your needs Type the server IP domain name user name and passwor...

Page 80: ...Specify Advanced Settings 76 Click PPTP L2TP Client button to enable the feature Select L2TP Type the server IP domain name user name and password of the L2TP server Click Save 1 2 3 4...

Page 81: ...l Control Bandwidth Control Tenda APP LED Control DDNS Virtual Server DMZ Remote Management IPTV Firewall Static Routing UPnP Parental Control With Parental Control you can only allow your teenager to...

Page 82: ...Specify Advanced Settings 78 Click Edit to customize a device name for easy recognition Click Complete to save it 1 2...

Page 83: ...ample 07 00pm 10 00pm Select Specified Days Select the days you apply the rule for example Monday to Friday Disable Website Limit enabled by default and click Save Click the icon to activate your sett...

Page 84: ...iate and dangerous sites you can forbid them to access these websites or only allow them to visit some specified websites Select Blacklist forbid to access the following websites or White List only al...

Page 85: ...it turns to this icon the rule will take effect Otherwise it won t take effect To set up rules for an off line device If the device you want to control doesn t connect to the router at the moment you...

Page 86: ...m Select Specified Days Select the days you apply the rule for example Monday to Friday Select Blacklist forbid to access the following websites or White List only allow to access the following websit...

Page 87: ...example below shows how to configure Bandwidth Control feature You can configure it based on your own needs by referring to the example Example Always several devices share 4M broadband service in yo...

Page 88: ...dth Control to allocate sufficient bandwidth for your notebook Upload bandwidth rule is not always used unless you have to upload lots of files and videos Configuration Log in to the Router s User Int...

Page 89: ...nda App account and attach the Router to the account Step 1 To download the Tenda App Log in to the Router s User Interface and click Advanced Settings Tenda App Scan the QR code on the page to downlo...

Page 90: ...To attach the Router to an account Connect to the Router s WiFi using your smart device smart phone etc Open Tenda WiFi App on your smart device Log in to Tenda App account Click Add button Type the R...

Page 91: ...ure The router will obtain an ID and detect the attached account automatically Click Save Tips The ID is the unique number of the Router for Tenda App management The Tenda WiFi App uses the ID to find...

Page 92: ...g to your needs Click Save DDNS DDNS Dynamic Domain Name Server allows a dynamic public IP address of one service to be associated with a static host name so that anyone anywhere on the Internet can v...

Page 93: ...password 12345678 Configuration Log in to the Router s User Interface and click Advanced Settings DDNS Click DDNS button to enable the feature Select a service provider dyndns org here Type the usern...

Page 94: ...t to a specific port or a specific range of ports to a device or number of devices on your local network If you have a server in your home network you can allow certain types of incoming traffic to re...

Page 95: ...the IP address of the computer that established the FTP server 192 168 0 105 here Select the FTP server default port 21 the extranet port will be auto filled If you select Manual you need to enter th...

Page 96: ...e problem you can use the DDNS feature DMZ The DMZ host allows a particular interface or computer to have a direct access to some special messages via the Router without any firewall or network addres...

Page 97: ...an help you to manage your Router remotely Example You want to manage your home network when you are in the company Assume that the WAN IP address of your company s network is 202 165 100 105 and it i...

Page 98: ...atic You can give the WAN IP a static host name via DDNS to maintain the connection between your Router and the computer in your company Go to DDNS for details to configure a username password and dom...

Page 99: ...e Multicast Click Multicast button to enable the feature Click Save to activate the settings Set top Box If you has a set top box at home and also order IPTV service from your Internet Service Provide...

Page 100: ...rt suggests to do so or you are guided by some professional person Static Routing Static routing feature provides more routing information to your router A static route is a pre determined path that n...

Page 101: ...ce and click Advanced Settings Static Routing Type the IP address of the target network Type the subnet mask for this target network Type the gateway IP address which has to be the same LAN segment as...

Page 102: ...ssessing a specific purpose such as a printer can be identified and used automatically by another computer or device in your network Log in to the Router s User Interface and click Advanced Settings U...

Page 103: ...Reboot Firmware Upgrade Backup Restore System Status System Log Auto Maintenance Reset LAN IP Settings Here you can change the LAN IP address enable disable DHCP server or specify the LAN IP address...

Page 104: ...P Server will be disabled automatically when you use the Universal Repeater Client AP feature IP Address Range When the DHCP server is enabled the Router will assign IP addresses to the attached devic...

Page 105: ...servers that require permanent IP settings For example when you use DMZ or Virtual Server feature you d better specify a reserved IP address for your computer To reserve an IP address Log in to the Ro...

Page 106: ...not change the default value unless necessary If you are unable to open some website to receive or send emails etc try to minimize the MTU value until your network returns to normal MTU Applications 1...

Page 107: ...not advisable to change the default value When the cable length between your Router and the remote device modem Router etc is relatively long you can set WAN rate to 10M FDX or 10M HDX to enhance tra...

Page 108: ...used to configure the router If you want to clone other MAC address select Manual and type the Mac address in the following box Time Settings Log in to the Router s User Interface and click System Se...

Page 109: ...Parental Control Sleeping Mode LED Control effective the time should be set correctly Login Password To secure your network you d better set a login password up To change the login password Type the o...

Page 110: ...n with the new login password Reboot Rebooting the Router will activate any modified settings on the Router When the parameters you set cannot take effect or the Router cannot be used normally please...

Page 111: ...and click System Settings Firmware Upgrade Configuration Download the firmware file from Tenda official website http www tendacn com save and unzip it to your local computer Click Choose file to loca...

Page 112: ...of need To backup a file Log in to the Router s User Interface and click System Settings Back Restore Click Backup and locate the file with suffix cfg to your host after finishing configuration of th...

Page 113: ...to Tenda technical supporters you can go to this field to check your Router s syslog Log in to the Router s User Interface and click System Settings System Log Auto Maintenance Log in to the Router s...

Page 114: ...it to reset the Router to factory default settings Note 1 During the restoration do not disconnect the power of the Router and other relevant devices 2 Strongly recommend you not to restore the Route...

Page 115: ...ur computer FAQs Technical Support Safety and Emission Statement 1 Configure Your Computer Windows 8 Right click the icon on the bottom right corner of your desktop Click Open Network and Sharing Cent...

Page 116: ...Pv4 Select Obtain an IP address automatically and Obtain DNS server address automatically and click OK Click OK on the Ethernet Properties window see for the screenshot Windows 7 Click the icon on the...

Page 117: ...op follow steps below Click Start Control Panel Network and Internet Network and Sharing Center Click Local Area Connection Properties Find and double click Internet Protocol Version 4 TCP IPv4 Select...

Page 118: ...ndows XP Right click My Network Places on your desktop and select Properties Right click Local Area Connection and select Properties Scroll down to find and double click Internet Protocol TCP IP Selec...

Page 119: ...Appendix 115 Click OK on the Local Area Connection Properties window see for the screenshot...

Page 120: ...concrete that may also affect your wireless signal Q2 I cannot log in to the wireless router s User Interface What should I do A2 a Verify that your computer is connected to one of the router s LAN p...

Page 121: ...hether you can access the Internet by connecting to the modem directly without the router If not please double check the configuration of your modem or consult your ISP 3 Technical Support If you stil...

Page 122: ...FCC Statement This device is restricted to be used in the indoor This device complies with Part 15 of the FCC Rules Operation is subject to the following two conditions 1 This device may not cause har...

Page 123: ...e manufacturer is not responsible for any radio or TV interference caused by unauthorized modifications to this equipment 2 To avoid unnecessary radiation interference it is recommended to use a shiel...

Page 124: ...doit pas tre Co plac ou ne fonctionnant en m me temps qu aucune autre antenne ou metteur Cet quipement devrait tre install et actionn avec une distance minimum de 20 centim tres entre le radiateur et...

Reviews: