TELUS Mobility™
14
www.telusmobility.com
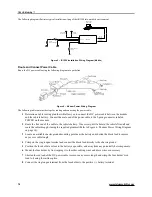
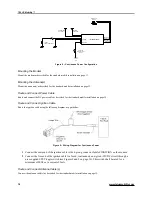
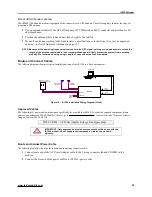
The following diagram illustrates typical installation wiring of the iR1200 into a mobile environment.
+12V DC
VEHIC LE BATTERY
+12VDC
ENGINE IGNI TION
SWITCH
FU S E
GPS ANTENN A
(OPTIONA L)
MODE M
ANTENNA
iR1200
POWE R
IGNITION
MOBILE DATA
COMPUTER
RS-232
GPS DATA
RS-232
MODEM DATA
Figure 5 – iR1200 Installation Wiring Diagram (Mobile)
Route and Connect Power Cable
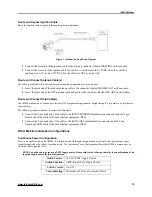
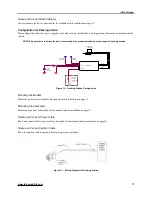
Route the DC power cable using the following diagram as a guideline:
Figure 6 – Modem Power Wiring Diagram
The following table contains the steps for routing and connecting the power cable:
1
Determine a cable routing plan that will allow you to connect the DC power cable between the modem
and the vehicle battery. Connect the male end of the power cable to the 2-prong connector labeled
POWER on the modem.
2
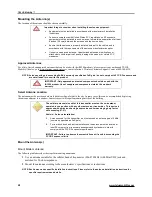
Route the free end of the cable to the vehicle battery. If necessary, drill a hole in the vehicle firewall and
route the cable through it using the supplied grommet (Refer to Figure 6 – Modem Power Wiring Diagram
on page 14).
3
Locate an available chassis ground mounting point near the battery and shorten the black lead to remove
any excess cable length.
4
Crimp on the ring tongue terminal and connect the black lead directly to the chassis ground.
5
Position the fuse holder as close to the battery as possible, and away from any potentially hot components.
6
Mount the fuse holder by tie wrapping it to the other cabling wires and dress wires as necessary.
7
Shorten the red lead of the DC power cable to remove any excess length and crimp the fuse holder’s red
lead to it using the in-line splice.
8
Connect the ring tongue terminal from the fuse holder to the positive (+) battery terminal.
Summary of Contents for iR1200
Page 1: ...iR1200 Rugged Modem iR1200 GPS Enabled Modem INSTALLATION GUIDE ...
Page 2: ......
Page 6: ......


