background image

12

13

Getting to know your phone

Getting started

1

2

3

4

5

11

13

6

9

8

12

7

10

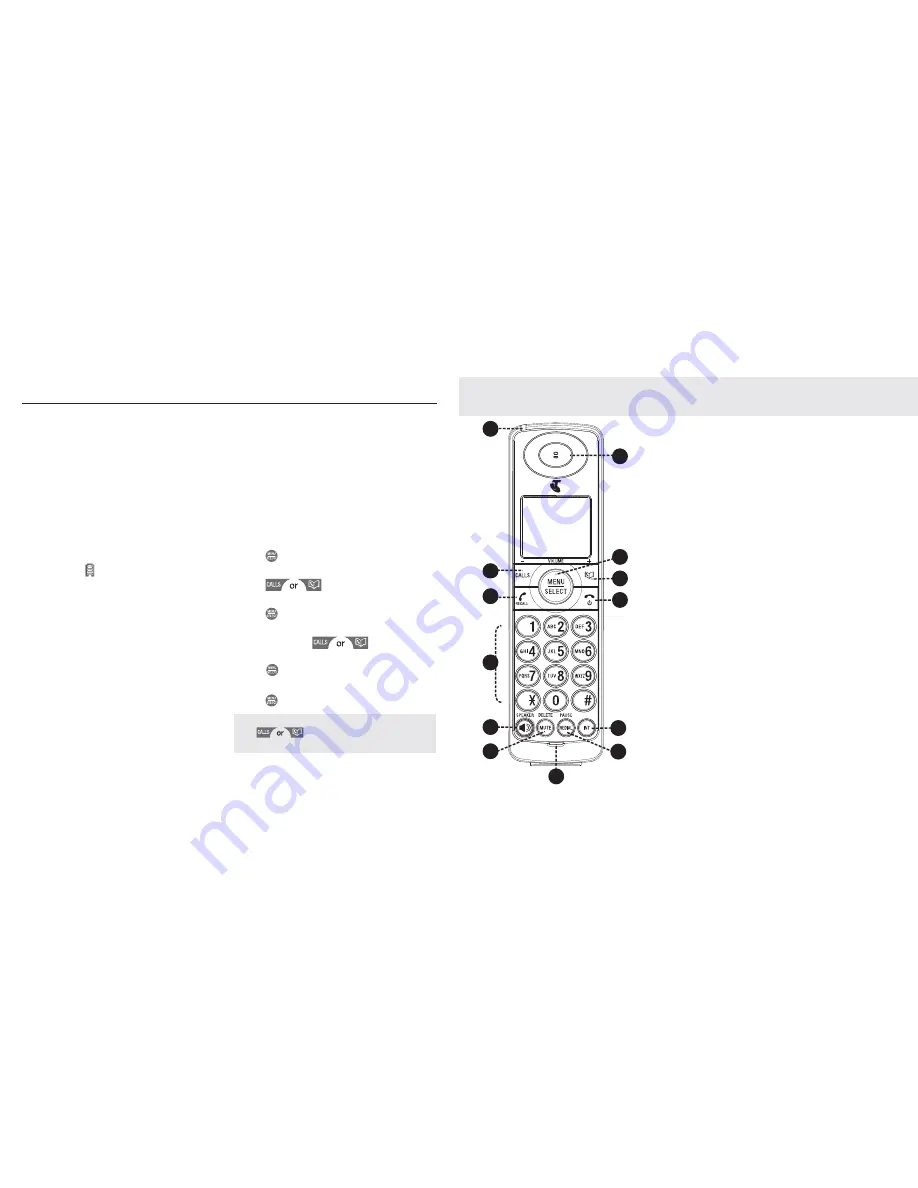
Handset buttons

1. EARPIECE

2. MENU / SELECT

In idle mode: 
press to access main menu. Press 

and hold

 to 

access Telstra Service Number list.

In menu/editing mode: 
press to confirm and save the settings.

During a call: 
press to access the sub-menu list. 

In phonebook/call list entry: 
press to edit the entry.

3. VOLUME UP/ PHONEBOOK / SCROLL UP

In idle mode: 
press to access the phonebook. 

In menu mode: 
press to scroll up.

In editing mode: 
press to move the cursor to the right.

During a call: 
press to increase volume.

Call list/phonebook/redial list entry: 
press to scroll up the list.

1. Plug the mains power cable into the charger 

base, plug the other end into the mains power 
wall socket and switch the power on.

2. To fit the NiMH battery into the handset, slide 

out the battery compartment cover. Place 
the supplied rechargeable battery pack in 
the battery compartment, with the battery 
connector plugged in, as shown on page 10. 
Slide the battery compartment cover back

3. Place the handset on the base to charge for 

at least 24 hours. When the handset is fully 
charged the    will be displayed.

Using your Telstra Long Range 9750 
phone on a Broadband ADSL line?

If this product is to be used on a broadband 
ADSL line, then you must ensure that it is 
connected via an ADSL filter. Using this product 
on a Broadband line without an ADSL filter may 
cause problems with this product and your 
Broadband service.

Date and time 

If you have subscribed to Telstra’s Calling 
Number Display service, the date and time is set 
automatically for all handsets when you receive 
your first call. The date and time is recorded with 
each answering machine message you receive. 
If you have not subscribed to Telstra Calling 
Number Display you can set the date and time 
manually.

Set date and time manually

1. Press 

 when in idle mode to enter the 

feature menu.

2. Press 

 to scroll 

to 

SET DATE/TIME

.

3. Press 

 and then edit the date.

4. Press the dialing keys (0-9) to enter a two-digit 

number or press 

 until the screen 

displays the correct value. 
Press 

 to advance.

5. Repeat step 3 until the date and time are set.

6. Press 

 to save.

NOTE

Press 

 to toggle 

AM/PM

 when moving the 

cursor to the AM/PM setting fi eld.

1

Summary of Contents for Long Range 9750

Page 1: ...th integrated answering machine User Guide This telephone has been designed for ease of use Please read the instructions and keep it handy for future reference If you have any problems with your phone...

Page 2: ...s network This User Guide provides you with all the information you need to get the most from your phone Before you make your first call you will need to set up your phone Follow the simple instructi...

Page 3: ...eview an entry 25 Dial an entry 25 To search alphabetically 26 Edit a name and number 26 Delete an entry 26 Settings 27 Handset settings 27 Ringer volume 27 Ringer tone 27 Alert tones 28 Handset reset...

Page 4: ...ay be a remote risk of electric shock from lightning 8 Do not use the telephone to report a gas leak in the vicinity of the leak 9 Use only the supplied NiMH Nickel Metal Hydride battery The operation...

Page 5: ...tant safety instructions 10 The use of other battery types or non rechargeable battery primary cell can be dangerous These may cause interference and or unit damage Telstra will not be held liable for...

Page 6: ...pack you will need to prepare additional handsets and chargers for use For each additional handset and charger 9 8VH 2QO 6XSSOLHG GDSWHU N24861 THIS SIDE UP THIS SIDE UP THIS SIDE UP 1 2 3 4 RED WIRE...

Page 7: ...nt cover back 3 Place the handset on the base to charge for at least 24 hours When the handset is fully charged the will be displayed Using your Telstra Long Range 9750 phone on a Broadband ADSL line...

Page 8: ...LIGHT Lights up when placed on charger 4 TALK OFF In idle mode press andhold to power on off the handset In menu mode press to exit to previous level In pre dial mode press to backspace 5 VOLUME DOWN...

Page 9: ...On visible Flashing or Off not visible ANS ON Onwhenansweringmachineis turnedon Offwhenansweringmachineis turnedoff Onwhennewansweringmachine messageisreceived Offwhennonewansweringmachine message On...

Page 10: ...e are XX new voice messages received where XX is from 01 to 59 ZZ Steadily ON There are ZZ old voice messages kept in the TAM memory no new voice messages Display Description XX FF Flashing XX alterna...

Page 11: ...ttings Remote access Remote pin MSGalerttone FlashTime Short Medium Long Phonebook Review Store Set Date Time Setdate CallLog Review Delallcalls Timeformat 12hour 24hour Ringer Volume Ringeroff Level1...

Page 12: ...e listening volume of the earpiece or loudspeaker with five levels when during a call Each press of the button increases or decreases the volume level by one increment 1 Press to increase or decrease...

Page 13: ...th T press once then press to scroll through the entries Phonebook Redial Up to 20 of the last telephone numbers called are saved in the redial list You can select any of the numbers to redial or dele...

Page 14: ...gh the choices Level 1 to 6 and Ringer Off are available 4 Press to save your preference and return to the feature menu Ringer tone You can select different ringer tones 1 Press when in idle mode to e...

Page 15: ...out of range 1 Press when in idle mode to enter the feature menu 2 Press to scroll to TONES 3 Press and to select KEY TONE Or 3 Press and to select BATTERY LOW Or 3 Press and to select OUT OF RANGE 4...

Page 16: ...umber is unavailable When the list is full and a new call is received the oldest entry will be deleted automatically IMPORTANT To use Telstra Calling Number Display you must first subscribe to the ser...

Page 17: ...l caller press and hold the button again 3 Way Chat This service is available on most lines ready for you to use If you are already on a call you can add another person and then have a 3 Way Chat To p...

Page 18: ...YSTEM 3 Press to select PLAY MESSAGE Options during playback Press to adjust the speaker volume Press to skip to the next message Press to repeat the message currently playing Press twice to listen to...

Page 19: ...Saver setting is selected the answering machine will pick up after two rings if there are new messages and after four rings if there are no messages OGM settings This is the message your callers hear...

Page 20: ...o play the next message Delete the current message Increase the loudspeaker volume by one level 1 to 8 Decrease the loudspeaker volume by one level 1 to 8 Delete all old messages In idle mode press an...

Page 21: ...1 During the external call press Your external caller is put on hold 2 If you have only one other handset it will ring If you have extra handsets enter the handset number to select the other handset...

Page 22: ...ad keys firmly when dialing Help Phone does not work Have you installed the battery correctly See page 10 Check that the mains power is correctly connected See page 9 Is the handset switched off To sw...

Page 23: ...io sets clock alarms and computers if placed too close It is recommended that you place your product at least one metre away from such appliances to minimise any risk of interference Never dispose of...

Page 24: ...buse improper installation or operation vermin infestations lack of reasonable care unauthorised modification loss of parts tampering or attempted repair by a person not authorised by VTech or where t...

Page 25: ...elecommunications Australia Pty Ltd ABN 70 136 672 627 Address 24 Gilby Road Mount Waverley 3149 IMPORTANT NOTE THIS IS NOT A PRODUCT RETURN OR SERVICE ADDRESS PLEASE CONTACT TECHELP BY PHONE OR EMAIL...

Page 26: ...50 51 1...

Page 27: ...Copyright Act no part of it may in any form or by any means electronic mechanical photo copying microcopying scanning recording or otherwise be reproduced stored in a retrieval system or transmitted w...

Reviews: