background image


Teledyne PDS - Teledyne PDS, T20-P and POS MV Quick Setup 

Configuration  

  23 


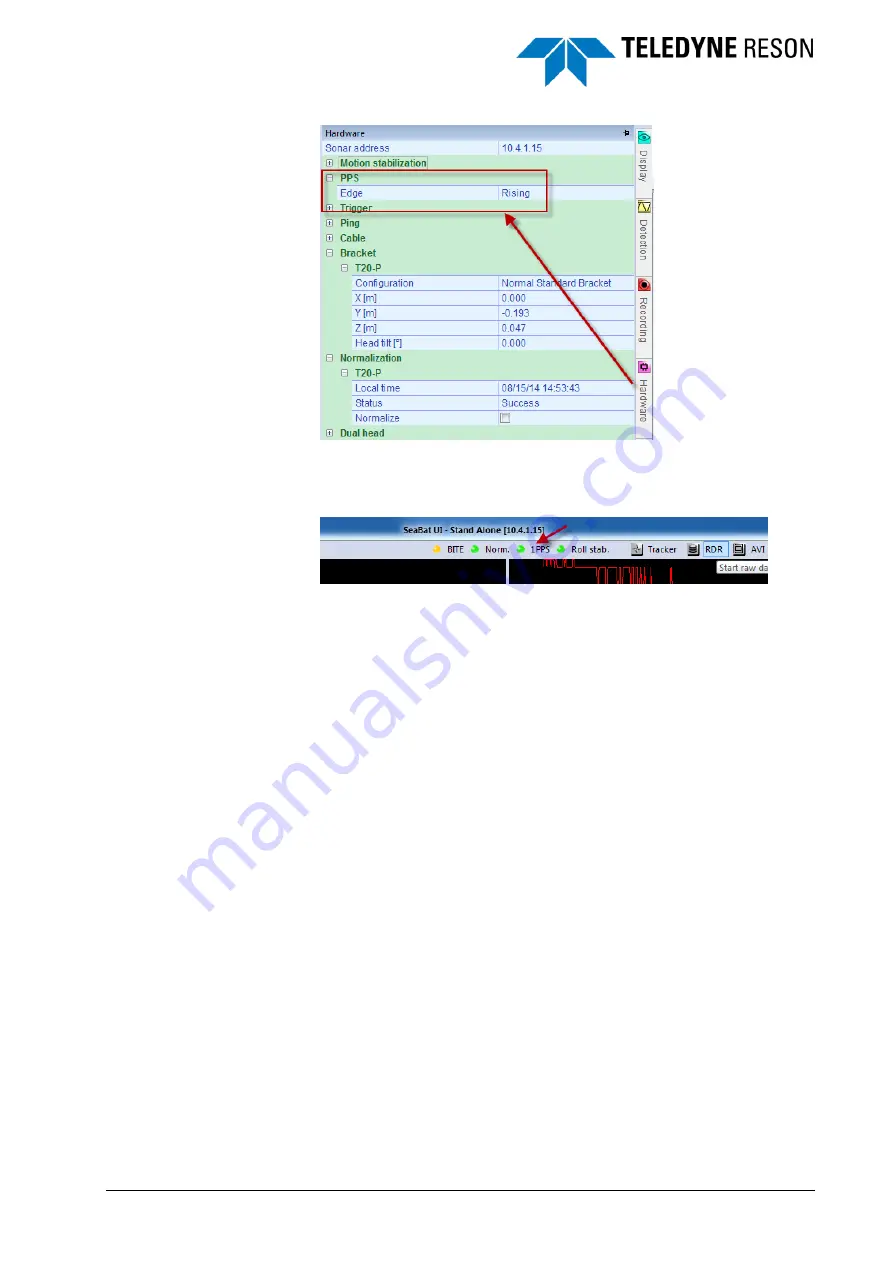
Figure 3-6 

Hardware pane PPS setting 

When the PPS pulse is received correctly, the status LED becomes green 
colored. 


Figure 3-7 

PPS status LED 

3.4.3 Sound Velocity 

For correct beam forming the sound velocity from the sound velocity 
probe is used. 

Different Sound Velocity probes are used: 


The RESON SVP70 or SVP71 with the RESON supplied cable 
(pn  85002223). This cable is connected to the T20-

P’s ‘SVP 

power’ socket. 


Or alternatively a SVP probe from an external supplier is used. In 
this case a serial cable from the sensor is connected to COM3 of 
the T20-P. 

The sound velocity settings are defined in the SUI I/O pane sound velocity 
tab. COM3 is the port used for the sound velocity. (Also when connected 
to the T20-

P’s SVP power socket.) 

Summary of Contents for Reson PDS

Page 1: ...Teledyne PDS T20 P and POS MV Quick Setup Teledyne PDS Version 1 0 6 June 2015 Teledyne RESON B V Stuttgartstraat 42 44 3047 AS Rotterdam The Netherlands Tel 31 0 10 245 15 00 www teledyne reson com ...

Page 2: ...chapters text modified after review UBL 1 0 3 10 04 2015 Configuration text modified TrueHeave 1 0 2 28 09 2014 Added section Offsets Modified text POS MV CMR and RTCM input Modified text sound velocity input Added text Heave input Added link PDS2000 instruction 1 0 1 09 09 2014 Version after review 1 0 0 22 08 2014 First version of the PDS2000 T20 P with POS MV setup Manual ...

Page 3: ...3 2 Configure T20 P TCP IP Settings 14 3 3 3 Configure POS MV TCP IP Settings 17 3 4 SUI Configuration 19 3 4 1 Roll Stabilization 19 3 4 2 Time and PPS Setup 20 3 4 2 1 Serial Time Message 20 3 4 2 2 Ethernet Time Message 21 3 4 2 3 PPS 22 3 4 3 Sound Velocity 23 3 4 4 Other I O Settings 24 3 5 POS MV Configuration 24 3 5 1 Connect with POS MV 24 3 5 2 Installation settings 25 3 5 3 Timing 27 3 5...

Page 4: ... Timing 51 3 6 3 1 Clock synchronization set up 52 3 6 3 2 Timestamp Mode 52 3 6 4 Offsets and Corrections 53 4 Appendix Installing Teledyne PDS 57 4 1 Introduction 57 4 2 Install Teledyne PDS 57 5 Appendix Installing SeaBat User Interface SUI 61 5 1 Introduction 61 5 2 Vessel Configuration 61 6 Appendix Installing POSView 65 6 1 Introduction 65 6 2 Installing POSView 65 ...

Page 5: ...13 Lever Arm Mounting Angles 26 Figure 3 14 Keep Ref to Sensor 1 values zero 27 Figure 3 15 Tags Multipath AutoStart 28 Figure 3 16 Time Tag UTC Time 28 Figure 3 17 Input Output Ports 28 Figure 3 18 Time Input Output Ports Set up 29 Figure 3 19 Tags Multipath AutoStart 30 Figure 3 20 Time Tag UTC Time 30 Figure 3 21 Ethernet Realtime 30 Figure 3 22 PPS Data selection 31 Figure 3 23 Input Output Po...

Page 6: ...Figure 3 41 VRU 42 Figure 3 42 Compass 43 Figure 3 43 Heave 44 Figure 3 44 Timestamp mode 7K 53 Figure 3 45 Offsets 54 Figure 4 1 Welcome page of the Teledyne PDS InstallShield Wizard 57 Figure 4 2 Type of setup in the Teledyne PDS InstallShield Wizard 58 Figure 4 3 Update C Map SDK software 58 ...

Page 7: ...e manual will not describe the components in full detail Refer to the associated manuals for more information For other information about Teledyne PDS see the Teledyne PDS User Manual the file Teledyne PDS User Manual pdf in the folder Manuals This manual is also available as a HTML Help file and can be opened with F1 or with Help Help Topics from the menu bar Teledyne PDS instruction movies are a...

Page 8: ......

Page 9: ...hows the rear panel with the connectors of a POS MV Figure 2 2 Rear panel Applanix POS MV The Teledyne PDS software the POS MV s POSView software and the SeaBat User Interface SUI are installed on a computer The POS MV the RESON T20 P and the computer are linked to each other by an Ethernet connection An Ethernet switch is used for this purpose The T20 P need serial motion data for its roll stabil...

Page 10: ... with projector Supplied by RESON pn 85002228 2 Connect T20 P with receiver Supplied by RESON pn 1008775 3 Connect T20 P with sound velocity probe as delivered by RESON SVP 70 or SVP 71 Alternatively a Sound Velocity probe could be connected to Supplied by RESON pn 85002223 or supplier of Sound Velocity probe RESON T20 P Applanix POS MV NETWORK SWITCH Projector Receiver SVP power Motion COM2 Time ...

Page 11: ...h Ethernet cable 9 Connect POS MV GNSS serial port with GPS correction source Serial cable 10 Connect POSMV with IMU Supplied by Applanix pn 10005142 25 11 Connect POS MV with secondary GPS antenna Coax 50 ohm as supplied by Applanix 12 Connect POS MV with primary GPS antenna Coax 50 ohm as supplied by Applanix 13 Connect Ethernet switch with Teledyne PDS computer Ethernet cable 2 3 Computer requi...

Page 12: ...erator Manual and the POS MV User Manual for a full description of installing the equipment Take special attention to the POS MV s GPS antennas The distance between the primary and secondary antenna should be at least 2 meters but may not exceed 5 meters The primary antenna ANT1 is the antenna used for positioning ...

Page 13: ...me computer 3 2 1 Teledyne PDS Installation Refer to appendix Installing Teledyne PDS on page 57 for the procedure to install Teledyne PDS on a computer 3 2 2 SeaBat User Interface SUI The SUI setup and controls the sonar Refer to appendix Installing SeaBat User Interface SUI on page xx for the procedure to install the SUI on a computer 3 2 3 POSView POSView setup and controls the POS MV Refer to ...

Page 14: ...OS MV are described It is recommended to disable a firewall as it could block programs as Teledyne PDS or POSView 3 3 1 Configure computer TCP IP Settings and Disable Firewall The following table describes how to configure the computer IP address for MS Windows7 For other Windows versions the procedure is almost similar Step Action 1 Press the windows Start button 2 Select Control Panel ...

Page 15: ...Teledyne PDS Teledyne PDS T20 P and POS MV Quick Setup Configuration 9 Step Action 3 Select Network and sharing Center 4 Select Change adapter settings ...

Page 16: ... The available computer connections are listed In this example only one but more are possible 6 Right click at the LAN connection on which the sonar is connected A context menu opens Select Properties 7 In the next window select Internet Protocol Version 4 TCP IPv4 and press Properties ...

Page 17: ...s E g 10 11 10 100 Set the subnet mask to 255 255 255 0 9 Press OK to close the wizard When a firewall is enabled it possibly blocks Teledyne PDS or other applications Figure 3 1 Firewall It is recommended to disable the firewall The following table describes the procedure to disable a firewall for windows 7 For other windows versions the procedure is almost similar ...

Page 18: ...12 Configuration Teledyne PDS Teledyne PDS T20 P and POS MV Quick Setup Step Action 1 Press the windows Start button 2 Select Control Panel ...

Page 19: ...Teledyne PDS Teledyne PDS T20 P and POS MV Quick Setup Configuration 13 Step Action 3 Select Windows Firewall 4 Press Turn Windows Firewall on or off ...

Page 20: ... IP address automatically Use static IP address The T20 P has the follow default static IP addresses LAN1 10 11 10 1 LAN2 10 11 10 2 The static IP range of the T20 P s LAN2 port is between 10 11 10 2 and 10 11 10 9 On this way it is very easy to configure an IP number for the T20 P processor as you now know the range of the port In case of generation an IP address automatically a DHCP server must ...

Page 21: ...number to 10 11 10 100 with subnet mask 255 255 255 0 Refer to section Configure computer TCP IP settings on page 8 2 Connect the Ethernet cable from the computer to the LAN2 port of the T20 P processor 3 Double click the SUI shortcut on the desktop to start the SUI 4 Press Hardware to open the hardware pane ...

Page 22: ...ne s sonar address When clicked in the sonar address field the sonar is displayed by its current IP number and serial number Select the Sonar by selecting the associated IP address The Sonar is now connected with the SUI A wedge will appear in the wedge view of the SUI when the sonar functions 6 Press the application button ...

Page 23: ...Configure POS MV TCP IP Settings It is possible to change the POS MV IP number with the POSView software However before it is possible to connect with POSView to the POS MV the computer must be in the IP range of the POS MV The default IP address of a new delivered POS MV is 192 168 053 100 In order to change the POS MV IP address the computer IP address should initially be changed in the same ran...

Page 24: ...e POS MV IP address is unknown it is possible to listen with a terminal program at Com 4 5 the highest Com available at 9600Bd during power up the IP address The following table describes the procedure to change the POS MV IP number Step Action 1 Double click the shortcut on the desktop to start POSView 2 See the following figure A Open menu Tools B Select Connect to connect to the POS MV 3 See th...

Page 25: ...velocity And other I O devices The configuration of above items is necessary for correct functionality of the sonar Refer to the SeaBat User Interface manual for a full description of the SUI 3 4 1 Roll Stabilization The roll stabilization is a feature of the T20 P to correct the swath width for Roll movements Refer to the T20 P operate manual for more details See Figure 3 2 The roll stabilization...

Page 26: ...l message from the POS MV Or by Ethernet message 7 from the POS MV 3 4 2 1 Serial Time Message When a serial message is used for timing 1 Connect the serial cable from the POS MV COM1 to the T20 P COM 1 timing port Refer to section Connections on page 3 2 Connect the POSMV PPS port to the PPS in port of the T20 P Refer to section Connections on page 3 3 Open the SUI I O pane and select the correct...

Page 27: ...0 P COM1 timing port The PPS ports are still connected to each other Refer to section Connections on page 3 Perform the following steps 1 Open the SUI I O pane and select Network as protocol Settings are changed by selecting the field and selecting the value from the drop down list See Figure 3 4 Figure 3 4 Changing the serial protocol into network 2 Setup the settings as indicated in Figure 3 5 S...

Page 28: ...figuration section Ethernet time message on page 29 3 4 2 3 PPS For accurate time stamping the PPS signal is used When a clock driver is selected the IO module automatically detects to use the rising or falling edge of the PPS pulse The PPS edge control is grayed out disabled in the SUI When no clock device is selected it is possible to select a rising or falling PPS pulse See Figure 3 6 ...

Page 29: ...city probe is used Different Sound Velocity probes are used The RESON SVP70 or SVP71 with the RESON supplied cable pn 85002223 This cable is connected to the T20 P s SVP power socket Or alternatively a SVP probe from an external supplier is used In this case a serial cable from the sensor is connected to COM3 of the T20 P The sound velocity settings are defined in the SUI I O pane sound velocity t...

Page 30: ...distances or offsets are measured the highest possible accuracy needs to be achieved for best performance The best is to use land survey methods Refer to the POS MV user manual for dimensions of the IMU and the phase center location of the GPS antenna Follow the following sections to set up a POS MV 3 5 1 Connect with POS MV When the IP numbers are correctly defined as described in section Configu...

Page 31: ...he X Y Z offsets of the IMU and Primary GPS ANT1 on the POS MV to this reference point The position as output by the POS MV is with respect to this chosen reference point It is easy to choose the IMU as reference point The reference point on the IMU is marked with a sticker on the IMU Figure 3 11 IMU reference point BE AWARE OF THE USED CONVETION FOR THE POS MV INSTALLTION LEVER ARMS MOUNTING Diff...

Page 32: ...he Lever Arm Mounting angle dialog box A Enter the offset Ref to IMU Target B Enter the offset Ref to primary GPS lever Arm C Enter the Roll Pitch and heading offsets C O values of IMU frame with respect Reference frame Leave the other fields to 0 0 0 for a standard multibeam installation Figure 3 13 Lever Arm Mounting Angles X Y Z X ...

Page 33: ...r mounting tab Leave the sensor 1 offset to zero 0 On this way the earlier chosen reference point usually the IMU is the reference point for the 102 Ethernet output messages In Teledyne PDS it is possible to use this IMU also as reference point Otherwise the Sensor 1 reference must be used as reference in Teledyne PDS Figure 3 14 Keep Ref to Sensor 1 values zero 3 5 3 Timing The POS MV must be con...

Page 34: ...ng angles window opens Select in the Tags AutoStart tab as Time Tag 1 UTC Time Figure 3 16 Time Tag UTC Time Select from the POSView menu bar Settings Input Output Ports Figure 3 17 Input Output Ports The Input Output window Ports Set up window opens Set all the communication settings Baud rate parity data bits etc See Figure 3 18 ...

Page 35: ...lected in the SUI I O time settings Figure 3 18 Time Input Output Ports Set up The communication settings and messages as selected must also set in the SUI Refer to the SUI s section Time and PPS setup at page 20 Time message INZDA with a rate of 1Hz is recommended 3 5 3 2 Ethernet Time Message Select from the POSView menu bar Settings Installation Tags Multipath AutoStart See Figure 3 19 ...

Page 36: ...he lever Arms mounting angles window opens Select in the Tags AutoStart tab as Time Tag 1 UTC Time Figure 3 20 Time Tag UTC Time In POSView select logging Ethernet Realtime Figure 3 21 Ethernet Realtime Select output message 7 PPS Data Leave or set the output rate to 50Hz This value does not apply for message 7 ...

Page 37: ...Ethernet output on page 32 3 5 4 Motion The RESON T20 Series Sonar requires serial roll correction on port COM 2 for the roll stabilization feature The POS MV is set to output this message Select from the POSView menu bar Settings Input Output Ports Figure 3 23 Input Output Ports The Input Output window Ports Set up window opens See Figure 3 24 Select COM 2 output binary formula select TSS1 with a...

Page 38: ...on to output position and motion data to Teledyne PDS or the SUI instead as serial connections When serial connections are used COM 3 COM 4 and COM 5 port are configured to output these messages serially 3 5 6 Ethernet Output To switch on the Ethernet output select from the POSView menu bar Logging Ethernet Realtime Figure 3 25 Ethernet Realtime The following messages must be enabled 3 Primary GPS...

Page 39: ... used See section 3 6 1 2 3 5 7 RTCM CMR input There are two methods available to apply RTCM or CMR correction data to the POS MV By COM 3 port input By GNSS port input 3 5 7 1 COM 3 PORT input This method is named the tightly coupled mode Only GPS satellites are used and the RTK fix will only available when the vessel is sailing and or GAMS is calibrated and online The formats RTCM v2 x and CMR C...

Page 40: ... section 3 5 7 2 C Set as input Base 1 GPS and select the correct type of RTCM or CMR input messages Figure 3 27 Input Output Ports Set up 3 5 7 2 GNSS Port This method is named the closed coupled mode By using the POS MV GNSS port the corrections are applied straight at the POS MV s GNSS board The formats RTCM v2 x RTCM v3 x CMR CMR and CMRx are supported Both GPS and Glonass corrections are used...

Page 41: ...iguration The GNSS port senses automatically the RTCM CMR correction format and therefore doesn t need to setup The GNSS port is configured not user configurable to output standard a GGA and GST string to be used by a VRS Virtual reference station With latest versions POSMV firmware the tightly couple mode is linked to the closely coupled mode automatically switching between the two modes 3 5 8 Ca...

Page 42: ...30 GAMS Param Setup In the appeared dialog enter See Figure 3 31 A The separation between the two GPS antennas The value will be filled in by the POS MV after calibration automatically but when already a value is entered this routine will perform faster B Set the heading threshold to 0 5 degrees Figure 3 31 GAMS Parameter Setup Continue with initializing the calibration ...

Page 43: ...ing approximately a minute Contact Applanix or Teledyne Reson when it is not possible to sail this figures due to the vessel characteristics The calibration must in this case achieve from other techniques such as the Applanix POSPAC software application Monitor the heading accuracy on the POSView Attitude pane and continue sailing the figures until this accuracy is lower as the set heading thresho...

Page 44: ...ight out with a fixed speed until the calibration is completed GAMS status will change to Online Figure 3 35 GAMS status Select from the POSView menu bar Settings Save settings Figure 3 36 Save Settings A successful calibration is indicated by continuous GAMS status online and a high heading accuracy of 0 03 degrees in a low multipath environment ...

Page 45: ...Teledyne PDS 3 6 1 Equipment Selection For this basic setup the RESON 7K Drivers as used by the T20 Series and the POS MV drivers are selected for positioning heading and motion Driver selection is done during the new project configuration wizard or the configurations equipment page Refer to the Teledyne PDS user manual for full details Figure 3 37 Equipment page 3 6 1 1 RESON Select from the equi...

Page 46: ...d devices are selected by ticking the checkbox es Figure 3 39 RESON SeaBat 7K devices Multibeam Bathy data Sonar Image Image data The sonar wedge as also available in the SUI is now available in Teledyne PDS Views Device messages Sonar messages are now available in Teledyne PDS Sonar configuration This makes it possible to control the sonar Gain power etc from Teledyne PDS ...

Page 47: ...r bite Make the sonar Bite information available in Teledyne PDS Water column Data The water column data 3 6 1 2 POS MV Select if the Ethernet port of the POS MV is used to output data in Teledyne PDS for POSITIONING Select the PosMV all coupled modes ethernet msg device from the Positioning system Geogs group Figure 3 40 Positioning ...

Page 48: ...42 Configuration Teledyne PDS Teledyne PDS T20 P and POS MV Quick Setup MOTION Select the PosMV Ethernet 102 device from the group VRU Figure 3 41 VRU ...

Page 49: ...sing It is a more accurate heave then realtime heave It might be used when RTK is not available and you notice problems with your heave True heave has a delay of approximately 3 minutes When PDS logging is stopped the system continues to log the true heave device data for approximate 3 minutes A warning opens when disabling Realtime mode during this time Select the POSMV Ethernet 111 device from t...

Page 50: ...Heave 3 6 2 I O Selection For the T20 Series sonar and the POSMV the proper I O must be set up and selected 3 6 2 1 RESON I O The following table describes the set up of the I O for the RESON multibeam Step Action 1 Select in the equipment page the multibeam device Becomes blue colored ...

Page 51: ...Teledyne PDS Teledyne PDS T20 P and POS MV Quick Setup Configuration 45 Step Action 2 Press the I O Port button 3 Press Add ...

Page 52: ...yne PDS Teledyne PDS T20 P and POS MV Quick Setup Step Action 4 Give a name and press Ok 5 Enter as IP address the T20 P IP address and tick the TCP IP radio button Press Ok 6 The port is now assigned to the multibeam driver ...

Page 53: ...ledyne PDS Teledyne PDS T20 P and POS MV Quick Setup Configuration 47 Step Action 7 Select other multibeam devices as for example the snippets device Becomes blue colored 8 Press the I O Port button again ...

Page 54: ...ion 9 Select the just made I O port and press Ok 10 The port is assigned to the driver Do this for all the multibeam devices When all multibeam device options were used the list looks like 3 6 2 2 POSMV I O The following table describes the set up of the I O for the POS MV devices ...

Page 55: ...Teledyne PDS Teledyne PDS T20 P and POS MV Quick Setup Configuration 49 Step Action 1 Select in the equipment list the appropriate POS MV device Becomes blue colored 2 Press the I O Port button ...

Page 56: ...50 Configuration Teledyne PDS Teledyne PDS T20 P and POS MV Quick Setup Step Action 3 Press the Add button 4 Enter a name and press OK 5 Enter as local port 5602 and select UDP IP as protocol Press OK ...

Page 57: ...synchronize the computer clock However doing so has some advantages Time delays are correctly indicated The log file names are corresponding with the synchronized date and time The computer clock is synchronized with the correct date and time A correct computer date and time is necessary when importing tidal data into PDS It is essential the correct time stamp mode is selected for the devices This...

Page 58: ...on 1 Press from the Teledyne PDS Control Center toolbar the clock synchronization button 2 Tick the PDS2000 ClockSync module with remote RESON 7K IO module radio button Select the T20 P s IP address Press OK 3 6 3 2 Timestamp Mode When the T20 P is interfaced to the POS MV and the computer as described in chapter lnterfacing see page 3 the time stamp mode is set to Time in message for all devices ...

Page 59: ...K Not for all drivers it is possible to set a timestamp E g sonar image needs no timestamp 3 6 4 Offsets and Corrections It is essential to set for each device the proper offset and corrections calibration values when applicable The devices offsets with respect to a chosen vessel reference point should be measured and specified in the Teledyne PDS Vessel configuration Geometry page Refer to the Te...

Page 60: ... the offset and correction needed for each device Refer to the section Installation settings on page 25 with a description of the offsets and corrections as used in the POS MV Device Device offset and correction s Position system Geogs POSMV all coupled modes Ethernet msg 3 10 12 20 102 104 Device offset with respect to the in POSView defined sensor 1 reference point usually the IMU VRU POSMV Ethe...

Page 61: ...h respect to the sonar acoustic center Roll Pitch and Heading correction as determined during the multibeam calibration Snippets None Sidescan Sonar None Sonar Image Device offset with respect to the sonar acoustic center Roll Pitch and Heading correction as determined during the multibeam calibration Device Messages None Sonar Configuration None Sonar BITE None Water Column Data None ...

Page 62: ......

Page 63: ...ributed on a CD Rom or USB flash drive A new version of Teledyne PDS is always available on the ftp site of RESON The address is ftp teledyne reson com with user name pds2000 and password getlatestversion See also the Help menu of the Control Center a Select in Windows Explorer the correct drive and select the file setup exe to start the installation of Teledyne PDS The welcome page of the Teledyn...

Page 64: ...for MS Windows 7 the folder C Program Data RESON PDS2000 and for MS Windows XP the folder C Documents and Settings All Users Application Data RESON PDS2000 accessible e If already an older Teledyne PDS version is was installed with not the latest C Map software then an Update C Map SDK dialog will appear Figure 4 3 Update C Map SDK software From this new Teledyne PDS version onwards Teledyne PDS w...

Page 65: ... PDS Teledyne PDS T20 P and POS MV Quick Setup Appendix Installing Teledyne PDS 59 place the Teledyne PDS and the Dongle software on the hard disk of the computer g Click on on the desktop to start Teledyne PDS ...

Page 66: ......

Page 67: ...nterface software to be run on the customer furnished laptop PC is provided on the USB key that s delivered with your SeaBat T Series Portable system Installation Plug in the USB key and select the USB in the Windows Explorer if the system doesn t automatically open the USB folder Double click from the folder software installers the SeaBat T Series exe to start installation of the SeaBat UI softwa...

Page 68: ... Select SeaBat UI and click Next Review settings and click Next if you want to continue Click Finish when first part of the installation is complete Follow the instructions of the SeaBat UI InstallShield Wizard to install the SeaBat User Interface as shown here Choose destination location and click Next ...

Page 69: ...dyne PDS T20 P and POS MV Quick Setup Appendix Installing SeaBat User Interface SUI 63 Click Install to begin the installation Click Finish to complete the last part of the installation and exit the InstallShield Wizard ...

Page 70: ......

Page 71: ... user guide Refer to this guide for full installation details 6 2 Installing POSView The table below indicates the procedure to install the MV POSView software on the computer Step Action 1 Insert the CD containing POS MV software into the PC s CD drive 2 Browse to the Cd folder with windows explorer if the CD doesn t startup automatically and click the file Setup exe ...

Page 72: ...66 Appendix Installing POSView Teledyne PDS Teledyne PDS T20 P and POS MV Quick Setup Step Action 3 Click in the appeared dialog Install MV POSView 4 Click Next to start the installation wizard ...

Page 73: ...Teledyne PDS Teledyne PDS T20 P and POS MV Quick Setup Appendix Installing POSView 67 Step Action 5 Follow the wizard Click Next 6 Clcik Next 7 Click Install ...

Page 74: ...ix Installing POSView Teledyne PDS Teledyne PDS T20 P and POS MV Quick Setup Step Action 8 A dialog with a status bar appears during installation 9 Click Finish 10 A shortcut is created at the computer s desktop ...

Page 75: ...puter requirements 5 Computer requirements 5 D Dongle 59 E equipment 39 Ethernet Output 32 Ethernet time message 21 30 F firewall 11 I I O 44 48 installation parameters 25 IP settings 7 M Motion 31 P PPS 3 22 primary antenna 6 R roll stabilization 19 RTCM 33 S sound velocity 23 static IP 14 T tightly coupled mode 33 Timestamp 52 timing 20 ...

Reviews: