


09419A DCN8342
Teledyne API Model 480L O
3
Monitor User Manual
49
7.3 INTERNAL PARTICULATE FILTER REPLACEMENT
1. Disconnect power from the monitor.
2. Open front panel.
3. Locate the internal particulate filter (see Figure 7-1 above). Un-strap the filter from
the two plastic hold-down clamps. Note the arrow on the filter showing flow
direction.
4. Loosen the two nuts holding the filter into the two union fittings.
5. Install the nuts on the new filter.
Hand-tighten until snug; do not use tools
.
6. Re-strap the filter in place with the flow-direction arrow oriented as found in Step 3.
7. Reconnect power.
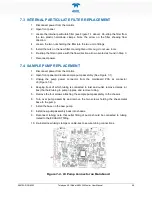
7.4 SAMPLE PUMP REPLACEMENT
1. Disconnect power from the monitor.
2. Open front panel and locate sample pump assembly (See Figure 7-1).
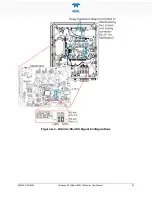
3. Unplug the pump power connector from the mainboard PCA at connector
J9 (Figure 7-2).
4. Keeping track of which tubing is connected to inlet and outlet, remove clamps (or
ties) that hold tubing to pump nipples, and remove tubing.
5. Remove the four screws attaching the sample pump assembly to the chassis.
6. Turn over pump assembly and remove the two screws holding the sheet-metal
base to the pump.
7. Install the base on the new pump.
8. Install new pump assembly back into chassis.
9. Reconnect tubing; note that outlet fitting of pump should be connected to tubing
routed to the EXHAUST fitting.
10. Re-install new tubing clamps or cable-ties to secure tubing connections.
Figure 7-2. J9 Pump Connector on Mainboard
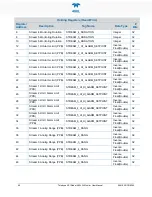
Summary of Contents for 480L
Page 2: ......


