background image

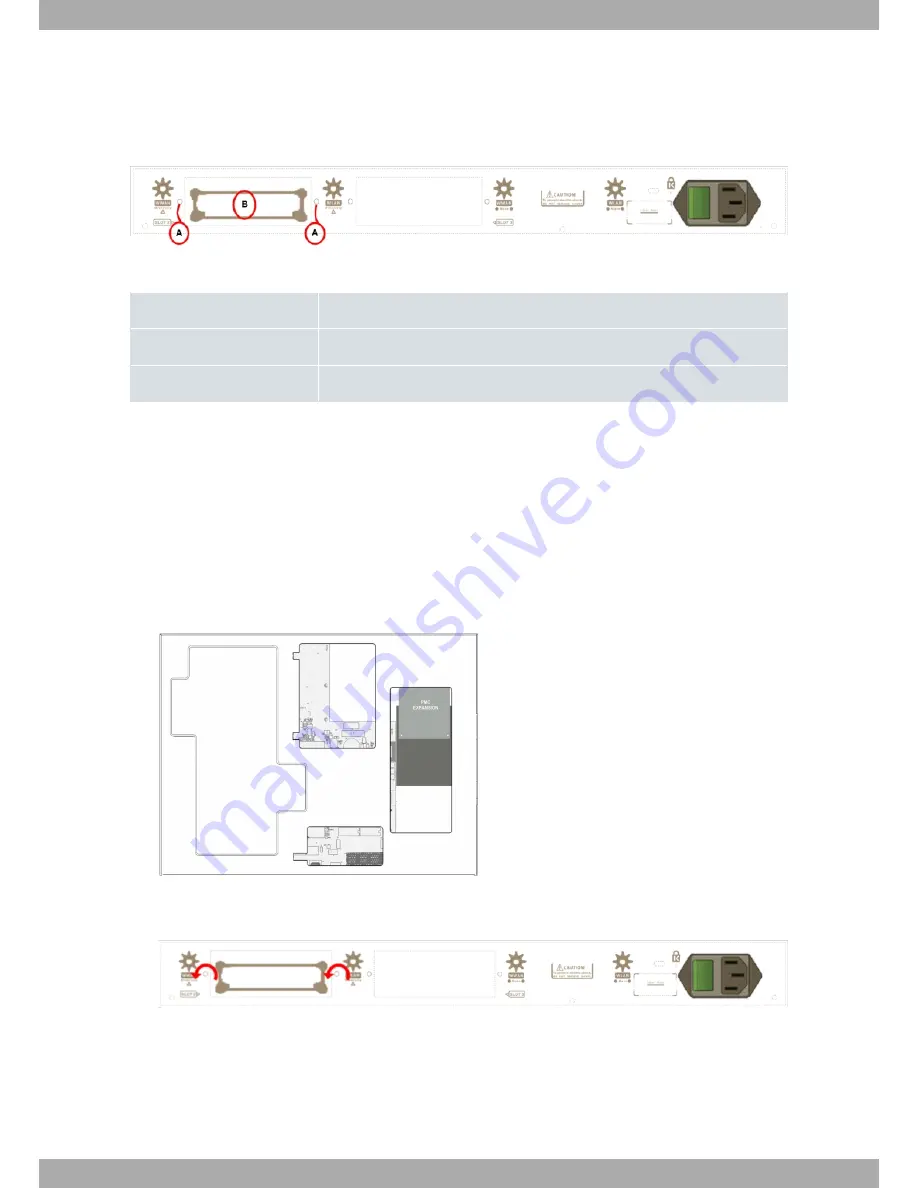
3.2.2 SLOT 2 - Expansion Slot

SLOT 2 is located on the left hand side of the device’s

Rear Panel

on page 6. In this case, we insert a PMC (PCI

mezzanine card) into the SLOT.

Fig. 15:

SLOT 2 Expansion Slot

SLOT 2 elements table

Item

Description.

A

Screws to hold the cover of the expansion module in SLOT 2.

B

PMC-PCIexpansion module.

To correctly insert the card, please follow these steps:

(1)

Switch off the device and remove the cables, as described in section

Disconnecting

on page 17.

(2)

Remove the device from the workplace and place it in a stable, safe location where it can be easily accessed
and handled.

(3)

Remove the screws from the side panel to be able to dismantle the flap that gives access to the expansion
cards. Please see

Fig. 9

on page 8.

(4)

Once the screws have been removed, slide the flap and lift it (making sure no grooves attach the flap to the top
panel). Place it in a safe location.

(5)

Find the place where the expansion board needs to be located. This slot has a set of elevated connectors with
gold contacts and a pair of standoffs.

Fig. 16:

PMC Expansion board: Location

(6)

Using a screwdriver, remove the expansion slot cover. This cover is located on the rear panel. Push this out.

Fig. 17:

Removing the SLOT 2 cover

(7)

Place PMC board standoff posts over the securing screws. Secure these firmly.

(8)

Place the PMC card in the slot so that this firstly adjusts to the space on the device rear panel and subsequently
to the two PMC connections. This operation must be carried out carefully, without forcing any piece or part of
the device. Check that the board is clearly settled over the PMC connectors. Please see

Fig. 18

on page 12.

Teldat S.A.

3 Components and Power Supply

ATLAS 6x/i6x NW Router

11

Summary of Contents for ATLAS 60 NW

Page 1: ...ATLAS 6x i6x NW Router Installation Manual Copyright Teldat DM632 I Version 1 1 September 2015 Teldat S A Teldat S A Manual ATLAS 6x i6x NW Router 1 ...

Page 2: ... S A offers no warranty whatsoever for information contained in this manual Teldat S A is not liable for any direct indirect collateral consequential or any other damage connected to the deliv ery supply or use of this manual Manual Teldat S A 2 ATLAS 6x i6x NW Router ...

Page 3: ... and Power Supply 4 3 1 Components 4 3 1 1 Front Panel 4 3 1 2 Rear Panel 6 3 1 3 Top Panel 7 3 1 4 Side Panel 7 3 2 Expansion Slots 8 3 2 1 SLOT 1 Expansion Slot 8 3 2 2 SLOT 2 Expansion Slot 11 3 2 3 SLOT 3 Expansion Slot 13 3 3 Installation in a rack 16 3 4 Power Source 16 3 4 1 Internal Power Source 17 3 4 2 PoE Source 18 3 5 Microswitches 20 3 5 1 Procedure to ignore the configuration 20 3 6 ...

Page 4: ...r 28 A 4 2 WWAN Connectors 28 A 4 3 WLAN Connectors 28 A 4 4 Configuration Connector 29 A 5 Technical Specifications 29 A 5 1 Hardware Architecture 29 A 5 2 LAN Interfaces 29 A 5 3 Configuration Interface 29 A 5 4 Power Supply 30 A 5 5 Dimensions and weight 30 A 5 6 Environmental Specifications 30 Appendix B Regulatory compliance and safety information 31 B 1 Recycling and the Environment 31 B 2 T...

Page 5: ...scription of the available features in the ATLAS 60 NW family Technical specifications Power supply requirements A description of the device LEDs and connectors Troubleshooting 1 5 What is not in this manual This manual does not contain information relative to the device software or its configuration For information on how to configure this device please see the relevant manuals to be found on the...

Page 6: ...e changes and improvements to either software or hard ware of this product modifying the specifications of this manual without prior notice The images showing the front and back panels of the device are for information purposes only Some slight modifications may exist in the actual device 1 About This Guide Teldat S A 2 ATLAS 6x i6x NW Router ...

Page 7: ...layer and at the network layer and security mechanisms the potential to create Virtual Private Networks through IPSec or L2TP plus an extensive range of pro tocols and IP routing functionalities The ATLAS 60 NW router family can be expanded by means of a PMC card allowing you to increase the range of interfaces in the device This manual shows you how to install and connect these devices 2 1 1 Powe...

Page 8: ...ector which provides access to the device s local console for configuration and monitoring purposes B USB slot to connect a USB device C GE0 GE1 GigaEthernet Interfaces D PoE connector for power supply through Ethernet Power over Ethernet E 8 port switch Ethernet F SLOT 1 expansion slot for 8 port switch Ethernet expansion boards or PMC PCI cards For further information please see section SLOT 1 E...

Page 9: ...t available or not installed not supported Red Interface not found no data connection Yellow Connecting Green Communications estab lished xDSL Shows the status of the xDSL inter face Off Interface not available or not installed not supported Red Interface not found no data connection Yellow Connecting Green Communications estab lished In addition to the LEDs described in the above table the front ...

Page 10: ...Mbps Flashes depend ing on the activity Green Ethernet link connection established Off Link has not been detected Green 100M bps Flashes depend ing on the activity 3 1 2 Rear Panel The following figure shows the rear panel Fig 5 Rear panel The rear panel elements are as follows Rear panel connectors table Item Description A Not supported B SLOT 2 expansion slot for PMC PCI cards For further inform...

Page 11: ...el elements are as follows Top panel elements table Item Description A Flap that provides access to the expansion cards 3 1 4 Side Panel The following figure shows the side panel Fig 7 Side panel The side panel elements are as follows Side panel elements table Item Description A Slots for the screws for rack mounting B Securing screws for the flap on the top panel C Securing screws for the top pan...

Page 12: ...llow these steps 1 Switch off the device and remove the cables as described in section Disconnecting on page 17 2 Remove the device from the workplace and place it in a stable safe location where it can be easily accessed and handled 3 Remove the screws from the side panel to be able to dismantle the flap that gives access to the expansion cards Fig 9 Remove the flap screws from the top panel 4 On...

Page 13: ...expansion slot and screw it down Fig 13 Replace the cover on SLOT 1 10 Reposition the top panel flap and screw it into place using the screws Fig 14 Replace the screws on the top panel flap 11 Connect and switch on the device as explained in section Connecting on page 17 Should you encounter any problems switch off the device and make sure that the above steps have been carried out correctly If th...

Page 14: ... Vendor 0x1957 Device 0x0100 Subs Vendor 0x0000 Subs Device 0x0000 Slot 1 PCI device PCI to PCI bridge Bus 11 Device 0 Function 0 Vendor 0x10B5 Device 0x8112 Subs Vendor 0x0000 Subs Device 0x0000 Slot 1 PCI device bridge Bus 12 Device 14 Function 0 Vendor 0x1057 Device 0x18C1 Subs Vendor 0x5444 Subs Device 0x1700 Current production date 11 23 Current software license 28 60 S N 754 00111 BIOS MAC A...

Page 15: ...e the screws have been removed slide the flap and lift it making sure no grooves attach the flap to the top panel Place it in a safe location 5 Find the place where the expansion board needs to be located This slot has a set of elevated connectors with gold contacts and a pair of standoffs Fig 16 PMC Expansion board Location 6 Using a screwdriver remove the expansion slot cover This cover is locat...

Page 16: ...d make sure that the above steps have been carried out correctly If the problem persists please contact your supplier 13 Connect a terminal to the console and check that the device detects the PMC board BIOS CODE DUMP BIOS DATA DUMP End of BIOS dump FLASH BIOS CODE VERSION 02 01 Mar 6 2013 17 59 56 L1 Current date Mar 27 2013 Wednesday Current time 12 56 57 System Info PCB 0x128 GPPORCR 0x00280000...

Page 17: ...software license 28 60 S N 754 00111 BIOS MAC Add 00 a0 26 a2 00 2c TRYING APP DUMP CONFIGURED appcode1 bin ver 0 11 0 1 0 0 0 0 APP0 CODE DUMP Mode 0 APP0 DATA DUMP APP CODE DUMP APP DATA DUMP Running application at 0x00200140 Flash configuration read Parsing text mode configuration Configuration parsed Initializing Press any key to get started 3 2 3 SLOT 3 Expansion Slot SLOT 3 is located in the...

Page 18: ...lace the xDSL expansion card so that this firstly adjusts to the space on the device rear panel and sub sequently to the motherboard connection This operation must be carried out carefully without forcing any piece or part of the device Check that the board is clearly settled over the motherboard connector 9 Screw the board to the securing posts using two screws and their corresponding washers Fir...

Page 19: ...L CARD 0x08 LAN OVER SWITCH SWITCH 8 10 100 CARD 0x18 POE CARD 1 SECURITY ENGINE Slot 1 PCI device PowerPC processor Host Bus 10 Device 0 Function 0 Vendor 0x1957 Device 0x0100 Subs Vendor 0x0000 Subs Device 0x0000 Slot 1 PCI device PCI to PCI bridge Bus 11 Device 0 Function 0 Vendor 0x10B5 Device 0x8112 Subs Vendor 0x0000 Subs Device 0x0000 Slot 1 PCI device bridge Bus 12 Device 14 Function 0 Ven...

Page 20: ...4 on each side as shown Fig 26 Attaching the brackets The spaces for the screws in the ATLAS 60 NW router leave the factory protected by covers These can be removed with a sharp tool such as a small flat screwdriver We recommend removing the upper cover to simplify the pro cess Fig 27 Device with the brackets 3 4 Power Source The ATLAS 60 NW router is powered with an internal power source Addition...

Page 21: ...nnected communication devices should be plugged to THE SAME GROUNDED POWER OUTLET which should at the same time be of good quality lower than 10 ohms Whether the workplace is provided with an uninterrupted power supply system UPS regulated supply or whether it is independent from the rest such as lighting etc it is highly recommended that all data devices should be connected to the same power sour...

Page 22: ...de the flap and lift it making sure no grooves attach the flap to the top panel Place it in a safe location 5 Find the place where the MiniPoE card needs to be located Fig 30 MiniPoE card location 6 Place the PMC card so that this adjusts to the two connectors This operation must be carried out carefully without forcing any piece or part of the device Check that the card is clearly settled over th...

Page 23: ...L CARD 0x08 LAN OVER SWITCH SWITCH 8 10 100 CARD 0x18 POE CARD 1 SECURITY ENGINE Slot 1 PCI device PowerPC processor Host Bus 10 Device 0 Function 0 Vendor 0x1957 Device 0x0100 Subs Vendor 0x0000 Subs Device 0x0000 Slot 1 PCI device PCI to PCI bridge Bus 11 Device 0 Function 0 Vendor 0x10B5 Device 0x8112 Subs Vendor 0x0000 Subs Device 0x0000 Slot 1 PCI device bridge Bus 12 Device 14 Function 0 Ven...

Page 24: ...ation Note For the device to operate correctly all micro switches must be in the OFF position The default configuration for the router establishes the access IP and mask address as follows IP address 192 168 1 1 IP mask 255 255 255 0 Note Some devices leave the factory with customized settings This personalization can mean that the de fault configuration is different from the one shown above 3 5 1...

Page 25: ...PROM 2048 Bytes Devices GIGABIT ETHERNET 1 GIGABIT ETHERNET 2 LAN OVER SWITCH SWITCH 8 10 100 CARD 0x18 POE CARD 1 SECURITY ENGINE Slot 1 PCI device PowerPC processor Host Bus 10 Device 0 Function 0 Vendor 0x1957 Device 0x0100 Subs Vendor 0x0000 Subs Device 0x0000 Slot 1 PCI device PCI to PCI bridge Bus 11 Device 0 Function 0 Vendor 0x10B5 Device 0x8112 Subs Vendor 0x0000 Subs Device 0x0000 Slot 1...

Page 26: ...al area network LAN Please pay careful attention to the labeling so you do not mix this switch with other types of ports Fig 33 LAN Switch ports 3 6 2 GE0 GE1Connections The ATLAS 60 NW router has two interfaces to connect to Ethernet networks Each interface has a metallic connect or 10 100 1000 Base T The GE0 GE1ports are independent from the Switch Please pay careful attention to the labeling so...

Page 27: ...emory ex pansion 3 7 1 Procedure to install a hard disk To correctly insert a hard disk please follow these steps 1 Switch off the device and remove the data cables as described in section Disconnecting on page 17 2 Remove the device from the workplace and place it in a stable safe place where it can be easily accessed and handled Open up the device To do this you need to remove the top cover secu...

Page 28: ... problem persists please contact your supplier 10 Check that during startup the HD LED located on the device s front panel is flashing 3 7 2 Procedure to install a flash memory expansion USB To install a flash memory expansion USB please follow these steps 1 Switch off the device and remove the data cables as described in section Disconnecting on page 17 2 Remove the device from the workplace and ...

Page 29: ... screws 6 Connect and switch on the device as described in section Connecting on page 17 Should you detect any prob lems switch off the device and make sure that the above steps have been carried out correctly If the problem persists please contact your supplier Teldat S A 3 Components and Power Supply ATLAS 6x i6x NW Router 25 ...

Page 30: ... device is very slow in dis playing the application prompt Check that micro switch 3 is in the OFF position You have forgotten the pass word to access the device Ignore the configuration by means of micro switch 5 as explained in the relevant section The LEDs show that the GE in terfaces are established but there is no connectivity at the data layer Check the configuration routes IP addresses etc ...

Page 31: ...e Conf port to an asynchronous terminal or to a PC with terminal emulation Note The configuration for the terminal must be Eight data bits Speed 9600 bps One stop bit No parity bit No type of flow control Connection to the configuration port can be carried out using the RJ45 connectors cable supplied together with the device and the RJ45 Female DB9 Female adapter also provided Fig 40 Connecting fo...

Page 32: ... MDI X and auto polarity auto detection feature that acts bidirectionally You do not need a null HUB cable to connect it to another Ethernet interface A 4 2 WWAN Connectors PIN ANT Internal External RF in out GND Not available in all models A 4 3 WLAN Connectors PIN ANT Internal External RF in out GND Not available in all models Technical Information Teldat S A 28 ATLAS 6x i6x NW Router ...

Page 33: ... 64 Mbytes EEPROM 2Kbytes NVRAM 128Kbytes A 5 2 LAN Interfaces PROTOCOLS Ethernet 802 3 Nº OF PORTS 3 logical interfaces SPEED 2x 10 100 1000 Mbps BaseT GEx 8x 10 100 Mbps BaseT Switch CONNECTORS RJ45 female CABLE UTP Cat 5 Depending on the model A 5 3 Configuration Interface LOCAL TERMINAL V 24 9600 8 N 1 without flow control CONNECTOR RJ45 female on the device s front panel Teldat S A Technical ...

Page 34: ...d weight TYPE Box to assemble in a Rack 1U high LENGTH x WIDTH x HEIGHT 440 x 378 71 x 43 2 mm WEIGHT 4 0 kg A 5 6 Environmental Specifications ENVIRONMENTAL TEMPER ATURE On 5º to 50 ºC Off 20º to 70 ºC RELATIVE HUMIDITY On 8 to 95 non condensing Off 5 to 95 non condensing Technical Information Teldat S A 30 ATLAS 6x i6x NW Router ...

Page 35: ...y additional steps established by law All the packing materials i e the cardboard box plastic and any other packaging together with the pieces making up an ATLAS 60 NW must be recycled complying with the current active laws regarding recycling materials The below symbol with a cross over the rubbish container can be seen on the device This means that when a device reaches the end of its life it mu...

Page 36: ... J H I H K1 01 01 0 3 1 L 6 17 01 1 8 7 2 L 21 01 1 02 6 02 2 L1 6 8 3 1 0 6 1 01 1 02 0 1 2 4 2 01 01 M 00 L1 N 10 1 01 1 02 2 2 6 1 O O 4 O 2 1 21 6 3 01 01 6 2 6 1 3 8 0 17 2 8 O 01 2 1 P Q R B C S C S C B H I N 6 2 4 2 12 0 5 1 76 6 6 A Q S Regulatory compliance and safety information Teldat S A 32 ATLAS 6x i6x NW Router ...

Page 37: ...1 08 1 6 1 0 0 7 01 01 0 2 4 7 2 hi j k lg m non pq ii j rl st qui j v n lw 70 2 O 2 01 c0 1 7M 1 Td 6e s 81 6 01 01 2 6 0 O 1 ckxse 01 2 6 O 6 O 1 10 0 676 1 O N 0 01 6 c1 2 6 2 2 0 5 1 ef 01 O 2 6 10 2 4 18 0 9 6 7 01 01 2 6 01 2 1 K1 6 3 1 1 1 18 L20 1 7 67 3 6 01 O N 1 A A A c Td e y cW e c e A P y C aW W _ W GB B W c Td e S C W S c W e S F c e S W X C E C Teldat S A Regulatory compliance and ...

Page 38: ... compliance could void the user s authority to operate this equipment This product complies with Part 15 of the FCC Rules Operation is subject to the following two conditions 1 this device may not cause harmful interference and 2 this device must accept any interference received including in terference that may cause undesired operation of the device B 3 2 IC Statement B 3 2 1 Industry Canada Clas...

Reviews: