


EN
26
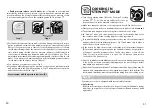
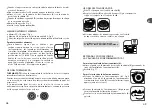
USING THE STEAM BASKET
Pour 750 ml of water into the bottom of the pot (Q).
Clip the stand (K) to the basket (J), then place the assembly
at the bottom of the pot.
During steam cooking, the ingredients in the steam basket
must not come into contact with the water.
Foods placed in the steam basket
must not exceed the MAX 2 line.
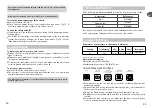
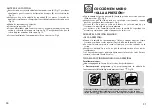
REMOVE AND REPLACE
THE OPERATING VALVE (A)
To remove the operating valve (A):
Align the dot with the valve positioning mark (C) and then pressing down on
the operating valve (A).
Remove it
- Fig 11
.
To replace the operating valve:
Install the operating valve (A)
- Fig 8
by aligning the dot
of the operating valve with the positioning mark (C) (see
opposite).
Push in the operating valve (A) so that it connects to the
steam release rod.
Press down on of the operating valve (A), then turn it to
the pictogram symbol required.
27
dot
When steam begins to escape from the valve, reduce the heat and set a
timer for 20 minutes.
When the 20 minutes are up, turn off your heat source.
Gradually turn the operating valve (A), adjusting the speed that pressure is
released by how far you open the valve, to align the pictogram on the
operating valve (A) with the valve position index (C).
When the pressure indicator (D) goes down, your pressure cooker is no
longer under pressure.
Open your pressure cooker
- Fig 3
.
Clean it with washing-up liquid and warm water. Dry thoroughly.
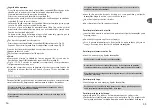
MINIMUM AND MAXIMUM FILLING
Minimum 250 ml (2 glasses)
- Fig 4
.
Maximum 2/3 of the height of the pot, MAX 2 line
- Fig 5
.
Do not use sea salt in your pressure cooker - instead, add table salt when
the cooking is complete.
For certain foodstuffs:
For thick foods that swell in size and/or froth up during
cooking, such as rice, pulses, dried beans, stewed fruit,
pumpkin, courgettes, carrots, potatoes, fish fillets, etc.,
do not fill your pressure cooker beyond 1/3 (MAX 1 line)
of its capacity. At the end of cooking, let your pressure
cooker cool for a few minutes, then cool down in cold
water (see the “End of cooking in ‘pressure cooker mode’
- rapid pressure release” paragraph).
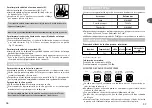
USE OF THE THERMO-SPOT
®
THERMO-SPOT® indicates the ideal cooking start temperature to unlock the
flavour in your food.
Thanks to its non-stick coating, there is no need to use fat in your cookware
(apart from the first use), for healthier dishes.
When the cookware reaches the ideal temperature, it turns an even red
colour. To avoid overheating, lower the heat once the disc is red.
1/3
MAX1
MAX2
2/3
Summary of Contents for Chefclub ClipsoMinut' Duo
Page 64: ...122 selon mod le RU 123 2 12 16 13 250 4 2 3 MAX 2 5 MAX 2 7 1 3 MAX 1 6...
Page 65: ...RU 125 1 2 4 A 10 A D 2 D D Tefal Tefal A I 10 Tefal...
Page 66: ...RU 3 17 13 1 2 17 13 K J Q 2 3 MAX 2 5 A C 9 127 126 A B C D E G H I J K N P max 1 max 2 Q...
Page 68: ...RU A 9 2 A A 10 A 131 A 11 B 12 E 16 2 17 13 A 8 130...
Page 69: ...RU A 2 17 13 D 133 D D D A 1 2 1 3 17 13 D 132...
Page 70: ...RU 135 D D G D D G D E 18 18 A B E I 14 15 16 Tefal 134...
Page 72: ...RU 139 138 Tefal PS PF i...
Page 73: ...RU 141 TEFAL 17 13 1 17 13 Tefal A D A 1 A 15 16 D D A A A Tefal...