background image

3

98-05243-ENUS R2

Matrix

®

 Pro

GPS iS required

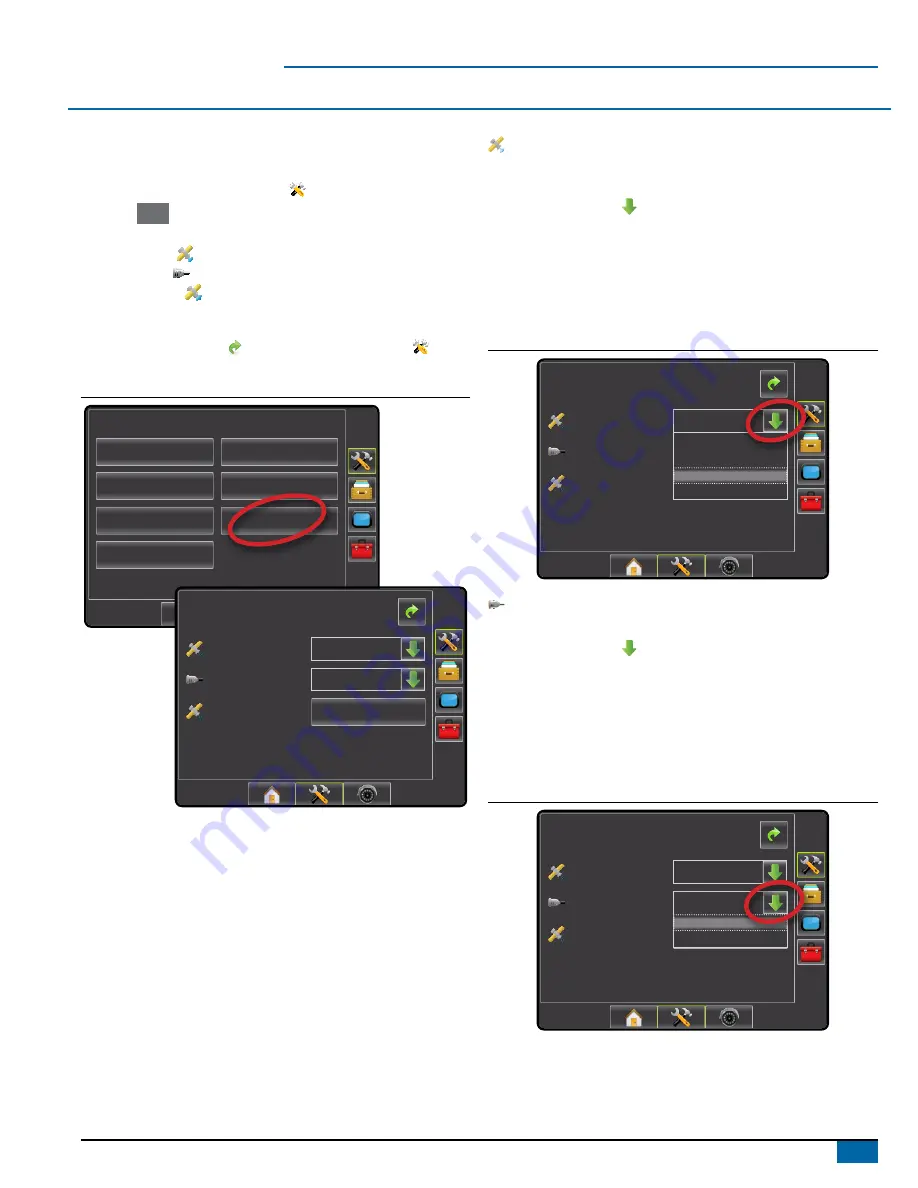
GPS is used to configure GPS Type and GPS Port.

NOTE:  These settings are required for auto steering and tilt sensor 

operation, as well as proper implement operation. 

1.  Press CONFIGURATION side tab   .
2.  Press 

 GPS 

.

3.  Select from:

►GPS Type 

 – select GPS source transmissions

►GPS Port 

 – sets (D)GPS COM port

►GPS Status 

 – displays information for TeeJet Customer 

Service use on GGA/VTG (Data Rates), Number of Satellites, 

HDOP, PRN, GGA Quality, GPS Receiver and Receiver Version.

4.  Press RETURN arrow   or CONFIGURATION side tab   to 

return to the main Configuration screen.

Figure 1-5: GPS 

Configuration

Vehicle

Implement

AutoSteer

Tilt

Lightbar

GPS

Video

Config->GPS

GPS Status

GPS Port

GPS Type

Information

Internal

GPS/DGPS

GPS Type

GPS Type customizes the system to accept GPS source or DGPS 

source transmissions. 
1.  Press DOWN arrow   to access the list of options.
2.  Select:

►GPS Only – uncorrected signals

►DGPS Only – differentially corrected signals

►GPS/DGPS – either type of signal

►GPS+GLONASS – uncorrected signals from both the GPS and 

GLONASS systems

Figure 1-6: GPS Type

Config->GPS

GPS Status

GPS Port

GPS Type

Information

Internal

GPS/DGPS
GPS Only
DGPS Only
GPS/DGPS
GPS+GLONASS

GPS Port

GPS Port sets port transmission to Internal or External. 
1.  Press DOWN arrow   to access the list of options.
2.  Select:

►Internal – use the internal (D)GPS (if equipped) and transmit out

►External – receive external (D)GPS data

NOTE:  Working with GPS signals such as Omnistar HP/XP or RTK will 

require GPS port to be set to External.

Figure 1-7: GPS Port

Config->GPS

GPS Status

GPS Port

GPS Type

Information

GPS/DGPS

Internal

Internal
External

Summary of Contents for Matrix Pro 570G

Page 1: ...Matrix Pro BoomPIlot Setup Guide Automatic Boom Section Control For use with software version 2 0x and 2 5x Refer to the Matrix Pro GS User Manual for details on setup with software version 3 x...

Page 2: ...t Configuration 5 Vehicle Setup 5 Vehicle Type 6 Antenna Height 6 Direction to Boom 6 Distance to Boom 6 Implement 7 Speed Out Sense In cable 7 Implement Single Section Setup 7 Guidance Width 8 Spray...

Page 3: ...operator Do not leave a vehicle while the BoomPilot is engaged Be sure that the area around the vehicle is clear of people and obstacles before and during engagement The BoomPilot is designed to supp...

Page 4: ...ible Figure 1 4 Example of Unavailable Options Config AutoSteer Enabled Valve Setup Steering Settings Valve Test Valve Diagnostics Options On Config Vehicle 12 50 ft 0 00 ft Front Wheel Backward Vehic...

Page 5: ...ormation Internal GPS DGPS GPS Type GPS Type customizes the system to accept GPS source or DGPS source transmissions 1 Press DOWN arrow to access the list of options 2 Select GPS Only uncorrected sign...

Page 6: ...8 GPS Status Config GPS GPS Status GPS Port GPS Type Information Internal GPS DGPS Config GPS GPS Status GPS Port GPS Type Information Internal GPS DGPS GPS Information GGA Rate 5 Hz VTG Rate 5 Hz Nu...

Page 7: ...2 Overlap Delay Off Delay On 1 00 s 1 00 s 50 Vehicle Setup Vehicle Setup is used to configure Vehicle Type Antenna Height Direction to Boom and Distance to Boom 1 Press CONFIGURATION side tab 2 Press...

Page 8: ...to Boom Antenna Height ft 1 2 3 12 50 Clear 4 5 6 7 8 9 0 Direction to Boom Direction to Boom sets whether the boom is located behind or in front of the GPS antenna as the vehicle moves in a forward...

Page 9: ...green wire to master 12 Volts on off from rate controller Figure 1 15 Speed Out Sense In cable Speed Cable 45 05615 Speed Status 12v Connect Green Wire Connect Red Wire OFF ON Green Wire Sense Red Wi...

Page 10: ...g Implement Num Sections Spray Width Guidance Width 60 00 ft 12 00 ft 1 Guidance Width ft 1 2 3 Clear 4 5 6 7 8 9 0 Spray Width Spray Width establishes the width of the implement Range is 34 0 2952 7...

Page 11: ...ction Overlap used to select the amount of overlap allowed when the boom sections are turned on and off Delay On used to enter the timing for the boom section valves to switch on Delay Off used to ent...

Page 12: ...g Implement Num Sections Spray Width Guidance Width 60 00 ft 180 00 ft 15 Guidance Width ft 1 2 3 Clear 4 5 6 7 8 9 0 Spray Width Spray Width establishes the width of each implement section Range is 0...

Page 13: ...ase the Delay On setting Range is 0 0 10 0 seconds Default is 1 00 second 1 Press the KEYPAD icon 2 Use the entry screen to establish the delay on time Figure 1 24 Delay On Config Implement 2 Overlap...

Page 14: ...ions On Mode To turn all sections on 1 Press NAVIGATION AND GUIDANCE OPTIONS icon to display navigation options 2 Press and hold BOOMPILOT icon All On Status Bar Icon will change to yellow Figure 1 26...

Page 15: ...ttings Ranges Vehicle Setup Settings Description Factory Setting Range User Settings Vehicle Type Front Wheel Antenna Height 12 0 ft 3 66 m 0 0 32 8 ft 0 0 10 0 m Direction to Boom Forward Boom Offset...

Page 16: ...w teejet com This guide contains the instructions to setup the automatic boom section control ABSC or BoomPilot options on the vehicle through the Matrix Pro console Please review this manual thorough...

Reviews: