background image

Page 14

Four-Cycle Engine • L-Head • Horizontal Crankshaft • Air-Cooled

181-630-14

III. Filter Removal/Installation

1.

Remove wing nut. See Figure 33 or 34.

2.

Remove Cover. 

3.

Remove optional foam pre-filter, if present (see equip
ment manufacturers instructions) from outside of paper 
filter.

4.

Remove paper filter element from base. 

5.

Inspect filters for discoloration or dirt accumulation. If 
either is present, see "I. Servicing Foam Filters" 
instructions on page 13. See "II. Servicing Paper Fil-
ters" instructions on page 13.

6.

Clean inside of base and cover thoroughly.

7.

Install paper filter element onto body.

8.

Install foam pre-filter, if present (see equipment manu-
facturer’s instructions) over paper element.

9.

Install cover over filters.

E. Alternator (Optional)

For alternator related electrical problems such as:

• Inoperative starter

• Discharged battery 

• Fuse replacement

• Alternator maintenance/repairs

See your equipment manufacturer’s instructions and an 
Authorized Tecumseh Servicing Dealer.

F.

Carburetor

If you think your carburetor needs adjusting, see your 
nearest Authorized Tecumseh Servicing Dealer. Engine 
performance should not be affected at altitudes up to 7,000 
feet 

(2,134 meters)

. For operation at higher elevations, 

contact your Authorized Tecumseh Servicing Dealer.

G. Engine Speed

To avoid serious injury or death, DO NOT modify engine in 
any way. Tampering with the governor setting can lead to a 
runaway engine and cause it to operate at unsafe speeds. 
NEVER tamper with factory setting of engine governor.

Running the engine faster than the speed set at the factory 
can be dangerous and will VOID THE ENGINE 
WARRANTY.

H. Adjustments

Do not make any engine adjustments. Factory settings are 
satisfactory for most conditions. If adjustments are needed, 
contact your Authorized Tecumseh Servicing Dealer.

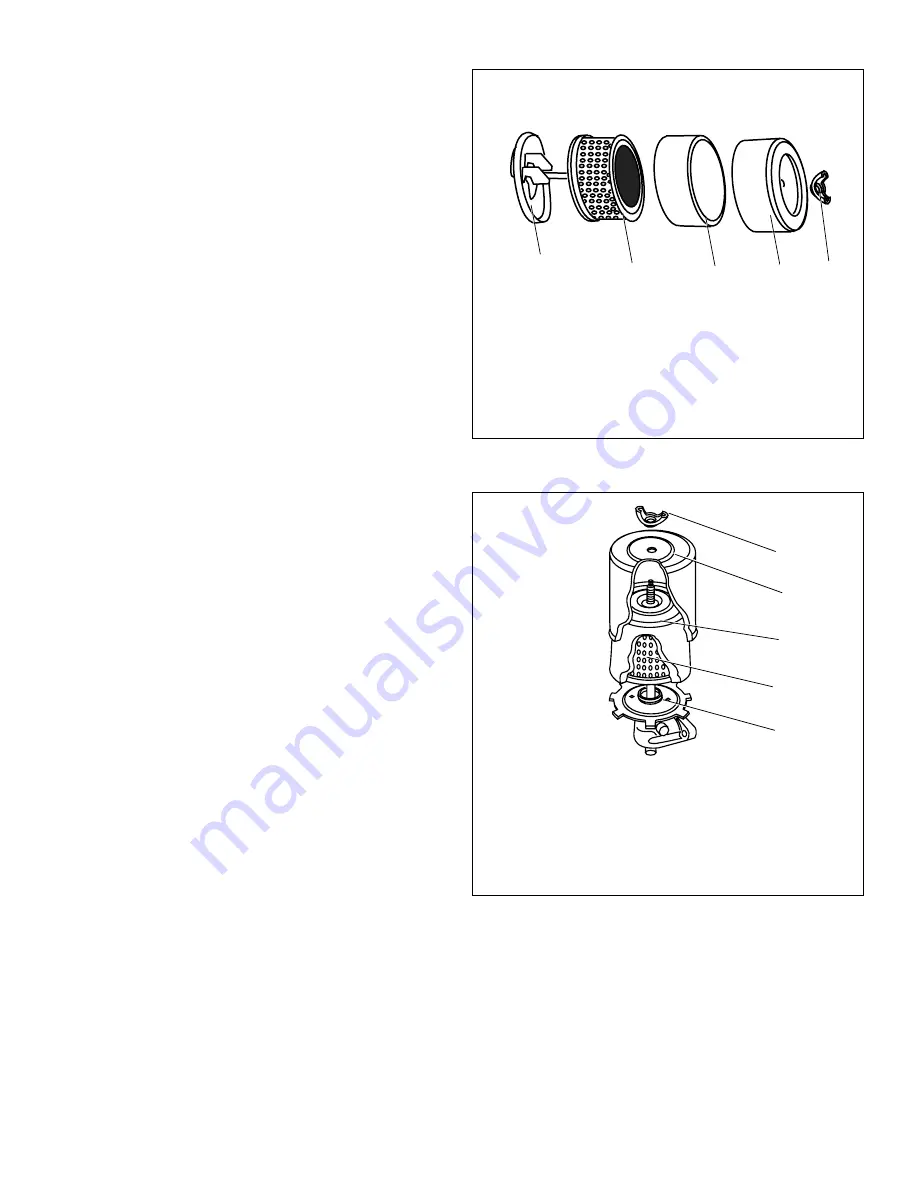
Figure 33. Air Cleaner “A”

Figure 34. Air Cleaner “B”

1. Wing Nut
2. Cover

3. Foam Pre-Filter
4. Paper Filter
5. Body

2

1

3

4

5

5

3

1. Wing Nut
2. Cover

3. Foam Pre-Filter
4. Paper Filter
5. Body

1

2

4

Summary of Contents for LH358EA

Page 1: ...ine and Short Term Storage 12 VII Maintenance 12 VIII Transporting Your Engine 15 IX Storing your Engine 15 X Preventing Forest Brush and Grass Fires 17 XI Maintenance Intervals 18 California US EPA Emission Control Warranty Statement 20 Emission Control System Warranty 21 XII Warranty Information 22 181 630 14 English 12 01 06 Register Your Tecumseh Engine Maintenance Tips Parts Look Up System Gr...

Page 2: ...rator s Manual Follow these basic rules for your personal safety Keep this manual handy at all times for future reference Read it carefully and familiarize yourself with operating maintenance components and safety instructions Notice Regarding Emissions NOTE Engines which are certified to comply with California and U S EPA emission regulations for SORE Small Off Road Equipment are certified to ope...

Page 3: ... container to store and dispense fuel Tecumseh recommends purchasing gasoline in containers with a capacity of 2 5 gallons or less Small containers are easier to handle and help eliminate spillage during refueling DO NOT pour fuel from engine or siphon fuel by mouth To empty fuel tank see I Draining Fuel instructions on page 16 C Adult Supervision of Operation Refueling and Maintenance The manufac...

Page 4: ...accidental starting when working on equipment always Disconnect spark plug wire and keep it away from spark plug See Figure 3 Keep the disconnected spark plug wire securely away from metal parts where arcing could occur Attach the spark plug wire to the grounding post if provided See Figure 4 Disconnect battery at negative terminal first if engine is equipped with an electric starter Turn off all ...

Page 5: ...ded for individuals who have had adequate training experience and who practice proper tool usage Service procedures should be clearly understood and practiced when servicing Tecumseh Engines Order as part no 692509 for LH Models Tecumseh manufactures and is responsible only for the engine used on this power equipment If repair or service is needed for anything other than the engine contact the ser...

Page 6: ...listed in the Operator s Manuals will not be considered warranty IV Before Starting Your Engine A Checking Oil Level To avoid engine damage it is important to Check oil level before each use and every 5 operating hours when engine is warm Check oil level more frequently during engine break in Keep oil level between FULL and ADD marks on dipstick See Figure 7 Be sure oil fill cap is tightened secur...

Page 7: ... 9 D Low Oil Shutdown Switch Some engines are equipped with an optional Low Oil Shutdown Switch This is a lighted rocker switch that is connected to a float switch in the engine crankcase When oil level drops below a predetermined level the float switch cuts off current to the spark plug and the engine stops running Oil must be added to the engine to bring the oil to the proper level before the en...

Page 8: ...highly flammable and can explode Fuel vapors can spread and be ignited by a spark or flame many feet away from engine To prevent injury or death from fuel fires follow these instructions 1 Stop engine and allow it to cool before refueling 2 Be sure engine is outdoors and in a well ventilated area 3 Clean area around fuel fill cap and remove fuel fill cap See Figure 11 4 Using an approved red GASOL...

Page 9: ...ot equipped with a CLIMATE GUARD air cleaner a CLIMATE GUARD Conversion Kit is available at any Authorized Tecumseh Servicing Dealer See Figure 15 If the engine is equipped with a CLIMATE GUARD no changes need to be made when changing from summer to winter operation See Figure 16 I Winter Application In temperatures below 32 F 0 C the inlet air scoop should be pointed directly at the muffler II Su...

Page 10: ...ectric Starters instructions below If you have a manual recoil starter see B Engines with Recoil Starters instructions on page 10 A Engines with Electric Starters 1 To avoid carbon monoxide poisoning make sure engine is outdoors in a well ventilated area 2 Move engine Stop Switch or Low Oil Shutdown Switch to ON if present see equipment manufacturer s instructions See Figures 17 and 18 3 Be sure f...

Page 11: ...ntrol to NO CHOKE position 7 If engine dies after Choke Control is to moved to NO CHOKE position repeat steps 2 thru 6 to restart engine 8 If engine fires but does not continue to run move Choke Control to NO CHOKE position and start engine 9 If engine fails to start after 3 attempts in the NO CHOKE position move Choke Control to FULL CHOKE position and start engine 10 If engine does not start aft...

Page 12: ...itches are on See Figure 14 on page 7 4 Move Engine Speed Control to FAST position and set Choke Control to FULL position see equipment man ufacturer s instructions See Figures 25 thru 28 NOTE If restarting a warm engine after a short shutdown move Engine Speed Control to FAST position and Choke Control to NO CHOKE position Figure 23 Engine Stop Switch Figure 24 Low Oil Shutdown Switch Figure 25 T...

Page 13: ...ontrol is moved to NO CHOKE position a Momentarily move Choke Control back to FULL CHOKE position b Next move Choke Control to 1 2 CHOKE position until engine runs smoothly c Finally move Choke Control to NO CHOKE position 8 If engine dies after Choke Control is to moved to NO CHOKE position repeat steps 2 thru 7 to restart engine 9 If engine fires but does not continue to run move Choke Control t...

Page 14: ...efore each use and every 5 operating hours See A Checking Oil Level instructions on page 4 Change oil after first 2 operating hours and every 25 operating hours thereafter more often if operated in extremely dusty or dirty conditions Engine should still be warm but not hot from recent use 1 Be sure you find the correct drain plug location if pro vided See Figure 30 2 Disconnect spark plug wire and...

Page 15: ...air cleaner on your engine Your engine will be equipped with one of the following air cleaners Type A or B Follow instructions for the air cleaner type that resembles your model See Figure 33 and Figure 34 NOTE Contact your Authorized Tecumseh Servicing Dealer for Tecumseh Air Cleaner I Servicing Foam Filters Clean foam pre filter every 3 months or every 25 operating hours Clean daily if used in e...

Page 16: ...your equipment manufacturer s instructions and an Authorized Tecumseh Servicing Dealer F Carburetor If you think your carburetor needs adjusting see your nearest Authorized Tecumseh Servicing Dealer Engine performance should not be affected at altitudes up to 7 000 feet 2 134 meters For operation at higher elevations contact your Authorized Tecumseh Servicing Dealer G Engine Speed To avoid serious...

Page 17: ...the blower housing In addition remove grass clippings dirt and debris from the following areas Cooling fins Air intake screen Levers Linkage Guards Carburetor Head Removing debris will facilitate adequate cooling correct engine speed and reduce the risk of fire I Fuel Storage NEVER store engine with fuel in fuel tank inside a building with potential sources of ignition such as hot water and space ...

Page 18: ...bilizer you can empty the fuel tank as described under I Draining Fuel instructions See B Extended Storage instructions B Extended Storage I Draining Fuel NOTES Clean debris from engine before draining fuel from carburetor See I Clean Engine instructions on page 15 If you have prepared your fuel for short term storage it is not necessary to drain fuel that contains stabilizer from your carburetor ...

Page 19: ...he engine for one to two seconds 7 Turn ignition switch key to OFF position Repeat Step 6 and Step 7 This will distribute oil throughout the cyl inder to prevent corrosion during storage 8 Remove rag covering spark plug hole and install spark plug 9 Carefully disconnect spark plug wire from grounding post if provided See Figure 36 NOTE Connect spark plug wire before attempting to start engine once...

Page 20: ...___Owner Dealer Date_______________Owner Dealer Date_______________Owner Dealer Date_______________Owner Dealer Date_______________Owner Dealer Date_______________Owner Dealer Date_______________Owner Dealer Date_______________Owner Dealer Date_______________Owner Dealer Date_______________Owner Dealer Date_______________Owner Dealer Date_______________Owner Dealer Date_______________Owner Dealer ...

Page 21: ..._____________Owner Dealer Date_______________Owner Dealer Date_______________Owner Dealer Date_______________Owner Dealer Date_______________Owner Dealer Every 200 Hours or Seasonally Scheduled Maintenance 1 Replace Spark Plug Date_______________Owner Dealer Date_______________Owner Dealer Date_______________Owner Dealer Date_______________Owner Dealer Date_______________Owner Dealer Date_________...

Page 22: ...d engine to a Tecumseh Authorized Service Outlet any Tecumseh Registered Service Dealer Tecumseh Authorized Service Distributor or Tecumseh Central Warehouse Distributor as soon as a problem exists The warranty repairs should be completed in a reasonable amount of time not to exceed 30 days Warranty service can be arranged by contacting either an Authorized Tecumseh Servicing Dealer and or Tecumse...

Page 23: ...placement the part shall be repaired or replaced by Tecumseh Power Company according to Subsection 4 below Any such emissions related part repaired or replaced under the ECS Warranty shall be warranted for the remainder of the ECS Warranty Period prior to the first scheduled replacement point for such emissions related part 4 Repair or replacement of any warranted emissions related part under this...

Page 24: ...purposes of this warranty policy consumer use shall mean consumer s personal residential household use by the original retail purchaser 5 For purposes of this warranty policy commercial use shall mean all other uses including use for commercial income producing or rental purposes 6 The engine warranty category of your engine can be determined by review of the engine model number on the Important E...

Reviews: