21
/
24
c) cables connecting main board
and carriage board are not
connected well
Check cables connecting
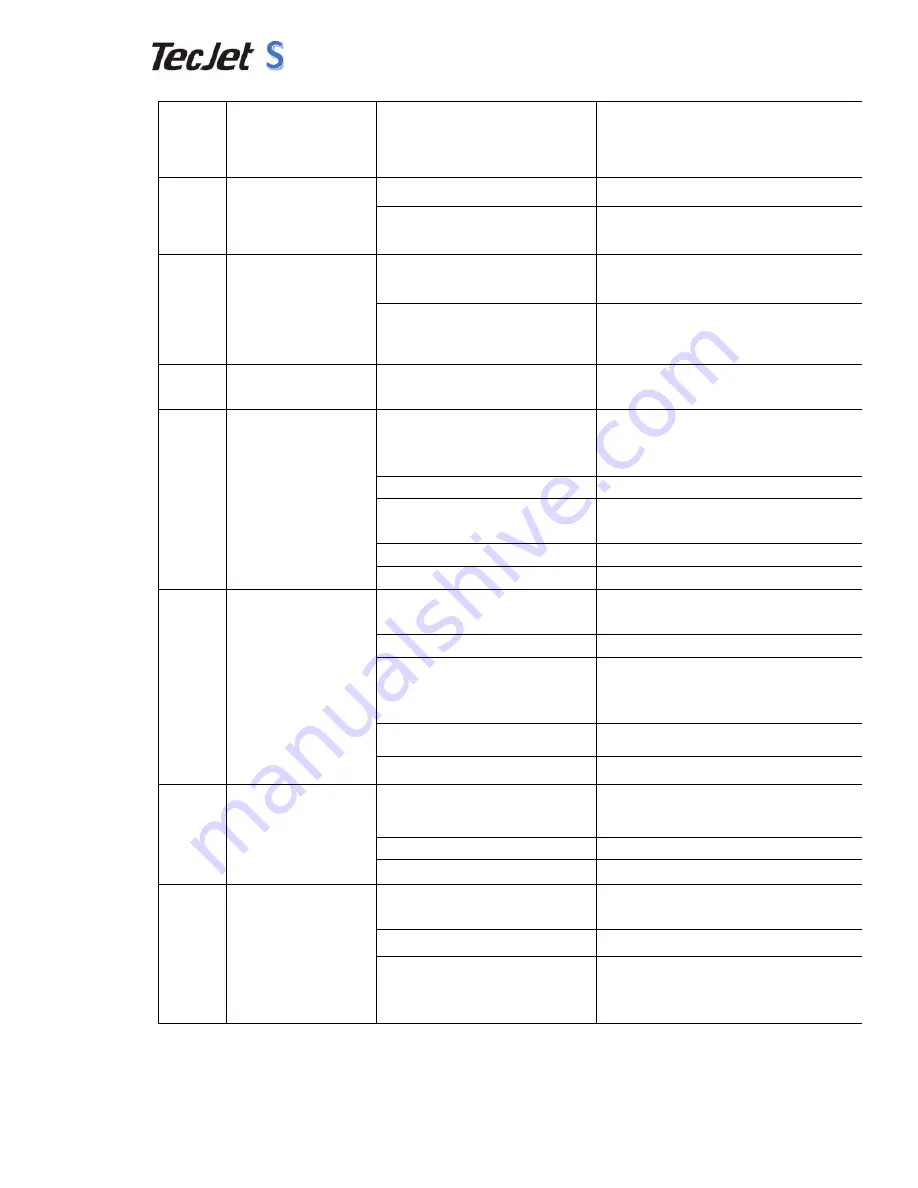
9
Printing is not finished
but data transmission
ends
a) carriage board is broken
Change new carriage board
b) there is not enough space to
install maintop
Clean installation disk or change another
disk so that the space is big enough
10
Empty or overlapping
printing
a) feeding adjustment is not good Make feeding adjustment again; change
different media to adjust
b) media situation different from
feeding calibration and printing
Adjust media feeding in system and make
media feed well
11
Image printing size is
too long or short
a) calibration values are not
correct
Calibrate feeding again or change values
in maintop
12
Bad resolution and ink
spitting
a) distance between head and
media is too high( normal
1.8-2.2mm)
Adjust the distance
b) lower than 42V
Check 42V power and see if it’s OK
c) vertical calibration and
two-way calibration is not good
Make vertical and two-way calibration
again
d) carriage moves too fast
Change printing speed
e) abnormal head drive plate
Change a new head drive plate
13
No ink out when
printing
a) affected by interior
temperature and humidity
Keep temperature normal
b) bad ink quality
Change good quality ink
c) Ink supply system is not good
Keep ink supply pressure normal and no
air leakage in ink tubes and connecting
parts
d) carriage moves too fast
Change printing speed
e) head drive plate is of problems Change new head drive plate
14
Color cast
a) check ink and head situation of
ink out
Ink is not matched with maintop profile or
head block
b) less than 42V
Check 42V power
c) abnormal head drive plate
Change new head drive plate
15
Error reports from
carriage and print
ends
a) 26P cables connecting not
good
Connect them again
b) servo motor reports errors
Check servo motor connecting
c) error reports from raster slip
Check raster slip position and situation.
Connecting between raster slip and
circuit plate is not good. Check Encoder
Summary of Contents for S Series
Page 12: ...9 24 DX5 1 DX5 2 DX7 1 DX7 2 XP600 1 XP600 2 ...
Page 15: ...12 24 For 5113 printhead it s the order as below ...
Page 17: ...11 24 For 5113 printhead it should be connected as below ...
Page 27: ...24 24 7 Control panel 8 Carriage connection instruction Mainboard ...
Page 30: ...27 24 ...
Page 34: ...21 24 4 11 Step Eleven Press Set As Default Printer and press OK then finish ...


