background image

40

41


Important note on disposal of batteries/accumulators: Batteries/accumulators 

may contain toxic substances that are harmful to the environment. Therefore, 

it is necessary to dispose of batteries/accumulators in accordance with 

applicable laws. Never dispose of batteries/accumulators in normal household 

waste. You can dispose of used batteries/accumulators at your dealer or at 

special recycling facilities free of charge.

12 Connecting the receiver

12.1 Connecting to power supply 

The Digital Receiver should not be connected to the mains until the unit is fully 

connected to the signal and the TV. This will prevent damage to the Digital Receiver 

or other components.

>  

After making all connections according to the following points, connect the 

receiver to the power supply. 

>  

Please ensure that the power cord is easily and quickly accessible. 

12.2 Connecting to TV set

>  

Please connect an HDMI cable to your TV and to the HDMI output of the 

Digital Receiver 

(5)

. If your TV is properly equipped, it will automatically switch 

to HDMI input when the digital receiver is turned on. Optionally you can also 

connect your receiver to your TV set in analogue mode (connection with 

EURO-SCART cable 

(6)

). 

12.3 USB slot

The USB socket (3) is used for software updates, recording and multimedia playback 

(music, videos, photos).

The receiver supports all types of hard drives up to 1TB in external enclosures that 

are equipped with an independent power supply. The only condition is that the hard 

drive has one primary partition that is formatted in NTSF (recommended) or FAT32.

We recommend that you regularly archive your data on a PC. A large number of files 

with recordings may slow down cooperation with the receiver (slow loading of the 

file list).

12.4 Connecting the antenna cable

> Connect the cable from your DVB-T/T2 antenna to the RF-Input of the receiver 

(4)

.

Please also refer to the 

Antenna Setup

 item in the User Manual.
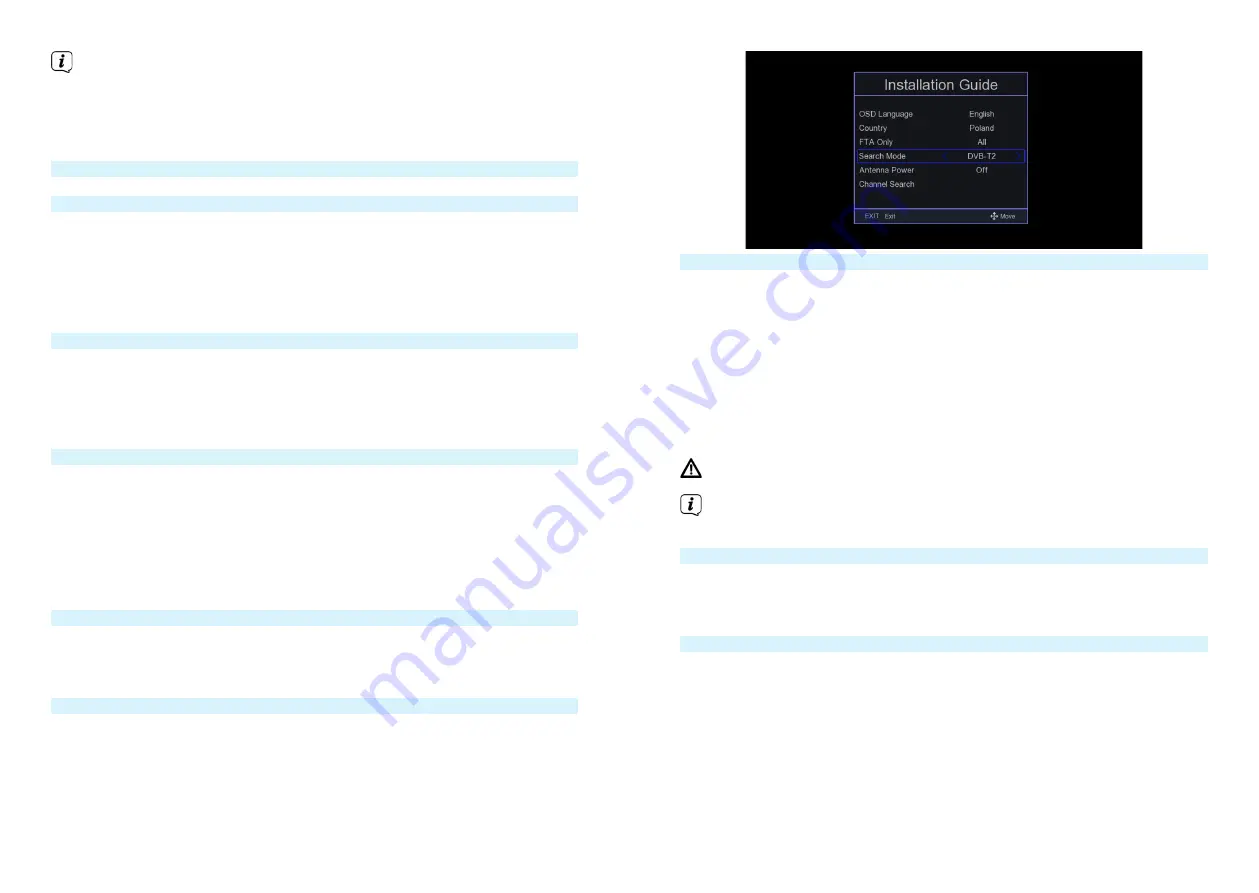
12.5 First start-up

The receiver must be configured during initial startup. 

>  

With the arrow buttons, select the menu language and the country in which  


the receiver will operate. 

>  

Then use the OK button to confirm your selection. The receiver starts    


searching for available programmes.

13 Basic operation

Dear Customer, the following points will introduce you to the user interface that 

allows you to use many of the receiver's settings and functions. Some buttons on 

the remote control give you direct access to the functions of the unit. Some of these 

buttons are labeled, for example EPG, MENU, OK, or colored for ease of use. Other 

buttons are multi-functional and their operation depends on the menu location 

selected by the user. Below is a brief description of how to use some of the unit's 

functions available through the menus.

1. The up/down arrow keys move the cursor up and down in the menu.

2. The left/right arrow keys move the cursor left and right. 

3. The EXIT key is used to exit a menu or function.

4. When using a submenu, the OK key is used to confirm the selection.

  Caution - Indicates an important note that must be followed to avoid 

malfunction or unintended operation of the unit.

  Note - Indicates a note about the function being described, as well as a 

related function.

13.1 Turning the device on / off

>  

If the unit is in standby mode, you can turn it on by pressing the On/Standby 

button on the remote control.

>  

To turn on the receiver, press the On/Standby button again.

13.2 Calling up the main menu and menu navigation

The following example shows how to access the main menu and call up the 

submenus. The purpose of the example is to call up the screen setup menu.

>  

When you press the Menu key, the main menu on the screen opens first.

Summary of Contents for TERRABOX T3

Page 1: ...1 Instrukcja obs ugi TERRABOX T3 Odbiornik DVB T2 z funkcj nagrywania na dysk USB...

Page 2: ...gi Z tego powodu nale y od czasu do czasu odwiedza stron g wn TechniSat aby pobra najnowsz wersj instrukcj obs ugi yczymy Pa stwu du o przyjemno ci z korzystania z TechniSat TERRABOX T3 Zesp TechniSat...

Page 3: ...a powinny si znajdowa 3 5 cm od siebie zwr cone do siebie nadajnikami Po zaprogramowaniu przycisku czerwona dioda LED przestaje miga i zaczyna wieci sta ym wiat em Pilot jest gotowy do programowania k...

Page 4: ...te Nie nale y umieszcza na urz dzeniu adnych pal cych si przedmiot w np zapalonych wiec Nie nara a urz dzenia na kapanie lub rozpryskiwanie oraz nie umieszcza na nim przedmiot w wype nionych cieczami...

Page 5: ...le y od czy urz dzenie od sieci elektrycznej i wyj kabel antenowy Przed od czeniem urz dzenia od sieci elektrycznej nale y najpierw prze czy je w stan czuwania i odczeka a za wieci si czerwona dioda L...

Page 6: ...nie danych na komputerze PC Du a liczba plik w z nagraniami mo e spowolni wsp prac z odbiornikiem powolne adowanie listy plik w 3 4 Pod czenie przewodu antenowego Prosz pod czy przew d z anteny DVB T...

Page 7: ...e y wybra odpowiedni opcj przyciskiem numerycznym i potwierdzi przyciskiem OK na wybranym kanale aby m c z niej korzysta Usuwanie programu z listy W celu usuni cia programu nale y wcisn przycisk 1 Del...

Page 8: ...walaj ce na zmian wygl du menu U ytkownik ma mo liwo zmiany prze roczysto ci jasno ci chromy kontrastu czy te czasu wy wietlania info banera Ustawienia LED Menu to pozwala na sterowanie m in jasno ci...

Page 9: ...rafi zasili wzmacniacz antenowy napi cem 5V W celu zasilenia wzmacniacza napi ciem 5V prosz przej przy pomocy przycisk w strza ek w g r d na pozycj Zasilanie anteny Przy pomocy przycisk w strza ek w p...

Page 10: ...obs uguje wi cej ni jedn cie k d wi kow odbiornik domy lnie b dzie szuka w tej kolejno ci cie ek d wi kowych w wybranych j zykach J zyk napis w podobnie jak w przypadku cie ek d wi kowych okre la on...

Page 11: ...wierdzi plik aktualizacji na dysku USB Po wybraniu cie ki do pliku prosz rozpocz aktualizacj wybieraj c Start i potwierdzaj c przyciskiem OK UWAGA Podczas trwania aktualizacji nie wolno wy cza odbiorn...

Page 12: ...czego nagrywanego pliku Section Record Opcja ta pozwala na tworzenie i zapisywanie plik w dla funkcji Timeshift Gdy opcja jest wy czona nagrania z Timeshift nie s zapisywane Informacje o dysku Dodatko...

Page 13: ...rogramu Nale y pami ta e dost pno napis w i spos b ich wy wietlania zale y od nadawcy W celu wy wietlenia listy dost pnych napis w dla programu TV prosz wcisn przycisk SUB czerwony funkcyjny Nast pnie...

Page 14: ...Informacje prawne TechniSat niniejszym o wiadcza e urz dzenie TERRABOX T3 0000 4927 jest zgodne z dyrektyw 2014 30 UE oraz 2014 35 UE Pe ny tekst deklaracji zgodno ci UE dost pny jest na stronie inter...

Page 15: ...gwarancji nie wy czaj nie ograniczaj ani nie zawieszaj uprawnie nabywc w konsument w wynikaj cych z powszechnie obowi zuj cych przepis w prawa Uzyskanie szczeg owych informacji na temat Produktu w ty...

Page 16: ...30 Og lne Wymiary obudowy odbiornika 142 mm x 84 mm x 30 mm Waga odbiornika 174 g Pilot Wymiary pilota 182 mm x 49 mm x 23 mm Funkcja MEMORY TAK 4 programowalne przyciski...

Page 17: ...User manual TERRABOX T3 DVB T2 receiver with USB recording function...

Page 18: ...age from time to time to download the latest version of the user manual We wish you much pleasure in using the TechniSat TERRABOX T3 TechniSat team Contents 1 Pictures and description of the device 4...

Page 19: ...ontrol The TV remote control and the decoder remote control should be 3 5 cm apart with their transmitters facing each other Once the button is programmed the red LED stops flashing and turns solid Th...

Page 20: ...heat escapes from the interior must be uncovered Do not place any burning objects such as lighted candles on top of the unit Do not expose the unit to dripping or splashing and do not place objects f...

Page 21: ...on Backing Up Data We recommend removing all memory media or data carriers before returning the receiver to a specialist dealer for repair Restoring data is not part of maintenance or repair work Tec...

Page 22: ...ile list 12 4 Connecting the antenna cable Connect the cable from your DVB T T2 antenna to the RF Input of the receiver 4 Please also refer to the Antenna Setup item in the User Manual 12 5 First star...

Page 23: ...l Select the desired option with the numeric buttons and confirm with OK on the selected channel in order to use it Removing a program from the list To delete a program press 1 Del and confirm with OK...

Page 24: ...Contains an option to change the appearance of the menu User can change transparency brightness chroma contrast or display time of info banner LED display settings This menu allows you to control the...

Page 25: ...power an antenna amplifier with 5V voltage To power the amplifier with 5V switch with the up down arrow buttons to the Antenna Power position Using the right left arrow buttons select on to activate t...

Page 26: ...soundtracks If a channel supports more than one audio track by default the receiver will search for audio tracks in the selected languages in that order Subtitle language similar to audio tracks this...

Page 27: ...lect File Path and confirm update file on USB disk After selecting the file path start the update by selecting Start and confirming with OK CAUTION Do not disconnect the receiver from the power supply...

Page 28: ...ngle recorded file Section Record This option allows you to create and save files for the Timeshift function When this option is disabled Timeshift recordings are not saved HDD information Additionall...

Page 29: ...or the program Please note that the availability of subtitles and the way in which they are displayed depends on the broadcaster To display the list of available subtitles for a TV program press the S...

Page 30: ...delay 15 Legal information TechniSat hereby declares that the TERRABOX T3 0000 4927 complies with Directive 2014 30 EU and 2014 35 EU The full text of the EU Declaration of Conformity is available at...

Page 31: ...hort circuits in the power supply The provisions of the guarantee do not exclude limit or suspend the rights of purchasers consumers arising from generally applicable law Obtaining detailed informatio...

Page 32: ...60 Netto weight 174 g Remote controller Dimensions 182 mm x 49 mm x 23 mm MEMORY function YES 4 programmable buttons...

Reviews: