background image

12

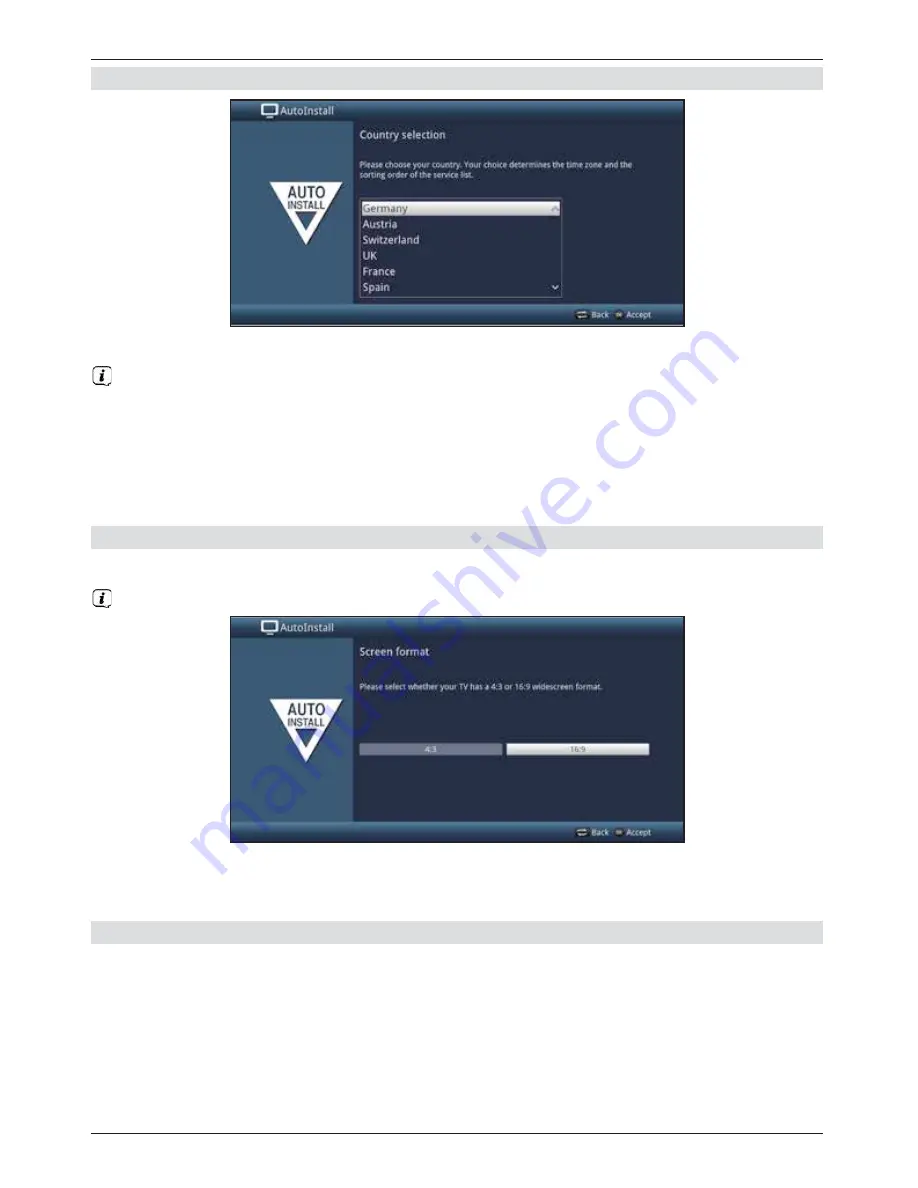
Country selection

Use the 

arrow keys

 to select the country where the device is to be operated.

  Automatic setting of the local time as well as changing to summer/winter time will take 

place based on your selection. 

Channels will also be automatically sorted in the installation wizard according to this 

setting as well as following a channel search.

Press the 

OK

 key to accept the selection.

Picture format

Use the 

right/left arrow keys

 to set the picture format for the connected TV.

  The picture format on the TV will be automatically adjusted according to your selection.

Confirm with the 

OK

 key to accept the selection.

Antenna signals

In this section in the installation wizard, select how many antenna cables are connected to 

the receiver.

Summary of Contents for Digit ISIO S2

Page 1: ...igitaler Twin HD Receiver mit Internetzugang DiSEqC 1 2 K BDA_Digit ISIO S2 DVB30 _RC3 qxd 13 05 2014 10 45 Seite 1 Quick start manual Digit ISIO S2 Digital Twin HD Receiver with Internet access With...

Page 2: ...ecording EPG Page up Back TV Radio mode Rewind Info Fast forward Channel Volume Menu Zoom Format Function keys 0 AV source selection Stop DVR Arrow keys Pause playback Options selection Function selec...

Page 3: ...card manufacturer s instructions Insert the smartcard you want into the relevant CI module Now carefully insert the CI module into the slot Rear of TV LNB 1 input LNB 2 input Audio outputs analogue di...

Page 4: ...ng functions may be changed For this reason you should occasionally visit the TechniSat homepage to download the latest version of the operating manual We wish you many years of viewing pleasure with...

Page 5: ...ght tingling To prevent such discharge current mains operated devices receivers TVs etc must always be installed or connected with the power switched off i e all devices must be disconnected from the...

Page 6: ...tes on operation Operation of the digital receiver is simplified by the use of so called On Screen Displays OSD This also means that the number of keys on the remote control unit is reduced All functi...

Page 7: ...irely of recyclable materials Please sort the components appropriately and dispose of them in line with your local waste disposal regulations At the end of its useful life this receiver may not be dis...

Page 8: ...note that the LNB must be connected with LNB Input1 when operating with an antenna signal c LNB 2 connection to the LNB Input 2 on the DVB receiver d HDMI connection from the DVB receiver to the TV e...

Page 9: ...enna Settings as well 4 2 2 Operating with 1 antenna signal In exceptional cases you can also operate the receiver using just one antenna signal However in this event the recording and PiP functions a...

Page 10: ...nctions sections 8 19 8 20 and 8 21 to access MPEG MP3 and JPG files and the like on the USB storage medium You can also insert a WLAN dongle e g the TechniSat USB WLAN Adapter part no 0000 3633 or th...

Page 11: ...ress the OK key to accept the preselected settings and move on to the next step of the installation By pressing the Back key you can go back to the previous installation step so you can correct any wr...

Page 12: ...allation wizard according to this setting as well as following a channel search Press the OK key to accept the selection Picture format Use the right left arrow keys to set the picture format for the...

Page 13: ...guration of your antenna If you want to accept the default antenna setting press the OK button If the configuration of your reception equipment does not conform to the default setting press the Option...

Page 14: ...Info button If you want to check or modify the network settings press the Options key Use the up down arrow keys to select whether you want to configure a LAN or WLAN network and press the OK button N...

Page 15: ...ftware available you can press the OK button to go to the next step in the installation wizard If on the other hand new TV software is found the automatic software update can be started by pressing th...

Page 16: ...field then start the channel search process by pressing the OK button In this search all selected satellites in the antenna configuration are automatically scanned for channels This procedure may tak...

Page 17: ...elect another regional programme for a programme provider according to section 8 4 4 this will be saved in the same way for this programme provider ISIO Internet list updates The receiver has a pre pr...

Page 18: ...to select any of the following options Cancel The Ts Cs are closed and you can now decide whether you cant to switch watchmi on or off The default selection is set to on Reject The Ts Cs are closed a...

Page 19: ...select all broadcasters at once To confirm your selection press the green function key You can change these settings again at any time You can find the options under section 11 Loading EPG data Our d...

Page 20: ...he device is also in standby mode at this time You can also run the update manually at any time section 14 6 Product registration In this step you can register your product By doing so you will secure...

Page 21: ...current functions In this instruction manual the terms shown in the OSD as well as the buttons to be pressed are distinguished from the rest of the text by the print format used Warning indicates an i...

Page 22: ...Select the Settings menu item by using the arrow keys to move the highlight to this item Press the OK button to open the Settings menu Use the up down arrow keys to highlight the Picture settings ite...

Page 23: ...m line to line and to move upwards and downwards page by page using the page up down buttons You will see the so called menu path in the uppermost line of the menu This shows you the menu you are curr...

Page 24: ...nfirm your selection by pressing the OK button Changes will now be saved or discarded according to your selection and you move back to the next menu level up Alternatively Press the Menu button to lea...

Page 25: ...e the value is changed using the selection list Press the OK button to open the selection list Highlight the setting you want using the up down arrow keys By pressing the up down arrow keys it is poss...

Page 26: ...keyboard The keyboard now appears in alphabetic form You can switch to the QWERTY keyboard and back to the alphabetic keyboard by pressing the Option button You can now enter the term you want as fol...

Page 27: ...u want with the highlight you can then begin selecting the next character immediately since in this case the character is directly added to the term If you wish to continue directly selecting a charac...

Page 28: ...g any changes simply press the Options button until it is hidden 7 Operating the unit 7 1 Switching on Switch the digital receiver on by pressing the On Stand by button either on the receiver panel or...

Page 29: ...el list navigator then appears In TV mode only TV channels are shown and in radio mode only radio channels are shown The channel currently selected is highlighted You can view additional data about th...

Page 30: ...adcaster please refer to section 8 5 3 as well 7 3 5 Return to last channel selected Press the Back button on the remote control to return to the last channel selected Press the button again to return...

Page 31: ...t Ensure that the gold coloured chip on the smartcard is facing upwards in the direction in which the card is inserted Note section 8 5 in the instruction manual as well when doing so 7 5 Volume contr...

Page 32: ...amme provider is offering an HbbTV application Switch to a channel that is broadcasting HbbTV data After a few seconds the box appears at the lower right of the screen indicating the availability of H...

Page 33: ...igital receiver on and off to record the selected programme onto the selected recording medium while you are out according to section 10 4 1 If the device is switched on by the DVR timer this will be...

Page 34: ...sic Music navigator access MP3 titles stored on a device connected to the USB port or on a shared network drive or available via UPhP section 8 19 Pictures Pictures navigator access JPEG files stored...

Page 35: ...fting 8 1 Instant recording Switch to the channel on which the programme you want to record is being broadcast Press the Record button to record the current programme Press the Pause playback button t...

Page 36: ...vigator Starting DVR playback The DVR Navigator can be called up in the following ways Depending on whether you are currently in TV or radio mode a list will appear of the existing TV or radio recordi...

Page 37: ...ay button during playback Press the Pause Playbutton again to resume playback from the same location 8 5 6 Fast forward rewind Your DVR has fast forward and rewind functions so you can get to a specif...

Page 38: ...8 5 8 Skipping to tags During playback you have the option of navigating directly to locations in the recording where you have set tags Using the Tag menu item in the Options selection select the tag...

Page 39: ...7 Scart plug not connected correctly Connect Scart plug properly Picture not fully visible or distorted Picture format not correctly set Check picture format see section 7 3 1 Wrong picture display zo...

Page 40: ...ite e g a tree Mount dish with clear line of sight No picture no sound display on Short circuit in LNB connection Switch off receiver resolve short circuit switch receiver back on Faulty or missing ca...

Page 41: ...ains adapter from the receiver Press and hold Standby and the up arrow key on the device at the same time Reinsert the mains adapter while Standby and the up arrow key are pressed down Keep both butto...

Page 42: ...stem on storage medium is damaged Check storage medium section 10 4 2 DVR recordings are not displayed Selected storage medium is not attached Connect configured storage medium see section 10 4 1 Modi...

Page 43: ...43...

Page 44: ...ent replacement device Tobesureofenjoyingyourwarrantyinfull makeabsolutelysurethatonlyoriginalTechniSataccessories such as cables plugs etc are used during installation Invalidation of the warranty cl...

Page 45: ...s that are not included with delivery in the original packaging along with a proof of purchase copy of invoice or till receipt and the completed Service Report The Service Report will be returned to y...

Page 46: ...e box or directly on the equipment Item number Serial No Please note that a repair under warranty can only be carried out quickly and smoothly if this Service Report is completed in full and submitted...

Page 47: ......

Page 48: ...trademarks of TechniSat Digital GmbH PO Box 560 54541 Daun Germany www technisat de Technical Hotline Mon Fri 8am 7pm 49 0 3925 9220 1806 0 14 EUR Min from a German landline up to 0 42 Euro Min from...

Reviews: