background image

English

   - 19 -

buttons to read the entire text. To turn this feature off 

highlight 

Turn Off

 and press 

Select

.

Collect App and Broadcast Usage Data

: Allows 

Amazon to collect information relating to your use of 

broadcast TV content, as well as the frequency and 

duration of your use of third-party apps. The default 

setting is 

ON

 (Allow). Highlight and press 

Select

. You 

will be informed about this feature. To turn this feature 

off highlight 

Turn Off

 and press 

Select

.

Interest-based Ads:

 If you opt out of interest-based 

ads on your TV, apps will be instructed not to use the 

advertising ID to build profiles for advertising purposes 

or target you with interest-based ads on your TV. The 

advertising ID is a resettable identifier that can be used 

to build profiles or show you interest-based ads. The 

default setting is 

ON

 (Allow). Press 

Select

 to turn off.

Your Advertising ID:

 Shows your Advertising ID 

on the right hand side of the screen. Press 

Options


button to reset your ID. A confirmation dialogue will 

be displayed. Highlight 

OK

 and press 

Select

 to reset. 

This option will be available if the 

Interest-based Ads


option is set to 

ON

.

Data Monitoring

You can manage all your data usage here. 
Highlight 

Data Monitoring

 and press 

Select 

to switch 

on and adjust any settings. Data monitoring is set to 

OFF

 as default. 

Data Monitoring:

 Switching on allows you to monitor 

your data consumption. The default setting is 

OFF

.

Set Video Quality: 

This allows you to choose the 

video quality on Amazon Video. The default setting is 

Best

. Available options are 

Good

 (least amount of data 

used), 

Better

 and 

Best

 (most amount of data used).

Set Data Alert:

 Set a data limit and receive on-screen 

alerts when consumption reaches 90% and 100% of 

the limit. This is just an alert and will not block data 

consumption.

Monthly Top Data Usage:

 Displays a list of your apps 

and shows individual data usage for the monthly billing 

cycle specified in the 

Set Data Alert

 option. 

Notification Settings

You can manage all your notifications here, turn off 

all notification pop-ups or block/unblock notifications 

from specific apps. 

Highlight 

Notification Settings

 and press 

Select

To switch on/off notification pop-ups highlight 

Do Not 

Interrupt

 and press 

Select

.

To block or unblock notifications from individual apps, 

highlight 

App Notifications

 and press 

Select

. You'll 

see a list of your apps, it will show if notifications are 

ON

 or 

OFF

. To adjust this highlight an app and press 

Select

 to switch between 

ON

 and 

OFF

.

Featured Content

The  Home  screen  has  featured  content  at  the  top, 

when you select this content it will play a preview of 

the content. In this menu you can choose if the content 

plays or not and also switch the audio of this content 

on and off.

Highlight 

Featured Content

 and press 

Select

Highlight either 

Allow Video Autoplay

 or 

Allow Audio 

Autoplay

 and press 

Select

 to switch the feature on or 

off. The default setting is 

ON

 for both.

Allow video autoplay
ON -

 The video will automatically play. 

OFF -

 A still image will appear and no audio will be 

heard. 

Allow audio autoplay 
ON -

 Audio will be heard when the video plays. 

OFF -

 No audio will be heard when the video plays.

Auto Power Off 

Your TV will automatically switch off after 4 hours of 

no activity. This feature is to help save energy if your 

TV was accidentally left on. If you have been watching 

your TV for 4 hours without pressing any buttons, a 

warning will appear telling you its about to turn off. If 

you wish to continue watching at this stage highlight 

OK

 and press 

Select

.

To switch off this feature, highlight 

Auto Power Off


and press 

Select

. Your TV will now not switch off after 

4 hours of inactivity.

Location 

Its handy that your TV knows where it is in the world 

so when you ask Alexa a question like 'Alexa, what’s 

the weather outside?' it can tell you the weather in 

your location. 
Highlight 

Location

 and press 

Select

.

Enter your Postcode using the onscreen keyboard 

then select 

Next

 and press 

Select

. Your location will 

now be saved.

Time Zone

In this menu you can set your clock to display as a 24 

hour clock and you can also change your time zone. 

Highlight 

Time Zone

 and press 

Select

.

To switch 24 hour time format on/off highlight 

24-Hour 

Time

 and press 

Select

To change your time zone, highlight 

Time Zone

 and 

press 

Select

Sync Date and Time 

Your TV will automatically synchronise date and time 

with an internet time server. If you switch this feature 

off your TV will sync with broadcast time. This may 

Summary of Contents for 43551FIRE

Page 1: ...43551FIRE COLOUR TELEVISION WITH REMOTE CONTROL OPERATING INSTRUCTIONS ...

Page 2: ...tomising TV Settings 10 Adjusting the Picture Settings 10 Picture Menu Content 10 Adjusting the Sound Settings 11 Sound Menu Content 12 Settings 12 Inputs 12 Notifications 13 Network 13 Display Sound 14 Applications 15 Equipment Control 16 Live TV 16 Remotes Bluetooth Devices 17 Alexa 18 Preferences 18 Sleep Timer 20 Device Software 20 Accessibility 21 Help 21 My Account 21 Channel List 22 Channel...

Page 3: ... other cords When damaged it must be replaced this should only be done by qualified personnel Do not expose the TV to dripping or splashing of liquids and do not place objects filled with liquids such as vases cups etc on or over the TV e g on shelves above the unit Do not expose the TV to direct sunlight or do not place open flames such as lit candles on the top of or near the TV Do not place any...

Page 4: ...d the television set to a suitable support NEVER place the television set on cloth or other materials that may be located between the televi sion set and supporting furniture NEVER place items that might tempt children to climb such as toys and remote controls on the top of the television or furniture on which the television is placed The equipment is only suitable for mounting at heights 2 m If t...

Page 5: ... a higher dy namic colour and contrast range Dolby Vision presents amazing true to life images with stunning detail that other post processing technologies in the TV aren t able to produce Dolby Vision is supported via native and market applications HDMI and USB inputs When the input source is set to the related HDMI input high light the related HDMI option in the Home Settings Display Sounds Pict...

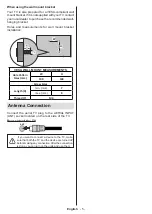
Page 6: ...t installation W H VESA WALL MOUNT MEASUREMENTS Hole Pattern Sizes mm W H 100 100 Screw Sizes Length X min mm 7 max mm 8 Thread Y M4 Antenna Connection Connect the aerial TV plug to the AERIAL INPUT ANT socket located on the rear side of the TV Rear side of the TV ANT If you want to connect a device to the TV make sure that both the TV and the device are turned off before making any connection Aft...

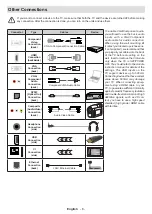
Page 7: ...e VGA Component audio you will need to use the back audio inputs with a VGA Component audio cable for audio connection When using the wall mounting kit contact your dealer to purchase one if not supplied we recommend that you plug all your cables into the back of the TV before mounting on the wall Insert or remove the CI module only when the TV is SWITCHED OFF You should refer to the module instru...

Page 8: ...tton to display the function options menu and then press the button consecutively to move the focus to Volume Up or Volume Down option Press and hold the button to increase or decrease the volume To change channel in Live TV mode Press the control button to display the function options menu and then press the button consecutively to move the focus to Channel Up or Channel Down option Press and hol...

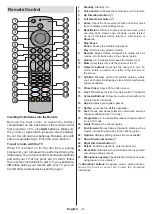
Page 9: ...d Play Starts to play selected media 8 Rewind Moves frames backwards in media such as movies scrolls back a day in the channel guide 9 Volume Increases decreases the volume level 10 Mute Completely turns off the volume of the TV 11 Numeric buttons Switches the channel in Live TV mode enters a number or a letter in the text box on the screen 12 Subtitle Displays audio and subtitle options where you...

Page 10: ...gistered you will be asked whether you want to use the account you signed in You can choose to change the account read the terms and conditions which will be accepted if you continue at this point Highlight the symbol with three dots next to the texts at the bottom side of the screen and press Select to read and learn more about the related subject Highlight Continue and press Select button to pro...

Page 11: ...ct a row then move the focus to the desired item in the row Press Select button to make a selection or to enter a sub menu The main screen will be opened with the Home tab On the upper side of the screen search tool will be located along with other tab options You can choose either to type a word to start a search via the virtual keyboard or try voice search option if your remote has a built in mi...

Page 12: ... setting is Medium Highlight your desired setting then press Select Adaptive Luma Control Makes higher depth impression by enhancing dark and bright areas Adaptive Luma Control has 4 different setting Off Low Medium Strong The default setting is Low Highlight your desired setting then press Select Local Contrast Control Divides each frame to small regions and applies independent contrast curves fo...

Page 13: ...o Settings The settings menu is split into separate menus to make it easy for you to find what you re looking for Inputs Use the Inputs menu to change between inputs and also select the Media Player from here if you have a USB Drive connected to one of the USB sockets Accessing the Inputs Menu You can access the Inputs menu through the Settings menu on the main screen Press the Home button to sele...

Page 14: ... Appstore menu Press Select to turn off the notifications related to Appstore Notification Settings In order to configure the notification settings clear all notifications first Press the Options button while No new notifications message is displayed on the screen then highlight Settings and press Select to see available options 2 options will be available Use the Do Not Interrupt option to hide o...

Page 15: ...put and press Select TV Speakers In the TV Speakers menu you can switch your TV s built in speakers on or off You may wish to switch them off if you have connected a soundbar Highlight TV Speakers and press Select to switch the TV Speakers on or off Digital Audio Format Depending on the type of audio device you have connected you may need to adjust the audio format that your TV outputs The audio f...

Page 16: ...gress can be saved on the cloud by Whispersync you can switch this on or off using the GameCircle option Highlight GameCircle and press Select Highlight Whispersync for Games and press Select to switch on or off The default setting is ON Appstore This menu allows you to control your app setting such as auto updates in app purchases and how to open external market links Highlight Appstore and press...

Page 17: ...evice Highlight Soundbar or Receiver and press Select You will now see a list of settings Highlight the setting that you wish to adjust and press Select Volume Increments Set the amount the volume increases or decreases when you askAlexa to change the volume The default increment is set to 4 Press Rewind or Fast Forward to increase or decrease the increments Press Option to restore back to default...

Page 18: ...and press Select Parental Controls Press Select to switch parental controls on or off PIN Protect Purchases Asks for a PIN before any video apps or games purchases Press Select to turn on or off Prime Video Ratings Restricts viewing of videos based on ratings The default setting for General and Family rating is On for Teen Young Adults and Mature ratings is Off Highlight the desired rating option ...

Page 19: ...amples of what you can use Alexa for look in this section You will find many ideas Highlight Things to Try then press Select you will see a list of things to try Highlight something in the list and then press Select to see more information Turn on TV with Alexa If you have another Alexa Enabled device it can be allowed to be used to control your TV You will need to set Turn on TV with Alexa option...

Page 20: ... press Select To switch on off notification pop ups highlight Do Not Interrupt and press Select To block or unblock notifications from individual apps highlight App Notifications and press Select You ll see a list of your apps it will show if notifications are ON or OFF To adjust this highlight an app and press Select to switch between ON and OFF Featured Content The Home screen has featured conte...

Page 21: ...r current software version and when it was last updated Press Select to check for any new updates USB Drive This menu will show you the available space on your drive You will also be able to eject or format the drive This menu will only appear if you have a USB drive connected Highlight USB Drive the space available will be shown on the right hand side of the screen Ejecting a USB Drive Highlight ...

Page 22: ...r Audio Description This setting controls the volume of the descriptive track related to the normal track for over the air channels and Prime Video content Highlight Audio Description and press Select Highlight the option you want and press Select to set You can set Over the Air Channels option to Off Low Medium or High and the Prime Video option to ON or OFF Help If you are struggling to understa...

Page 23: ...l have the choice here to filter via one of these options For example if you select Terrestrial than you ll only see Terrestrial channels in the guide Highlight the option you want and press Select After filtering channels Show All Channels option will be available in the options menu instead of Filter Channels option You can use this option to cancel filtering in the channel list Add to Favourite...

Page 24: ...cess Connect using WPS Push Button option will be available instead of Join Network Using WPS Button option Enter WPS PIN on your router Highlight Join Network Using WPS PIN option and press Select A code will be created and displayed on the screen Enter this code on your router Your TV will connect to your router without the use of a password Note During the initial setup process Connect using WP...

Page 25: ...7 Display 43 Operation temperature and operation humidity 0ºC up to 40ºC 85 humidity max Wireless LAN Transmitter Specifications Frequency Ranges Max Output Power 2400 2483 5 MHz CH1 CH13 100 mW 5150 5250 MHz CH36 CH48 200 mW 5250 5350 MHz CH52 CH64 200 mW 5470 5725 MHz CH100 CH140 200 mW Country Restrictions This device is intended for home and office use indoors in the UK The device may be used ...

Page 26: ...t subsidiary The Bluetooth word mark and logos are registered trademarks owned by the Bluetooth SIG Inc and any use of such marks by Vestel Elektronik Sanayi ve Ticaret A S is under license Other trademarks and trade names are those of their respective owners Amazon Alexa Fire Prime Video and all related logos are trademarks of Amazon com Inc or its affiliates Disposal Information European Union T...

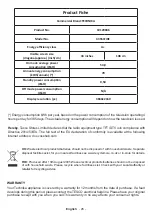
Page 27: ... consumption kWh annum 78 Standby power consumption Watt 0 50 Off mode power consumption Watt N A Display resolution px 3840x2160 WARRANTY Your Technika appliance is covered by a warranty for 12 months from the date of purchase If a fault develops during this period please contact the TESCO electrical help line Please have your original purchase receipt with you when you call This warranty in no w...

Page 28: ...50540119 Product Support For help setting up your product or for FAQs and trouble shooting support please visit www Tesco com productsupporttesco alternatively call 0800 323 4060 ...

Reviews: