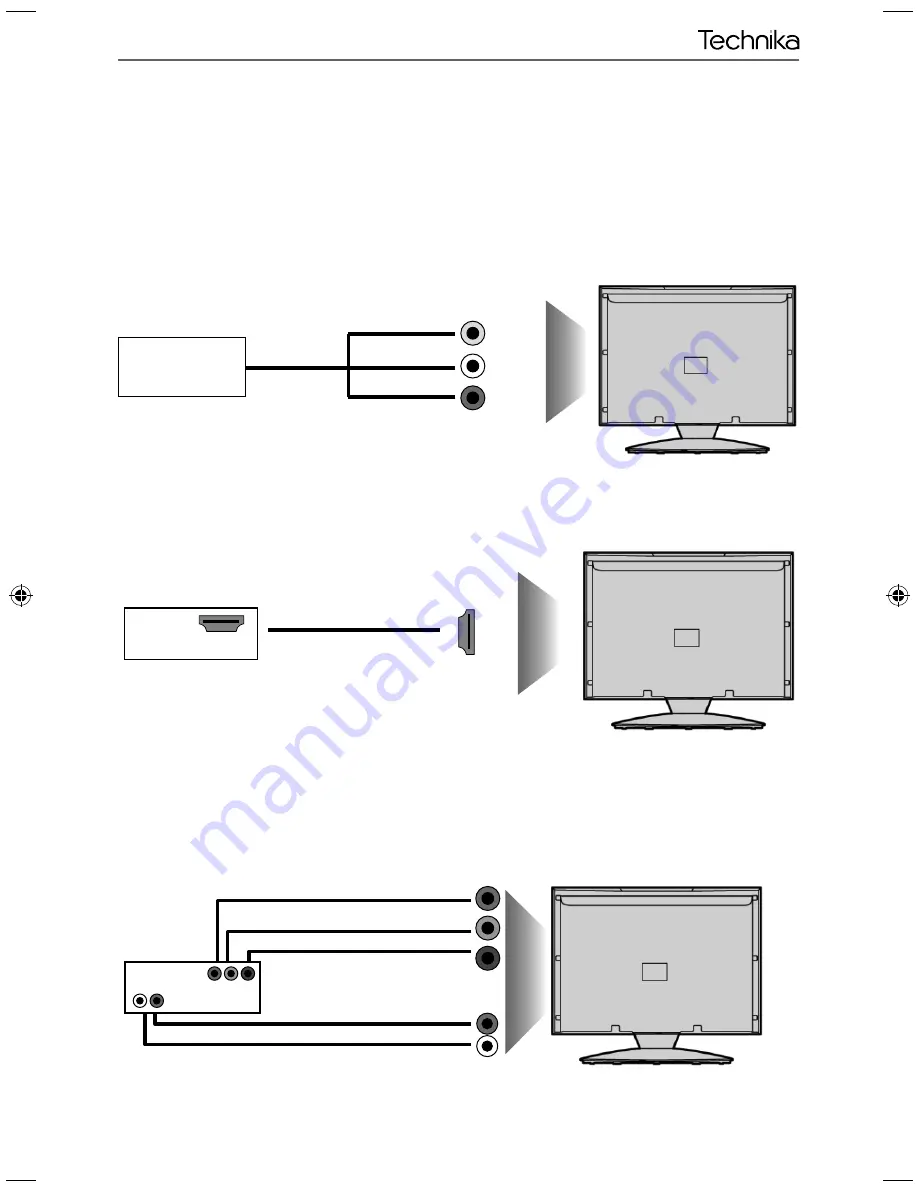
background image

15

15

Connections

CONNECTIONS 

Connecting a Camcorder, Camera or Games Console 

Source should be set to Video

Connecting a High Defi nition (HD) Device

Option 1

 - via HDMI to HDMI cable

A HDMI cable can output both video and audio and enables you to enjoy digital-quality video and audio 
with minimal loss of quality. 

TVs Input/Source should be set to HDMI.

Option 2

 - via Component cable

If you are supplied with a cable from the device which has RED, GREEN, BLUE, RED & WHITE connectors 
you must connect via Component (for picture) and by phono cable (for sound).

TV Source should be set to Component.

Component (HD)


Component 

Green 

Blue 

Red 

Audio L/R 

White 

Red 

Audio 
In L/R


Camera or 

Camcorder 

Yellow 

White 

Red 

Audio 
In L/R 

Video


HDMI OUT

HDMI

User Guide -Tesco ROI - 19-248 22-248 I.indd   Sec1:15

User Guide -Tesco ROI - 19-248 22-248 I.indd   Sec1:15

3/14/2013   3:09:25 PM

3/14/2013   3:09:25 PM

Summary of Contents for 19-248I

Page 1: ...19 248I 22 248I 22 248IW HD Ready LED TV with Saorview USB Media Player Model No User Guide ...

Page 2: ...r the item and then return it to you If we believe we cannot offer a permanent repair we will replace the item Sky Media UK LTD Helpline Information Telephone UK 0871 2000 463 ROI 01443 3940 Web support www skymediauk co uk The telephone opening hours are Monday to Friday 8 30am to 6pm Saturday 9am 5pm You must retain all packaging materials in addition to your proof of purchase receipt as you wil...

Page 3: ...d on top of the power cable as the weight of the television may damage the cable and cause a safety hazard Never place mobile phones speakers or any other device which may cause magnetic or radio interference with the television If interference is apparent move the device causing the interference away from the television To disconnect the apparatus from the mains please use the all pole mains swit...

Page 4: ...ageing of the screen Time Displays Teletext Do not view a stationary page for long period of time TV DVD Menus e g Listings of DVD disk content Pause Mode Do not leave the TV in pause mode for long periods of time e g When watching DVDs or videos Important Once shadow image screen burn occurs it will never disappear and is not repairable under warranty How do I dispose of this product UK Waste ele...

Page 5: ...et Up 11 TV Buttons and Input Source Menu 12 Remote Control 13 Connections 14 15 TV Menu Operation 16 21 Channel Menu 16 Picture Menu 17 18 Sound Menu 19 Time Menu 20 Lock Menu 21 Option Menu 22 PC Operation 24 25 7 Day TV Guide 26 USB Mode Media Player 27 General Information 28 31 Using your TV with a digital set top box 28 Frequently Asked Questions 29 Technical Specifications 30 Index 31 ...

Page 6: ...ble to package it correctly The safest way to package your item in the event of warranty service repair is in it s original box packaging WHAT IS INCLUDED IN THE BOX 1 x User Guide 1 x Quick Start Guide 2 x AAA Batteries 1 x TV 1 x Remote Control User Guide Quick Start Guide 1 x Stand 1 x Stand neck plus screws 1 x RF Cable Accessories Included with this TV are the following accessories ...

Page 7: ... wall mounting the TV higher than eye level the TV should be tilted downwards so that the TV s screen is face on See fig 1 and 2 Important If wall mounting this TV only use the screws already provided in the wall mounting holes Using other screws which are longer could cause irreparable damage to internal parts TV Viewing angle Viewing angle INCORRECT CORRECT 45 45 90 a d e b c 4 x M4x10 M4x8 For t...

Page 8: ...Fig B 4 Insert the batteries supplied into the Remote control and press the Standby button to power on the TV Tip If the TV finds some but not all of the Digital channels the TV is functioning correctly but the signal being received is not strong enough The signal strength needs to be above 85 you can see the signal strength the TV is receiving when you change channels programmes you will need to i...

Page 9: ...E MENU Choosing Mode Input Source To switch between the different input connections A Using the buttons on the remote control 1 Press SOURCE AV The source menu will appear 2 Press or to select the input you require 3 Press OK B Using the buttons on the Television 1 Press SOURCE 2 Scroll up down using CH CH buttons to the input source you require 3 Press Vol to change input source to the one select...

Page 10: ...e system settings to your preference MENU To display OSD menu EXIT To exit all menus NUMBER BUTTONS 0 9 to select a TV channel directly To return to the previous channel viewed FAV To display favourites menu VOL To increase decrease the sound level SUBTITLE To switch the dialogue at the bottom of the screen on off ASPECT To switch the screen between the different picture formats AUDIO To change th...

Page 11: ...SCART OUT RF IN RF OUT DVD or VCR HDMI 1 HDMI input SCART SCART input VGA PC Audio In 3 5mm PC audio input VGA PC VGA PC input RF IN RF TV Aerial Input COAX Audio Out Digital Coax output Video Component Video input Component HD HD input Ypbpr HDMI 2 HDMI input USB USB port CI CARD IN Common Interface Card Input Earphones Earphone Input I J K L H A B C D F E G A B C D E F G H I J K L ...

Page 12: ...ity video and audio with minimal loss of quality TVs Input Source should be set to HDMI Option 2 via Component cable If you are supplied with a cable from the device which has RED GREEN BLUE RED WHITE connectors you must connect via Component for picture and by phono cable for sound TV Source should be set to Component Component HD Component Green Blue Red Audio L R White Red Audio In L R Camera o...

Page 13: ...nal Info Displays signal strength and quality information CI Information Pay per view services require a smartcard to be inserted into the TV If you subscribe to a pay per view service the provider will issue you with a CAM and a smartcard The CAM can then be inserted into the COMMON INTERFACE PORT CI Card In To access this menu press MENU button on the remote control To enter a menu press OK If y...

Page 14: ...nd less bright User Lets you manually alter all the settings Ecohome Power saving mode which reduces the energy used by up to 25 by reducing the power to the LED LCD panel In Ecohome mode the TV will switch itself to Standby mode after 4 5 hours in the event that the TV buttons or remote control buttons are not pressed see the time menu to de activate this function Contrast Switch the balance betw...

Page 15: ...des Zoom 1 2 Original 16 9 The picture is the correct proportion but zoomed in to fill the screen Will display the picture from the broadcaster without any change Panorama Aspect Ratio Within the UK the picture format varies depending on the channel broadcast There are a number of different options to best meet your needs 4 3 Displays the 14 9 picture in the correct proportion As a result side bars...

Page 16: ...ing presets User Default settings Music Emphasises music over voices Movie Provides live and full sound for movies Personal Selects your personal sound settings Sports Emphasises sound for sports To access this menu press MENU button on the remote control To enter a menu press OK If you wish to make changes to any of the default settings use the scroll buttons To confirm any settings press OK butto...

Page 17: ...cific time for your TV to turn off On Time Allows you to set a specific time for your TV to turn on the channel it will then display the source it will be on and also the volume This function can then be toggled to repeat every day or a certain day Sleep Timer Lets you set the sleep timer so the television automatically switches off after a set amount of time Off 10min 20min 30min 60min 90min 120min...

Page 18: ...o clear Default password is 0000 Block Program Allows to completely block certain channels Parental Guidance Turns the parental guidance function on and off To access this menu press MENU button on the remote control To enter a menu press OK If you wish to make changes to any of the default settings use the scroll buttons To confirm any settings press OK button To exit this menu at anytime press EX...

Page 19: ... the amount of time the On Screen Menu stays on the screen before disappearing Blue Screen Changes the background when there is no input between clear and a blue background Only available on some sources Country Allows you the change the Reset Factory default Reset Menu System This resets the menus to factory settings Reset Menu System This clears all the TV channels from the telelvision Software ...

Page 20: ...der 6 Left click on the drop down for Screen refresh rate and select 60 Hertz if you experience picture noise or flickering select 50 hertz or 70 hertz 7 Click on Apply then click Yes and the settings will be saved 8 Now switch off your computer and connect the television as shown 9 Switch on the TV select the input source to VGA PC and re start your PC Connecting a Laptop In addition to the above ...

Page 21: ... EXIT button Auto Adjust Lets you automatically configure the television to be used as a computer monitor H Offset Changes the horizontal position of the picture V Offset Changes the vertical position of the picture Size increase picture size Phase To adjust delay time of phase in order to reduce the noise of picture Tip If the computer is left in active for a period of time the television will swi...

Page 22: ...el You can view the start and end time of all programmes and on all channels for the next 7 days and set reminders 1 Press TV GUIDE The following 7 Day TV Guide will appear 2 Navigate through the menu using You can now Set a reminder by pressing GREEN View a previous day by pressing YELLOW View the next day by pressing BLUE 3 Press EXIT to exit the 7 day TV Guide ...

Page 23: ...only has 1 partition you will only see 1 item 3 You can now access the item Press OK to view 4 While viewing you control the item using or by pressing i and using and OK USB mode offers playback of various different types of content that you have saved on your USB Memory Stick On switching to USB source the above menu screen will appear The content will be divided into Photo Music Movie and Text b...

Page 24: ...tore the Sky box channel if you still have and use analogue channels 1 5 you may for example decide that channel 6 is the best option for you 3 Press the corresponding number on the remote control to select the desired analogue channel chosen as per point 2 above 4 On the TV remote control press Menu Now navigate through the menus to select Manual Tuning or Analogue Manual tuning refer to the Tuni...

Page 25: ...is VCR DVD Recorder I have connected the TV to my VCR or DVD Recorder via SCART but it is not recording In addition to connecting via SCART you should connect the aerial cable from the wall socket to your VCR DVD Recorder and another aerial cable from the VCR DVD Recorder to the TV General Can I stop my TV turning off after 4hrs Yes 1 In the picture settings menu de select Eco home 2 In the time s...

Page 26: ...USB Mode Model 19 248I 22 248I Screen size diagonal 18 5 47cm 21 5 55cm Resolution 1366 x 768 1920 x 1080 Contrast Ratio 1000 1 1000 1 Brightness cd m2 250 cd m2 250 cd m2 PC RGB Yes RF 75 ohm Antenna PAL SECAM Video Inputs 1 x SCART 1 x Mini Video 1 x Mini Component YPbPr 1080i 2 x HDMI upto 1080P Sound Inputs 1 x 3 5mm jack for PC audio input 1 x 3 5 mini AV Audio input shared for Video Componen...

Page 27: ...Questions 29 Getting Started 11 Horizontal Position PC 25 Language 22 Manual Search 16 Noise Reduction 17 Phase PC 25 Picture Mode 17 Remote control 13 Reset to default 22 Sharpness 17 Sleep Timer 20 Sound Mode 19 Source Menu 12 System Lock 21 Technical Specifications 30 Treble 19 TV buttons 12 TV Guide 26 USB Mode Media Player 27 Using the television as a computer monitor 24 Using your TV with a S...

Page 28: ...TEC MAN 0050 ...

Reviews: