2. PRINTER SETUP
ENGLISH VERSION EO1-33034
2.8 Loading the Ribbon
E2-11
2.8 Loading the Ribbon
There are two types of media available for printing on: these are thermal
transfer media and direct thermal media (a chemically treated surface).
DO NOT LOAD a ribbon when using a direct thermal media.
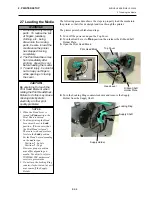
1.
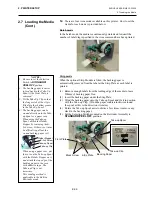
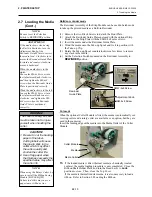
Grasp the tabs on the top and bottom of the Ribbon Stoppers and
move the Ribbon Stoppers back to the end of the Ribbon Shaft.
2.
Leaving plenty of slack between the ribbon spools, place the ribbon
onto the Ribbon Shafts as shown below.
3.
Slide the Ribbon Stoppers along the Ribbon Shafts to a position where
the ribbon is centred when fitted.
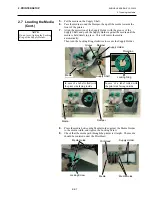
4.
Lower the Print Head Block and set the Ribbon Shaft Holder Plate
aligning its holes with the Ribbon Shafts.
5.
Take up any slack in the ribbon. Wind the leading tape onto the
ribbon take-up roll until the ink ribbon can be seen from the front of
the printer.
6.
Turn the Head Lever to
Lock
position to close the Print Head.
7.
Close the Top Cover.
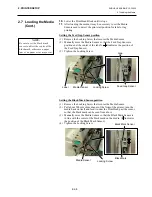
Auto Ribbon Saving Mode
When the auto ribbon saving function is selected, it will be activated to
reduce ribbon loss when a no print area extends more than 20 mm (3 or 6
ips) or 30 mm (10 ips). For further information on this function, please
ask a TOSHIBA TEC authorised service representative.
CAUTION!
Be careful not touch the
Print Head Element when
raising the Print Head Block.
Failure to do this may cause
missing dots by static
electricity or other print
quality problems.
1. Do not touch any moving
parts. To reduce the risk
of fingers, jewellery,
clothing, etc., being
drawn into the moving
parts, be sure to load the
ribbon once the printer
has stopped moving
completely.
2. The print head becomes
hot immediately after
printing. Allow it to cool
before loading the ribbon.
3. To avoid injury, be careful
not to trap your fingers
while opening or closing
the cover.
WARNING!
Ribbon Shaft
Ribbon Take-up Roll
Print Head Block
Ribbon Stopper
Ribbon Shaft
NOTES:
1. When attaching the ribbon
stoppers, make sure that the
pinchers face into the printer
2. Be sure to remove any slack in
the ribbon when printing.
Printing with a wrinkled
ribbon will lower the print
quality.
3. The Ribbon Sensor is mounted
on the rear of the Print Head
Block to detect a ribbon end.
When a ribbon end is
detected, “NO RIBBON”
message will appear on the
display and the ERROR LED
will illuminate.
NOTE:
Ribbon loss per ribbon saving
varies according to the relation
between the outer roll diameter
of the used ribbon and the print
speed.
Print speed Ribbon loss/Ribbon saving
3”/sec.
Approx. 6 mm
6”/sec.
Approx. 10 mm
10”/sec.
Approx. 20 mm
Ribbon Shaft
Holder Plate
Summary of Contents for B-SX4T-QQ
Page 3: ...TEC Thermal Printer B SX4T QQ QP Owner s Manual ...
Page 53: ...M EO1 33034 ...


