2. PRINTER SETUP
ENGLISH VERSION EO1-33034
2.7 Loading the Media
E2- 9
2.7 Loading the Media
(Cont.)
12.
There are four issue modes available on this printer. How to set the
media for each mode is provided below.
Batch mode
In the batch mode, the media is continuously printed and fed until the
number of labels/tags specified in the issue command have been printed.
Strip mode
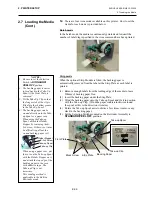
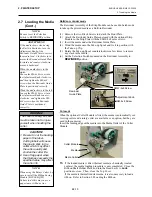
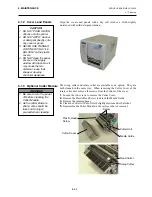
When the optional Strip Module is fitted, the backing paper is
automatically removed from the label at the Strip Plate as each label is
printed.
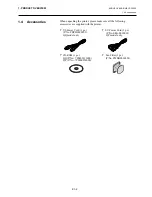
(1) Remove enough labels from the leading edge of the media to leave
500mm of backing paper free.
(2) Insert the backing paper under the Strip Plate.
(3) Wind the backing paper onto the Take-up Spool and fix it in position
with the Take-up Clip. (Wind the paper counterclockwise around
the spool as this is the direction it rotates.)
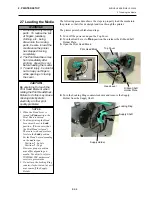
(4) Rotate the Take-up Spool anti-clockwise a few times to remove any
slack in the backing paper.
(5) Set the Selection Switch mounted on the Rewinder Assembly to
STANDARD/PEEL OFF
position.
Take-up Clip
Take-up Spool
Front Plate
Black Screw
Backing Paper
NOTES:
1. Be sure to set the Selection
Switch to
STANDARD/
PEEL OFF
position.
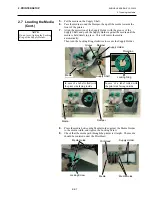
2. The backing paper is easier
to feed back to the Take-Up
Spool if the Front Plate is
removed.
3. Fit the Take-Up Clip so that
the longer side of the clip is
fitted into the shallow groove
in the Take-Up Spool.
4. The backing paper can be
wound directly onto the Take-
up Spool or a paper core.
When using the Take-up
Spool, detach the Holder
Stopper by removing the B-
3x4 screw. Otherwise, it may
be difficult to pull out the
wound backing paper roll.
Holder Stopper
B-3x4 Screw
Take-up Spool
Take-up Clip
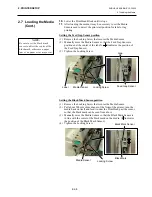
When using a paper core, put
the core on the Take-up Spool
with the Holder Stopper on it,
and attach the top edge of the
backing paper to the core
with adhesive tape. The
Take-up Clip is not
necessary.
This winding method is
applicable to the Built-in
Rewinder mode.
Strip Plate
Summary of Contents for B-SX4T-QQ
Page 3: ...TEC Thermal Printer B SX4T QQ QP Owner s Manual ...
Page 53: ...M EO1 33034 ...


