_ 5_
ENGLISH
Connections
ENGLISHENGLISH
O
Turn off the power for all equipment
before making connections.
O
Read instructions of each component
you intend to use with the CD player.
Caution:
If the CD player interferes with the tuner,
TV receiver, etc., allow a reasonable
distance between them.
ª
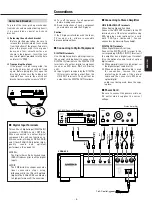
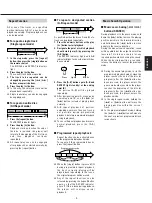
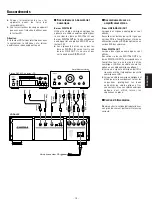
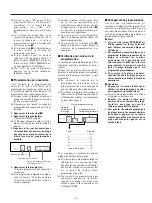
Connecting to Digital Equipment
DIGITAL IN terminals
Use the digital optical cable (optional) or
the coaxial cord (optional) to connect the
DIGITAL IN terminals to the DIGITAL OUT
terminals of another digital component
(such as an MD deck, DAT or CD drive
unit).
O
Input signals received by the DIGITAL
IN terminals will be output from the
LINE OUT terminals. They will not be
output from the DIGITAL OUT terminals.
ª
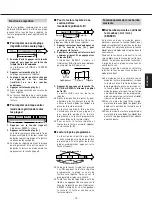
Connecting to Stereo Amplifier
LINE (ANALOG) OUT terminals
When Analog Signals Are Used,
Connect the LINE OUT terminals to the CD
terminals, etc. of the stereo amplifier using
RCA pin plug cords (optional) or a cord
with XLR-type (balanced) Cannon
connectors (commercially available).
DIGITAL OUT terminals
When Digital Signals Are Used,
Connect the DIGITAL OUT terminal to the
corresponding DIGITAL INPUT terminal if
the amplifier has a digital input terminal.
(Use the optional coaxial cord or optical
digital cable.)
O
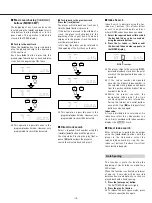
When a digital signal is to be output, set
the digital output switch to ON.
O
When an optical digital cable is used
for connection, remove the caps
protecting both ends of the optical
cable and the connectors. When an
optical digital
cable is not being used, leave the caps
in place.
∑
Power Cord
Be sure to connect the power cord to an
AC outlet which supplies the correct
voltage.
Stereo Amplifier
VRDS-25X
To AC outlet
DAT, MD Deck or CD Drive unit
Digital
optical cable
Digital optical
cable
RCA pin cord
Coaxial
cord
Coaxial
cord
XLR plug cord
XLR plug cord
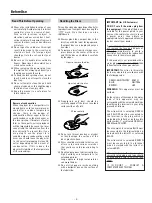
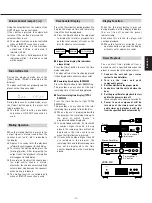
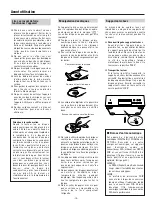
To protect the laser pick up mechanism
from shocks and movement during transit,
it is secured by a special anti-shock
bracket.
O
Releasing the anti-shock bracket
Before starting operation, be sure to
release this bracket, which is accessed
from the bottom of the player. To do this,
place the player with its rear panel
down on a firm, smooth surface as
shown in the diagram. Insert the lock
key (metal plate) provided into the hole
and turn it to "FREE".
O
Transporting the player
If the player is to be transported, the
anti-shock bracket should be fixed
again. Before doing this, first open the
disc tray to make sure that a disc is not
loaded. Then, secure the anti-shock
bracket by turning the screw to "LOCK".
Anti-shock Bracket
FREE
LOCK
ª
Digital Input Terminals
This unit has 2 digital input (DIGITAL IN)
terminals, 1 COAXIAL and 1 OPTICAL.
When connected to another digital
component, this unit can function as a
D/A converter, utilizing its DSRLL, ZD
#
,
and 1/16 shift 20-bit DAC to deliver high-
quality sound and optimum
performance. (See page 12.)
O
DSRLL
The Digital Servo Ratio Locked Loop
(DSRLL) reduces jitter in all the digital
inputs.
O
ZD
#
The ZD
#
distortion shaper executes
ideal conversion steps using
dithering, while the 1/16 shift method
(digital offset) 20-bit DAC contributes
to high-performance D/A conversion.

