background image

48

Foot:

Zip foot

Stitch setting:

A (B, for sewing
very close to the
edge of the fabric)

Stitch length:

1 - 4

9. Sew the button in place.

10. Set the stitch selector dial to "B" and

sew a few stitches.

11. Remove the fabric and cut off the

thread. 

12. Pull the threads to the lower side

and tie them off by hand.

Tips: 

If you want the button to be sewn on
loosely (on a "stalk") place a darning
needle on top of the button and sew
over that. 

When the button has four holes, sew
the back pair first and then the front.

Inserting a zip

By using the zip foot you can sew right
up to the edge of the zip without the
needle hitting it.

1. Mount the zip foot on the left or the

right side of the needle, according to
the side on which you wish to sew
(see the section "Changing the
foot").

2. Insert the fabric about 2 cm under

the zip.

3. Sew the zip in place.

4. To avoid the zip tab: 

a) Leave the needle sticking in the

fabric 

b) Raise the foot and

c) Move the zip tab behind the foot

Summary of Contents for NAHMASCHINE

Page 1: ...N HMASCHINE SEWING MACHINE TCM D 22290 Hamburg 21970ZI SCH MO 0703 BEDIENUNGSANLEITUNG UND GARANTIE INSTRUCTIONS FOR USE AND GUARANTEE...

Page 2: ...eiarmn hen zum Beispiel f r rmel Blendfreies N hlicht Integriertes Zubeh rfach mit umfangreichem Zubeh r Glatte Oberfl che leicht zu reinigen und der Stoff bleibt nicht h ngen Um alle Vorz ge optimal...

Page 3: ...einstellen 13 N hfu druck einstellen 13 Fadenspannung einstellen 14 N hrichtung ndern 15 R ckw rts n hen 15 Kantenlineal einsetzen 15 Stick Stopfplatte einsetzen 16 N hte und Sticharten 16 P Pf fl le...

Page 4: ...engeber Stichplatte N hfu mit Nadelklemmschraube Fadenabschneider Spannungsscheiben Fadenf hrung zum Spulen N hfu druckschraube Stichmusterfenster Garnrollentr ger Fu pedal Netzstecker Maschinenstecke...

Page 5: ...luss N hfu Knopfloch N hfu Knopfann h Fu S umerfu Garnrollenkappe Schraubendreher Garnrollenhaltestift f r bergro e Garnrollen Pinsel Nahttrenner lfl schchen Spulen 3x Ersatznadeln 3x Kantenlineal Sti...

Page 6: ...Nadel immer mit dem Handrad in die h chste Position wenn Sie nicht mit der N hmaschine arbeiten damit die Nadel vor Besch digung gesch tzt ist Achten Sie beim N hen darauf dass Sie nicht mit den Fing...

Page 7: ...e den Netzstecker an eine Netzsteckdose an Mit dem Fu pedal regulieren Sie die N hgeschwindigkeit N hmaschine einschalten Schalten Sie die N hmaschine am Hauptschalter ein Mit dem Einschalten der N hm...

Page 8: ...Hinweis Verwenden Sie beim N hen immer identisches Material f r Ober und Unterfaden Wickeln Sie Garnreste von der Spule ab und spulen Sie vor N hbeginn das gew hlte N hgarn neu auf 1 Stecken Sie die...

Page 9: ...so dass der Faden im Uhrzeigersinn aufgespult ist 3 F hren Sie das Fadenende in den Schlitz der Spulenkapsel ein 4 Ziehen Sie den Faden unter der Spannfeder hindurch Ziehen Sie etwa 10 cm Faden herau...

Page 10: ...en Garnrollentr ger 4 Bringen Sie den N hfu hebel in die obere Stellung 5 F hren Sie den Faden a durch die se b durch den Schlitz der Fadenf hrung c zwischen die Spannungsscheiben d nach links unter d...

Page 11: ...en fest 3 Drehen Sie das Handrad nach vorne Bewegen Sie die Nadel herunter und weiter bis die Nadel wieder ganz oben steht Dabei wird der Unterfaden als Schlaufe nach oben geholt 4 Ziehen Sie leicht a...

Page 12: ...den N hfu Lassen Sie Ober und Unterfaden etwa 10 cm nach hinten berstehen Halten Sie Ober und Unterfaden w hrend der ersten zwei bis drei Stiche fest damit der Faden richtig transpor tiert wird Bet t...

Page 13: ...ehen Sie das Handrad nach vorne bis die Nadel in der h ch sten Position steht Hinweis Die Stichmuster B und S1 B dienen zum Geradstich N hen am rechten Stoffrand Beste N hergebnisse erreichen Sie mit...

Page 14: ...d nnen Stoffen zwischen 1 und 3 bei mittleren Stoffen zwischen 3 und 5 bei festen Stoffen zwischen 6 und 9 Unterfadenspannung Die werkseitige Einstellung der Unterfa denspannung muss nur in seltenen...

Page 15: ...nschte Richtung 4 Senken Sie den N hfu und n hen Sie in die neue Richtung weiter R ckw rts n hen Beim R ckw rtsn hen wird der Stoff zu Ihnen hin transportiert Benutzen Sie das R ckw rtsn hen zum Vers...

Page 16: ...oben 3 Setzen Sie die Stick Stopfplatte in die daf r vorgesehenen Ausspar ungen Die Platte deckt genau die Laufbahnen des Stofftransporteurs ab N hte und Sticharten Geradstich F r alle herk mmlichen...

Page 17: ...Hosen R cken etc Das Blinds umen ben tigt etwas Erfahrung Am besten probieren Sie es zun chst an einem Stoffmuster 1 Setzen Sie den Blindsaum Fu ein siehe Kapitel N hfu wechseln 2 Falten Sie den Stoff...

Page 18: ...luss sollte den Stoff knapp au en anstechen Kr uselstich Den Kr uselstich k nnen Sie f r S ume Sets Taschent cher u verwenden Der Kr uselstich eignet sich auch zum Rand an Rand N hen und zum Ann hen v...

Page 19: ...il an den Knopf heran Merken Sie sich die Markierung 3 Markieren Sie sich die gew nschte Lage des Knopflochs auf dem Stoff 4 Legen Sie Ihre N harbeit unter den Fu so dass die Stoff Markierung mit der...

Page 20: ...elastischen Stoffen einen Einlauf faden mitf hren der mit einem Zickzack Stich bern ht wird Kn pfe ann hen 1 Setzen Sie die Stick Stopfplatte ein 2 Setzen Sie den Knopfann h Fu ein siehe Kapitel N hf...

Page 21: ...fen mit vier L chern zuerst die hinteren beiden vern hen und anschlie end die vorderen Rei verschluss einn hen Mit dem Rei verschluss Fu k nnen Sie dicht am Rand des Rei verschlusses n hen ohne dass d...

Page 22: ...agen Sie w hrend des N hens den Stoff leicht nach links in die Rundung des S umer Fu es ein Der Stoff darf nicht unter den rechten Teil des Fu es rutschen Sticken Stopfen 1 Stellen Sie den N hfu nach...

Page 23: ...zen Reinigen Hinweis Verwenden Sie keine scheuernden oder l sungsmittelhaltigen Reinigungsmittel Wischen Sie die Kunststoff Oberfl chen der N hmaschine mit einem angefeuch teten Tuch ab Entfernen Sie...

Page 24: ...ie beiden schwar zen Kunststoff Fl gel nach au en 5 Entfernen Sie die Greiferabdeckung 6 Nehmen Sie den Greifer heraus Achtung Der Greifer hat eine sehr scharfe Spitze 7 S ubern Sie den Greifer und di...

Page 25: ...el einwandfrei ist z B die Spitze nicht verbogen 6 Setzen Sie die neue Nadel mit der flachen Seite nach hinten ein 7 Schieben Sie die Nadel bis zum Anschlag nach oben 8 Ziehen Sie die Klemmschraube wi...

Page 26: ...Faden Feine Baumwolle Nylon Polyester Polyester Syntetik Baumwolle f r Naturstoffe Polyester Syntetik Baumwolle f r Naturstoffe Polyester Synthetik Baumwolle f r Naturstoffe Dicker Faden Teppichfaden...

Page 27: ...muss leicht abrollen Greifer reinigen Ursache n Stecker ist nicht richtig angeschlossen Steckdose ist ohne Strom Gl hbirne defekt Stick Stopfplatte ist einge setzt Stichl ngenrad steht auf 0 Nadel fa...

Page 28: ...aschine gr ndlich reinigen Nur mit N hmaschinen l len Nadel ersetzen Ursache n F den zu stark gespannt Nadel Garn und Stoff passen nicht zusammen Die Nadel ist falsch montiert Die Nadel ist besch digt...

Page 29: ...ing Forward and reverse sewing Free arm sewing for instance for sleeves Glare free light for sewing Built in accessories tray with a large set of accessories Smooth surface easy to clean and does not...

Page 30: ...the presser foot pressure 40 Adjusting the thread tension 41 Changing the sewing direction 42 Reverse sewing 42 Using the hem guide 42 Inserting the embroidering darning throat plate 43 Seams and type...

Page 31: ...tray Thread take up lever Throat plate Presser foot with needle clamp screw Thread cutter Tension discs Thread guide for winding bobbins Presser foot pressure screw Stitch pattern display Reel spindl...

Page 32: ...oot Buttonhole foot Button attaching foot Hemming foot Reel cover Screwdriver Spindle for oversized reels of thread Brush Seam divider Oil can Bobbins 3x Spare needles 3x Hem guide Embroidery and darn...

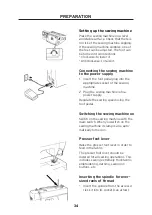
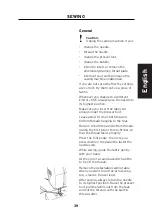
Page 33: ...se also be sure always to unplug the sewing machine after use When you are not using the sewing machine always use the hand wheel to raise the needle to the highest position This protects it from dama...

Page 34: ...ewing machine 2 Plug the sewing machine into a power supply Regulate the sewing speed using the foot pedal Switching the sewing machine on Switch on the sewing machine with the main switch When you sw...

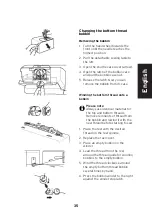
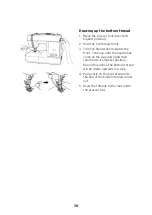
Page 35: ...ottom thread onto a bobbin Please note Always use identical material for the top and bottom threads Remove remnants of thread from the bobbin and rewind it with the new thread before starting to sew 1...

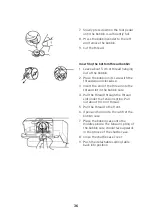
Page 36: ...wound clockwise 3 Insert the end of the thread into the thread slot in the bobbin case 4 Pull the thread through the thread slot under the tension spring Pull out about 10 cm of thread 5 Pull the thr...

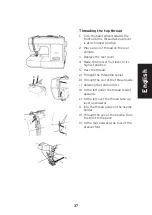
Page 37: ...aise the presser foot lever to its highest position 5 Pass the thread a through the threading eyelet b through the slot of the thread guide c between the tension discs d to the left under the thread f...

Page 38: ...e hand wheel towards the front Continue until the needle has come all the way down and then returned to its highest position During this action the bottom thread will be drawn upwards in a loop 4 Pull...

Page 39: ...c far enough under the presser foot Leave about 10 cm of both top and bottom threads hanging to the rear Hold on to both top and bottom threads during the first two or three stitches so that the threa...

Page 40: ...rds you until the needle is at its highest posi tion Please note The stitch settings B and S1 B are used for straight stitching on the right hand fabric edge The best results are obtained with 120 thr...

Page 41: ...3 and 5 for medium weight fabrics and between 6 and 9 for heavy fabrics Bottom thread tension The bottom thread tension set in the factory only needs to be altered in exceptional circumstances Always...

Page 42: ...xis in the desired direction 4 Lower the presser foot and continue sewing in the desired direction Reverse sewing When reverse sewing the fabric is fed towards you Reverse sewing can be used to reinfo...

Page 43: ...r foot lever 3 Insert the embroidery darning throat plate into the grooves provided The plate precisely matches the path followed by the feed dog Seams and types of stitch Straight stitch For all trad...

Page 44: ...ains trou sers dresses etc Hemming requires a certain amount of experience It is best to practise first on a spare piece of fabric 1 Attach the buttonholing foot see the section Changing the foot 2 Fo...

Page 45: ...stitching Use the fancy elastic stitch as a flat joining stitch to sew on elastic or for normal hems This stitch is appropriate for both woven and knitted fabrics Honeycomb stitching Honeycomb stitchi...

Page 46: ...3 Mark the position where you wish to have the button hole on the fabric 4 Place the sewing under the foot so that the marking on the fabric corre sponds with the position on the foot 5 Lower the foot...

Page 47: ...1 Put the embroidering darning throat plate in place 2 Attach the buttonholing foot see the Changing the foot section 3 Place the button between the button attaching foot and the fabric so that the ne...

Page 48: ...ng needle on top of the button and sew over that When the button has four holes sew the back pair first and then the front Inserting a zip By using the zip foot you can sew right up to the edge of the...

Page 49: ...mming During hemming guide the fabric a little to the left side of the opening of the hemming foot The fabric must be kept from slipping under the right hand toe of the foot Embroidering darning 1 Rai...

Page 50: ...ver clean your sewing machine with abrasives or solvents Simply wipe the surfaces of the machine clean with a damp cloth Dust the machine regularly and remove remnants of thread Cleaning the feed dog...

Page 51: ...tachable sewing table 3 Take out the bobbin case 4 Swing the two black plastic leaves outwards 5 Remove the bobbin case 6 Take the shuttle out Caution The shuttle has a very sharp point 7 Clean the sh...

Page 52: ...eck that the new needle is in perfect condition for instance the tip is not bent 6 Insert the new needle with the flat side to the rear 7 Push the needle upwards as far as it will go 8 Tighten the cla...

Page 53: ...nd vinyl Thread Fine cotton nylon polyester Polyester synthe tics cotton for natural fibres Polyester synthe tics cotton for natural fibres Polyester synthe tics cotton for natural fibres Heavy thread...

Page 54: ...case in correctly thread must unroll easily Clean shuttle Cause s Power plug is not plugged in correctly No power supply Bulb is defective Embroidery darning throat plate is attached Stitch length is...

Page 55: ...chine thoroughly Oil it exclusively with sewing machine oil Replace needle Cause s Threads pulled too tight Needle thread and fabric do not match each other The needle is inserted wrongly The needle i...

Page 56: ...he mains lead of this appliance may not correspond with the coloured markings identifying the terminals in your plug proceed as follows the wire which is coloured blue must be connected to the termina...

Page 57: ...le und Verbrauchsmaterial Diese k nnen Sie unter der angegeben Rufnummer bestellen Nichtgarantiereparaturen k nnen Sie gegen individuelle Berechnung zum Selbst kostenpreis ebenfalls vom TCM Service Ce...

Page 58: ......

Page 59: ...SERVICE SCHECK Bitte den Scheck in Blockschrift ausf llen und mit dem Artikel einsenden Schicken Sie den Artikel bitte unrepariert gegen entstandene Transportkosten zur ck Reparieren Sie den Artikel g...

Page 60: ...Artikel Nummer 210 420 Fehlerangabe Kaufdatum SERVICE SCHECK Bitte beide Seiten dieses Schecks in Blockschrift ausf llen und mit dem Artikel einsenden...

Page 61: ...ANTEE We give three years guarantee from date of purchase This article was produced using the latest manufacturing methods and underwent thorough quality control inspection We guarantee that the appli...

Page 62: ...62...

Page 63: ......

Page 64: ......

Reviews: