


Tires & Wheels
Page 88
R-380 DC System
MR-380-03
REPLACE THE TIRE (PNEUMATIC)
Note: To replace the tire, the tire/wheel assembly
must be removed from the vehicle. Refer
to Replace the Tire/Wheel section for
information on removing the tire/wheel
assembly.
Tire replacement should only be performed by personnel
trained in tire replacement.
The tire replacement procedure will be unique to the
type of replacement equipment being used. Refer to the
instructions provided with your equipment.
Always use a new valve stem when replacing a tire.
1: Remove the tire from the wheel.
2: Cut the old valve stem off of the wheel.
3: Remove the valve stem cap from the new valve
stem.
4: Lubricate the valve stem with liquid soap.
5: Install a new valve stem using a valve stem tool.
Note: The valve stem tool is available at most auto
repair shops.
6: Install the tire onto the wheel following the
instructions provided with your tire replacement
equipment.
7:
Inflate the tire to the proper pressure and check
for leaks.
8: Install the valve stem cap.
REPAIR THE TIRE (PNEUMATIC)
Note: To properly repair a puncture, the tire
must be removed from the wheel. Refer to
Replace the Tire section for information on
removing the tire from the wheel.
It is recommended to repair a tire with a combination
vulcanized plug and internal patch.
Tire repairs should only be performed by personnel
trained in tire repair.
The tire repair procedure will be unique to the type of
repair equipment or repair components used. Refer to
the instructions provided with your equipment or repair
components.
This section is one section of a complete service
manual. Before starting any procedure, read all
warnings and instructions that are located in the
Service Guidelines chapter.
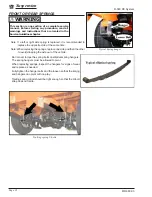
WARNING
Improper assembly or disassembly of a split rim
wheel can result if tire explosion causing severe
injury. Refer tire/wheel repair to a qualified tire
supplier.
WARNING
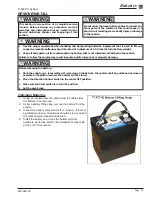
CHANGING TIRE/WHEEL
ASSEMBLY
Note: A spare tire, jack, or lug wrench is not
attached to the vehicle.
1: Loosen the wheel nuts (do not remove) before
raising the tire off of the ground.
2: Raise the tire to be changed off of the ground and
support with a jack stand.
3: Remove the wheel nuts and tire/wheel assembly.
4: Install the replacement tire/wheel assembly.
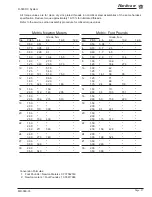
5: Install the wheel nuts and cross tighten to torque
specified in table.
6:
Check the tire for proper inflation.
7: Lower the vehicle to the ground and remove the
blocks from the wheels.
8: Check wheel nuts for tightness after 20 operating
hours.
This section is one section of a complete service
manual. Before starting any procedure, read all
warnings and instructions that are located in the
Service Guidelines chapter.
WARNING
Summary of Contents for R0-380-36
Page 6: ......
Page 12: ...Page 12 MR 380 03 Introduction R 380 DC System Notes...
Page 21: ...Table of Contents Special Tool List Special Tool List Troubleshooting Guide 23...
Page 24: ...Tool List Page 24 R 380 DC System MR 380 03 Notes...
Page 27: ...Lubrication Page 27 MR 380 03 R 380 DC System LUBRICATION DIAGRAM...
Page 28: ...Lubrication Page 28 R 380 DC System MR 380 03 Notes...
Page 44: ...Drive Axle Page 44 R 380 DC System MR 380 03 Notes...
Page 53: ...Steering Page 53 MR 380 03 R 380 DC System Exploded View of Steering Gear...
Page 72: ...Drive Motor Page 72 R 380 DC System MR 380 03 Notes...
Page 90: ...Tires Wheels Page 90 R 380 DC System MR 380 03 Notes...
Page 102: ...Replacement Parts Page 102 MR 380 03 R 380 DC System AXLE ASSEMBLY FRONT...
Page 104: ...Replacement Parts Page 104 MR 380 03 R 380 DC System AXLE REAR...
Page 106: ...Replacement Parts Page 106 MR 380 03 R 380 DC System BATTERY...
Page 108: ...Replacement Parts Page 108 MR 380 03 R 380 DC System BRAKES BRAKE LINES...
Page 114: ...Replacement Parts Page 114 MR 380 03 R 380 DC System BRAKES PARK BRAKE LINKAGE...
Page 118: ...Replacement Parts Page 118 MR 380 03 R 380 DC System CAB DOORS...
Page 136: ...Replacement Parts Page 136 MR 380 03 R 380 DC System STEERING LINKAGE...
Page 142: ...Replacement Parts Page 142 MR 380 03 R 380 DC System Notes...
Page 143: ......


